
Subscribe to Our Youtube Channel
Related Manuals for Gorenje GCW311K-HK


Summary of Contents for Gorenje GCW311K-HK
- Page 1 INSTALLATION AND OPERATION INSTRUCTION BUILT-IN GAS HOB GCW311K-HK - 731166 GC321K-HK - 731167 For Hong Kong Town Gas 04064NG - 07.03.2018...
- Page 2 Preface Thank you for buying one of our products. We are sure that this new, modern, functional and practical appliance, made using the finest quality materials, will fully satisfy your requirements. This new appliance is very easy to use, but in order to obtain the best results, we strongly recommend that you read this booklet carefully before use.
-
Page 3: Table Of Contents
Contents Saftey Precaution ............X Safety Precaution ............4 For the user Description of the Hob ..........X Description of the Hob ..........5 Instruciton for use ............X Instructions for use ............. 6 Cleaning and Maintenance ......... X Cleaning…………………………………………....9 For Installation Service &... -
Page 4: Safety Precaution
Safety precautions • To avoid any possible hazard, the appliance must be installed by Registered Gas Installer employed by Registered Gas Contractors only. • During the operation of gas burners, the room may be filled with extra heat and humidity, so it is necessary to assure adequate ventilation by keeping the natural air vents and by activating the mechanical aeration device (suction hood or ventilating fan). -
Page 5: Description Of The Hob
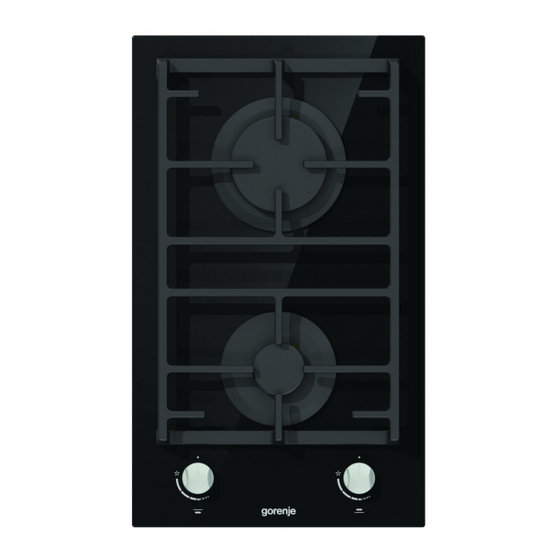
Description of the hob Model: Model: GCW311K-HK - 731166 GC321K-HK - 731167 1 Ultra Rapid Double Crown - 5000 W 2 Rapid gas burner - 3000 W 3 Auxiliary gas burner - 1100 W 4 Pan support for 1 Burner 5 Pan support for 2 Burners 6 Burner n°1 control knob... -
Page 6: Instructions For Use
• Adjust the flame depending on your need by turning the control knob between . Each burner has following input power in range: (Burner 1): 1800W 5000W GCW311K-HK - 731166 (Burner 2): 800W 3000W GC321K-HK - 731167 (Burner 3): 450W 1100W •... - Page 7 Instructions for use FOR CORRECT USE OF THE HOBS Bear in mind the following indications in order to achieve maximum efficiency with the least possible gas consumption: • Use only pans of dimensions which is suitable for the burner, as shown in the table below and FIG.2.
- Page 8 Instructions for use WARNINGS AND ADVICE: • Use of a gas cooking appliance produces heat and moisture in the room in which it is installed. The room must therefore be well ventilated by keeping the natural air vents (see FIG. 3) and by activating the mechanical aeration device (suction hood or ventilating fan FIG.
-
Page 9: Cleaning
Cleaning • Periodically wash the hot plate, the enamelled steel pan support, the burner crown caps “A” and “C”, outer burner cap “B”, and the burner crown "T” (see FIG. 6 and 7) with lukewarm soapy water. Ignition plug "AC" and safety device "TC"... -
Page 10: Service & Maintenance
Service and Maintenance ATTENTION! An y service and maintenance must be carried out by Registered Gas Installer. Disconnect the appliance from the gas and electricity supplies before carrying any service and maintenance. REPLACING COMPONENTS • To replace the components, it is necessary to remove the pan support, gas burners, knobs, a n d the flanges by unscrewing the screws (FIG. - Page 11 Service and Maintenance POWER CABLE TYPES AND SECTIONS CAUTION!!! Cable replacement must be carried out by Registered Gas Installer. When replacing the power cable, the earth conductor “B” must be kept longer than the phase conductor (FIG. 21) and must also observe the warnings indicated in Electrical Connection in P.17.
-
Page 12: Technical Data
Technical Data Model GCW311K-HK - 731166 GC321K-HK - 731167 Dimension (H/W/D) mm 58 / 300 / 505 58 / 300 / 505 Voltage / Frequency AC220 – 230V, 50Hz AC220-230V, 50Hz Output (kW) Min: 1.8 Rear (2) Min: 0.8 Max: 5.0 Rear (2) Max: 3.0... -
Page 13: Instructions For Installation
Instructions for installation INSERTING THE HOB Installation Make an installation opening in the worktop to accommodate the hob, using the critical dimension indicated in FIG. 9 to ensure Requirements best fit of the appliance. (see FIG. 9 and FIG. 10). The appliance can be installed with just one lateral wall (to the right or left of the hob), higher than the hob and positioned at a minimum distance as described in the table below. - Page 14 Instructions for installation FITTING THE HOB Installation Requirements The hob is equipped with a special gasket to avoid any infiltration of liquid into the unit. Apply this gasket correctly following instructions below: - Cut it into 4 strips of the lengths suitable to fit it along the 4 sides of the glass.
- Page 15 Instructions for installation IMPORTANT INSTALLATION SPECIFICATIONS Panels and furniture lining of the kitchen cabinet next to the appliance must be able to withstand a temperature of 90° C. The adhesive gasket used at the cabinet must be able to withstand a temperature of no less than 150 °...
- Page 16 Instructions for installation GAS CONNECTION Connection to the gas supply Before connecting to the appliance, check that the values on the data label affixed to the underside of the cooktop correspond to those of the gas and electricity mains in home. A label on the appliance indicates the regulating conditions: type of gas and working pressure.
- Page 17 Instructions for installation ELECTRICAL CONNECTION Connection to the electricity The electrical connections of the appliance must be carried out in compliance with the provisions and standards in force. Before connecting the appliance, check that: The voltage matches with the value shown on the specification plate and the section of the wires of the electrical system.
-
Page 18: Troubleshooting Guide
Troubleshooting guide Repairs must be done by Registered Gas Installer only. Any Important unskilled attempt to repair the appliance is extremely dangerous. Before attempting any repairs, disconnect the appliance from the mains by removing the fuse or unplugging the mains lead from the mains socket. Any unskilled attempts and/or repairs may cause electric shock and short circuit.
Need help?
Do you have a question about the GCW311K-HK and is the answer not in the manual?
Questions and answers