Table of Contents
Advertisement
Quick Links
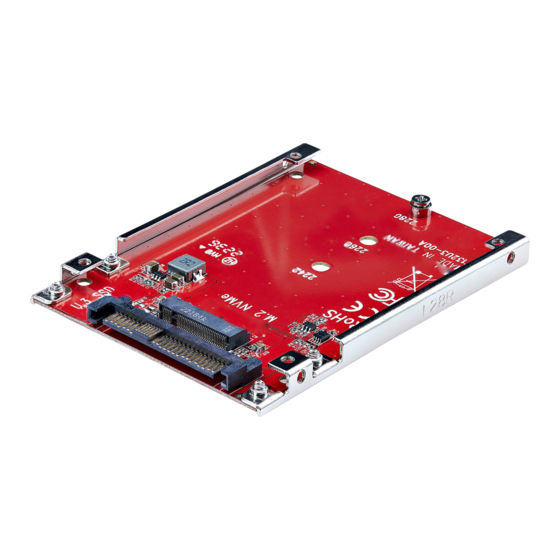
M.2 NVMe to U.3 (SFF-TA-1001) Adapter
Product ID
1M25-U3-M2-ADAPTER
1
2
1
Component
M.2 to U.3 Adapter
1
Mounting Holes
Standoff, Standoff
2
Installation Screw, and
Drive Mounting Screw
3
M.2 Connector
4
U.3 Connector
To view manuals, FAQs, videos, drivers, downloads, technical drawings, and more, visit www.startech.com/support.
3
1
1
Function
Secure the M.2 to U.3 Adapter to the Computer
•
Case's Drive Mounting Bay
Secure an M.2 Storage Device to the M.2 to U.3
•
Adapter
Compatible PCIe M.2 SSDs (NVMe): 2242, 2260,
•
and 2280 drives
Connect a M Keyed M.2 Storage Device to the
•
M.2 to U.3 Adapter
Connect the M.2 to U.3 Adapter to a U.3 Host
•
Controller
Requirements
U.3 (SFF-TA-1001) Enabled Computer x 1
•
M.2 NVMe Drive x 1
•
Note: The M.2 to U.3 Adapter does not support SATA M.2 Drives
For the latest product information, technical specifications, and declarations of
conformance, please visit:
Package Contents
M.2 to U.3 Adapter x 1
•
Quick-Start Guide x 1
•
4
Installation
Warning: Circuit Boards can be damaged by static electricity. Ensure that the
Installer is properly grounded before opening the Computer Case or touching
the M.2 to U.3 Adapter. The Installer should wear an Anti-Static Strap when
installing any computer component. If an Anti-Static Strap is not available,
discharge any built-up static electricity by touching a large Grounded Metal
Surface for several seconds. Only handle the M.2 to U.3 Adapter by its edges and
do not touch the gold connectors.
Install the M.2 NVMe Storage Device
1.
Place the M.2 Drive next to the Adapter and note the Drive Installation Holes
that match the length of the M.2 Drive. If the Standoffs and Installation Screws
are already installed in the correct position, proceed to step 6.
2.
On the front of the M.2 to U.3 Adapter, use Pliers to hold the Standoff in place
while using a Phillips Head Screwdriver to remove the Screw, located on the back
of the Adapter.
3.
Use the Phillips Head Screwdriver to remove the Screw on the front of the M.2 to
U.3 Adapter.
Remove the Standoff.
4.
5.
Install the Standoff in the Drive Installation Hole that matches the length of the
Drive.
6.
Gently slide the M.2 Drive Connector into the corresponding M.2 Connector,
located on the M.2 to U.3 Adapter, and press the Drive down toward the adapter
until the Drive is properly seated.
Note: The M.2 Connector on the Adapter is M Keyed and only fits M Keyed M.2
Storage Devices.
www.StarTech.com/1M25-U3-M2-ADAPTER
Quick-Start Guide
Manual Revision: May 16, 2023 4:13 PM
Advertisement
Table of Contents

Subscribe to Our Youtube Channel
Related Manuals for StarTech.com SFF-TA-1001


Summary of Contents for StarTech.com SFF-TA-1001
- Page 1 U.3 Connector Controller Note: The M.2 Connector on the Adapter is M Keyed and only fits M Keyed M.2 Storage Devices. To view manuals, FAQs, videos, drivers, downloads, technical drawings, and more, visit www.startech.com/support. Manual Revision: May 16, 2023 4:13 PM...
- Page 2 This device complies with part 15 of the FCC Rules. Operation is subject to the following two conditions: and do not represent an endorsement of a product or service by StarTech.com, or an endorsement of the product(s) to which (1) This device may not cause harmful interference, and (2) this device must accept any interference received, including this manual applies by the third-party company in question.
Need help?
Do you have a question about the SFF-TA-1001 and is the answer not in the manual?
Questions and answers