Advertisement
- 1 FEATURES
- 2 U5 CONTENTS
- 3 U5T2 CONTENTS
- 4 U5 TRANSMITTER: BASIC OPERATION
- 5 U5 TRANSMITTER: DISPLAY
- 6 U5 RECEIVER: BASIC OPERATION
- 7 U5 RECEIVER: DISPLAY
- 8 LV1 LAVALIER MICROPHONE
- 9 U5B BATTERY
- 10 2.4 GHz SPECTRUM OVERVIEW AND INTERFERENCE
- 11 QUICK START
- 12 APPLICATION SCENARIOS
- 13 TRANSMITTER INPUT MODE
- 14 RECEIVER OUTPUT MODE
- 15 BATTERIES AND CHARGING
- 16 INSTALL THE BATTERY
- 17 PRODUCT SPECIFICATIONS
- 18 TROUBLESHOOTING
- 19 U5 SERIES
- 20 IMPORTANT SAFETY INSTRUCTIONS
- 21 Documents / Resources
FEATURES
The U5 Wireless Audio for Video System can be used to send audio wirelessly from the included lavalier microphone (via the system's beltpack transmitter)to the receiver, which can be connected to a DSLR camera or audio device. The larger U5T2 set comes with two beltpack transmitters and two lavalier microphones, allowing you to send wireless signals from two lavalier microphones or other audio sources to a DSLR camera or audio device. If you have an additional U5 receiver (U5R), you can send your audio signal to two DSLR cameras or audio devices. The U5 receiver's shoe mount connects to any DSLR camera. The proprietary, rechargeable Xvive U5B lithium-ion battery provides up to 5 hours of continuous power. The U5C battery charger (sold separately with three U5B batteries) allows you to charge backup batteries so you can operate the system continuously. The U5 system reliably transmits high-resolution audio on the 2.4 GHz wireless band, and can be used for video shoots, livestreams, interviews, sporting events, weddings and more.
- 2.4 GHz wireless audio, true diversity for both channels simultaneously
- Use with a lavalier microphone or line input
- High-resolution 24-bit/48kHz audio
- TRS stereo 3.5mm output
- Dual-channel receiver for DSLR video recording and live broadcast
- Xvive U5B rechargeable lithium battery provides up to 5 hours of continuous use
- Less than 6ms latency
- Simultaneous broadcast on up to 6 channels
- Mic mode dynamic range is 99dB; line mode dynamic range is 107dB
- Mic mode signal-to-noise ratio is 95dB; line mode signal-to-noise ratio is107dB
- Broad 20Hz-20kHz frequency response; mic mode with100Hz high-pass lter
- Solid RF connection over a 100-foot range (actual range depends on RF signal absorption, re ection and interference)
- Stereo and mono output modes
U5 CONTENTS

U5T2 CONTENTS

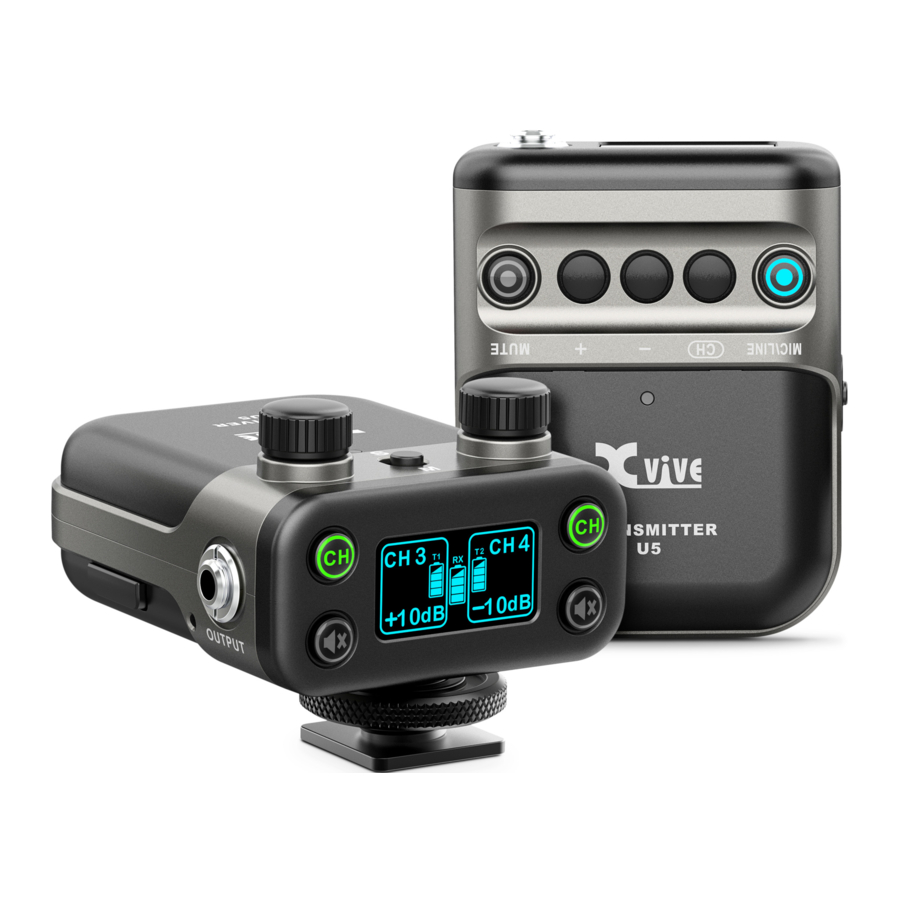
U5 TRANSMITTER: BASIC OPERATION

- Mute button: turns off the volume of the microphone input
- "+" and "-" gain buttons: changes the input gain level from Mic: -6 to +12dB; Line: 0 to +12dB
- "+" and "-" gain buttons: changes the input gain level from Mic: -6 to +12dB; Line: 0 to +12dB
- CH switch: selects the channel from 1 to 6
- Mic/Line input mode: select "Mic" for lavalier microphone, or "Line" for other devices with more dynamic range
- The power switch turns the unit on or off, or keeps it in hold mode. Hold mode disables all controls to ensure uninterrupted use
- USB charging port: Micro B
- OLED display: displays battery power level, channel selected, gain, clip, mute
- Battery compartment for U5B battery
- Belt clip
- Power status LED
- Input: mono 3.5mm TRS input
![]()

U5 TRANSMITTER: DISPLAY

- RF channel display: press channel switch button to select channel
- Input gain: Mic: -6 to +12dB; Line: 0 to +12dB
- Battery level: displays the transmitter's battery level
- Input clip: peak indicator. When the clip LED illuminates, the sound level is beyond the acceptable dynamic range and may result in distortion.
![]()
- Audio mute: press the mute button to turn off input audio
![]()


* The brightness of the screen will decrease when the unit is not in operation.
U5 RECEIVER: BASIC OPERATION

- T1 and T2 channel output gain: -54dB to +24dB
- T1 and T2 channel output gain: -54dB to +24dB
- S / M switch
- Power status LED
- Power switch: switches unit on/off, and can also be set to hold. All functions of the unit are disabled while the power switch is set to the hold position.
- USB charging port: USB Micro B input
- Audio output: Stereo 3.5mm TRS
- Channel switch and T1/T2 RF status LED
- Channel switch and T1/T2 RF status LED:
LED ON = transmitter is on and link is established
LED Flashing = signal connection interference
LED OFF = transmitter unlinked - T1 and T2 Channel mute switch with status LED
- T1 and T2 Channel mute switch with status LED
- OLED display: displays battery power, channel, gain, clip, mute
- Shoe mount adapter for DSLR camera, with 3/8" female screw adapter
- Battery compartment
U5 RECEIVER: DISPLAY
The screen is divided into three parts:
Transmitter 1 information; receiver battery level; and Transmitter 2 information.

- T1 RF channel display: To pair with transmitter, press the channel switch button and select the same channel on both units.
- T1 channel output gain: change this level using the output gain controls on the transmitter
- T1 channel transmitter battery level: The battery level of the paired transmitter is displayed after a successful connection. Only displays the U5 transmitter battery level—cannot display U3 and U4 transmitter battery levels.
- T1 channel clip and OFF display:
OFF: Press the channel switch button for 3 seconds to close the T1 channel.
Output clip: peak indicator. When the clip LED illuminates, the sound level is beyond the acceptable dynamic range, and may result in distortion.
![]()
- T2 channel display: shows channel, gain and battery level for the second transmitter
- Receiver battery level

LV1 LAVALIER MICROPHONE

- Microphone capsule
- Connection cable (1.6 m) with 3.5mm TRS jack
- Microphone clip
- Foam windshield
U5B BATTERY

- 3-pin power terminal
- Battery pull tab
2.4 GHz SPECTRUM OVERVIEW AND INTERFERENCE
U5 operates on the 2.4GHz ISM band, which is utilized by Wi-Fi, Bluetooth, and other wireless devices. 2.4GHz is an open band and, as such, does not require a license to be used worldwide.
Tips and Methods to Improve Wireless System Performance:
- Keep more than 3 metres of distance between the receiver unit and other WiFi transmitters such as routers.
- Change channels to avoid interference with other WiFi products.
- In cases of environmental interference from other WiFi systems, shorten the distance between the receiver and transmitter units.
2.4GHz Frequency Tables
| CHANNEL 1 | 2402MHz, 2480MHz, 2482MHz |
| CHANNEL 2 | 2408MHz, 2472MHz, 2474MHz |
| CHANNEL 3 | 2416MHz, 2464MHz, 2466MHz |
| CHANNEL 4 | 2434MHz, 2440MHz, 2442MHz |
| CHANNEL 5 | 2427MHz, 2448MHz, 2450MHz |
| CHANNEL 6 | 2422MHz, 2456MHz, 2458MHz |
* U2 1-4 channels are the same as U3/U3C/U4/U51-4 channels; U2/U3/U3C/U4 and U5 can be used with a maximum six sets at a time
QUICK START
- SET UP LAVALIER MICROPHONE
- Install mic clip on the Xvive LV1 lavalier microphone;
- Use the mic clip to attach the clip-on microphone to clothing, as desired;
- Run the mic cable to the transmitter in a way that avoids friction noise, and so that the cable and the transmitter antenna do not cross.
- The Xvive LV1 microphone has an omni-directional pickup pattern. Keep at least 10 inches away from your mouth or audio source.


INSTALL CLIP

- CONNECT TRANSMITTER
Connect the 3.5mm TRS lavalier microphone cable to the transmitter


- CONNECTING THE RECEIVER TO A DSLR CAMERA
Slide the shoe mount adapter onto the camera and tighten the clamping screw to hold the receiver in place. Connect receiver output to camera input using the 3.5 mm TRS cable.


- POWER ON
Turn the power switch to the 'on' position: the display screen will light up.


- PAIRING TRANSMITTER AND RECEIVER
Set transmitter and receiver to the same channel for pairing; the green LED on the receiver will illuminate when the connection is successful. You must use di erent channels for T1 and T2 to avoid interference.


- SETTING UP THE CAMERA AND RECEIVER


- Open the DSLR camera menu and navigate to the sound recording options.
- Set the audio input level control to "manual" mode.
- Adjust the record level. Check the output level on the DSLR camera display. Adjust the level so that the signal is strong, but not so high that it sets o the clip light.
* Input level too low?
Turn up the U5 receiver output level or the camera input level
* Left and right channel volumes imbalanced?
Mono mode: Adjust the two transmitter input gain controls to balance.
Stereo mode: Adjust the two transmitter input gain controls or adjust the receiver output level.
APPLICATION SCENARIOS
- Dual-channel receiver receives audio from two U5 transmitters (connected to lavalier microphones) for interviews, two-person broadcasts, etc.

- Dual-channel receiver receives audio from one U5 transmitter (lavalier microphone) and one U4 transmitter (mixing console or sound interface).

- Send wireless audio to recording equipment

- Use two receivers (set to the same channel) connected to two DSLR cameras to send them the same wireless audio.


TRANSMITTER INPUT MODE
Sets the input level according to the audio input device. Choose MIC for lavalier microphone, and LINE for audio mixer or other line-level audio device. Mic mode input gain is -6 to +12dB; Line mode input gain is 0 to +12dB. The preset will be saved at the mode.

| LINE MODE | MIC MODE |
| Use with audio devices with a 3.5 mm (1/8") output. Increasing the transmitter gain results in more dynamics. | Supplies 5V of phantom power for a lavalier microphone. Optimizing the transmitter input gain can increase the sensitivity of the microphone, increase the pick-up range and improve the sound-to-noise ratio. |
RECEIVER OUTPUT MODE
S MODE
S (stereo) mode combines two audio inputs by panning them sharp left and right when they are sent to the camera's mic input. The T1 signal will be sent to the camera from the receiver's left output channel. Audio source T2 will send its audio on the right channel. Adjusting the T1 and T2 output volumes will change their respective output volumes(L/R) independently. This method allows the signals to be balanced/mixed as desired during the editing/mixing stage.

M MODE
M (mono) mode mixes the T1 and T2 audio signals and sends the same audio signal to L and R output channel. You can set the left and right output volumes separately, but you can't change the level blend once the video is recorded. However, although the L and R signals are identical, the audio can be panned so that one side is louder and the other is a quieter (-6dB, for example) "safe" option.

BATTERIES AND CHARGING
The U5 transmitter and receiver each use one Xvive U5B rechargeable lithium battery. The batteries can be charged while installed in U5 transmitters or receivers; or you can use the U5C battery charger, sold separately along with three backup U5B batteries.
The U5 package includes a Dual USB charging cable, which connects to any 5V USB charger adapter or other USB charging device; it charges the transmitter and receiver at the same time.
Note: Turn off the power switch while charging. Please do not use U5 while charging, as this may reduce battery life.

* Always store at room temperature
* When storing the unit, please check the battery charge level regularly and charge if necessary.
POWER STATUS LED, INDICATES POWER STATUS
LED off = 100% ~ 30%
Solid red = 29% ~ 11%
Flickering red = less than 10%
| CHARGING TIMES | BATTERY LIFE |
| 0:15 | 30 min |
| 0:30 | 1 hours |
| 1:00 | 2 hours |
| 2:30 | 5 hours |
INSTALL THE BATTERY
TRANSMITTER

- Press and hold the POWER switch to turn off the power;
- Press and slide the battery button to open the battery compartment and install the battery;
- Insert U5B battery into the battery compartment with the terminals facing the right way; close the compartment. Make sure the battery compartment is locked securely.
RECEIVER

- Press and hold the POWER switch to turn off the power;
- Loosen the bottom clamping screw of the shoe mount adapter
- Press and slide the battery button to open the battery compartment; install the battery.
- Insert U5B battery into the battery compartment with the terminals facing the right way and close the compartment. Make sure that the battery compartment is locked securely.
* Please fully charge the battery prior to first use of the U5.
* During charging, the power status indicator LED will illuminate; once the unit is fully charged, the power status indicator light will automatically turn off.
PRODUCT SPECIFICATIONS
| Frequencies | 2400-2483.5 MHz |
| Wireless Range | Up to 100ft; depends on RF signal absorption, re ection and interference |
| Dynamic Range | MIC: 99dB; LINE: 107dB |
| Signal-To-Noise Ratio | MIC: 95dB; LINE: 107dB |
| Battery Life | 5 Hours (Xvive U5B battery) |
| RF Sensitivity | -86dBm |
| Total Harmonic Distortion | 0.2% |
| RF Output Power | 10 mW E.I.R.P. max |
| Operating Temperature Range | -18° to 57°(battery characteristics may limit this range) |
| Channel Count | Up to 6 |
| Latency | 6ms |
| High-resolution audio | 24-bit/48kHz |
TRANSMITTER
| Dimensions | 51 x 34 x 65mm |
| Weight | 55.2g without battery |
| Transmitter Type | Beltpack |
| Housing | Molded plastic and cast metal |
| Charging Voltage & Current | 5V 2A |
| Impedance | Input 4.7kΩ (1KHz) |
| Audio Input Connector | 3.5 mm mono TRS jack |
| Frequency | Broad 20Hz-20KHz frequency response; Mic mode with 100Hz high-pass filter |
| Rms | Input max RMS (Gain=0dB) = Mic: 460mV RMS; Line: 2V RMS |
| Phantom power | Mic mode: 5V; Line mode: none |
| Battery | Xvive U5B battery: 3.8V Rechargeable Li-ion, 830mAh |
| Battery life | Up to 5 Hours |
| Antenna Impedance | 50Ω |
| Antenna Type | 1/4 wave sleeve dipole, non-removable |
| Number Of Antennas | 1 |
| Display | OLED |
| Input Gain control range | Mic: -6 to +12dB; Line: 0 to +12dB |
| RF output level | 10 mW |
| Audio output max level | Mic input: -20dBV; Line input: +6dBV |
RECEIVER
| Receiver Type | Beltpack |
| Dimensions | 54 x 44 x 65mm |
| Weight | 53g without battery |
| Housing | Molded plastic and cast metal |
| Charging Voltage & Current | 5V 2A |
| Battery | Xvive U5B battery: 3.8V rechargeable Li-ion, 830mAh |
| Impedance | Output 470Ω (1KHz) |
| Output connector | 3.5 mm stereo TRS jack |
| Max output level | 2V RMS |
| Battery life | Up to 5 hours |
| Antenna Impedance | 50Ω |
| Antenna Type | 1/4 wave sleeve dipole, non-removable |
| Number of antennas | 4 (True diversity for both channels simultaneously) |
| Display | OLED |
| Audio output max level | 0 dBV |
| Frequency response | 20 Hz to 20 kHz |
| Output gain control range | -54dB to +24dB |
LV1 LAVALIER MICROPHONE
| Microphone | Electret condenser microphone |
| Dimensions | φ 8 × 19 mm (cable: 1.6m) |
| Weight | 13 g |
| Directivity | Omni-directional |
| Sensitivity | -32dB ±3dB |
| Frequency response | 30 Hz to 20,000 Hz |
| Impedance | 2.5kΩ ±30% |
| Signal-to-noise ratio | 75dB |
| Current consumption | 400μA Max |
| Operating voltage | 3.3V (2.5V to 10V) |
| Maximum input Sound Pressure Level | 120dB SPL |
U5B BATTERY
| Voltage | 3.8V DC | Dimensions | 30 x 13 x 31mm |
| Rated capacity | 830mAh | Weight | 23g |
| Watt hour | 3.15Wh | | |
| Max charge voltage | 4.35V | ||
TROUBLESHOOTING
| ISSUE | SOLUTION |
No Sound |
|
Distorted Audio |
|
Voice too low |
|
Signal instability: RF LED Flickering |
|
Multiple connections |
|
U5 SERIES


IMPORTANT SAFETY INSTRUCTIONS

RISK OF ELECTRIC SHOCK
DO NOT OPEN

TO REDUCE THE RISK OF FIRE OR ELECTRIC SHOCK, DO NOT REMOVE SCREWS.
NO USER-SERVICEABLE PARTS INSIDE.
REFER SERVICING TO QUALIFIED SERVICE PERSONNEL.
TO REDUCE THE RISK OF FIRE OR ELECTRIC SHOCK, DO NOT EXPOSE THE APPLIANCE TO RAIN OR MOISTURE.
PLEASE READ THESE INSTRUCTIONS AND KEEP THEM IN A SAFE PLACE

BEFORE USING YOUR XVIVE WIRELESS AUDIO FOR VIDEO SYSTEM, CAREFULLY READ THE OPERATING INSTRUCTIONS:
- Observe all instructions in the U5 manual carefully.
- Do not to perform service operations beyond those described in the U5 manual. Service is required when the apparatus has been damaged in any way, such as:
- Liquid has been spilled or objects have fallen into the apparatus;
- The unit has been exposed to rain or moisture;
- The unit does not operate normally, or performance changes in a significant way;
- The unit is dropped or the enclosure is damaged
- Do not place near heat sources, such as radiators, heat registers, or appliances which produce heat.
- Guard against objects or liquids entering the device. Do not use or place unit near water.
- Clean only with a dry cloth.
- Only use attachments/accessories specified by Xvive.
- Prolonged listening at high volume levels may cause irreparable hearing loss and/or damage. Always be sure to practice "safe listening."
SAFETY INSTRUCTIONS FOR LITHIUM ION RECHARGEABLE BATTERIES
If abused or misused, the rechargeable batteries may leak.
In extreme cases, they may even present a risk of:
- explosion,
- fire,
- heat,
- smoke or gas. Xvive does not accept any liability for damage arising from abuse or misuse.
- Keep away from children.
- Only charge rechargeable batteries with chargers recommended by Xvive.
- Observe correct polarity.
- Pack/store charged rechargeable batteries so that the terminals cannot contact each other – danger of shorting out/fire hazard.
- Do not expose to moisture.
- Switch rechargeable battery-powered products off after use.
- Only charge rechargeable batteries at ambient temperatures between 10°C/50°F and 40°C/104°F.
- When not using rechargeable batteries for extended periods of time, charge them regularly (about every three months).
- Do not mutilate or dismantle.
- Do not heat above 60°C/140°F, e.g. do not expose to sunlight or throw into a fire.
- Immediately remove rechargeable batteries from obviously defective products.
- Do not continue to use defective rechargeable batteries.
- Only use rechargeable batteries specified by Xvive.
- Dispose of rechargeable batteries at special collection points or return them to your specialist dealer.
- Store the products in a cool and dry place at room temperature (approx.20°C/68°F).
- Remove the rechargeable batteries if the products will not be used for extended periods of time.
E-mail: support@xviveaudio.com
www.xviveaudio.com

Documents / Resources
References
Download manual
Here you can download full pdf version of manual, it may contain additional safety instructions, warranty information, FCC rules, etc.
Advertisement


Need help?
Do you have a question about the U5 and is the answer not in the manual?
Questions and answers