Advertisement
FEATURES
U6 is an ultra-compact wireless mic system designed primarily for video production. The transmitter can be worn discreetly in two different modes: Clip and Hook+Loop. The Clip holds the transmitter in position on the underside of your shirt for a very understated look. Alternately, the Hook+Loop method completely conceals the transmitter underneath your clothing. Both installation modes are versatile and provide a solution for any application. The transmitter features a built-in omnidirectional condenser microphone, and wirelessly transmits crystal-clear, broadcast-grade digital audio on the 2.4 GHz band to the camera-mounted receiver. The system's four-channel design allows you to use four U6 sets in one area; or, with one set, having four frequencies to choose from ensures connection if there are competing wireless devices nearby. U6 is perfect for video content creation, filmmaking, vlogging, YouTube, live streaming, and more.
- 2.4 GHz True Diversity wireless system
- Omnidirectional microphone built into the Transmitter
- High-resolution 24-bit / 48 kHz audio
- Up to 4 hours of battery life
- Less than 5 ms latency
- 4 wireless channels
- Dynamic range: 100 dB
- Signal-to-noise ratio: 100 dB
- 3.5 mm / 1/8" TRS output from the receiver to your DSLR or video camera
- Three receiver output level presets: 0 dB, -10 dB, and -20 dB
- Frequency response: 80 Hz – 20 kHz
- Solid RF connection over a 90-foot range (actual range depends on RF signal absorption, re ection and interference)
PRODUCT SPECIFICATIONS
- Wireless Type: 2.4 GHz ISM worldwide open band
- Wireless Range: Up to 90 ft; depends on RF signal absorption, reflection and interference
- RF Sensitivity: -86 dBm and -92 dBm
- Total Harmonic Distortion: 0.2%
- Transmitter RF Output Power: <10 mW E.I.R.P. max
- Antenna Type: 1/4 wave sleeve dipole, non-removable
- Number Of Antennas: Transmitter: 1, Receiver: 2 (True diversity for both channels simultaneously)
- Channel Count: Up to 4
- Latency: 5 ms
- High-Resolution Audio: 24-bit / 48 kHz
- Transmitter Mounting Modes: Clip / Hook+Loop
- Microphone Polar Pattern: Omnidirectional
- Frequency Range: 80 Hz – 20 kHz
- Sensitivity: -32 dB ± 3 dB
- Dynamic Range: 100 dB
- Signal-To-Noise Ratio: 100 dB
- Receiver Analog Outputs: 3.5 mm TRS
- Receiver Output Gain: 0 dB, -10 dB, -20 dB
- Charging Voltage & Current: 5V 1A
- Battery: 3.8V rechargeable Li-ion Receiver: 420 mAh / Transmitter: 330 mAh
- Battery Life: 4 hours
- Dimensions:
Receiver: 39 x 14 x 50 mm / Transmitter: 30 x 13 x 43 mm - Weight: Receiver: 29 g (1.02 oz) / Transmitter: 18 g (0.63 oz)
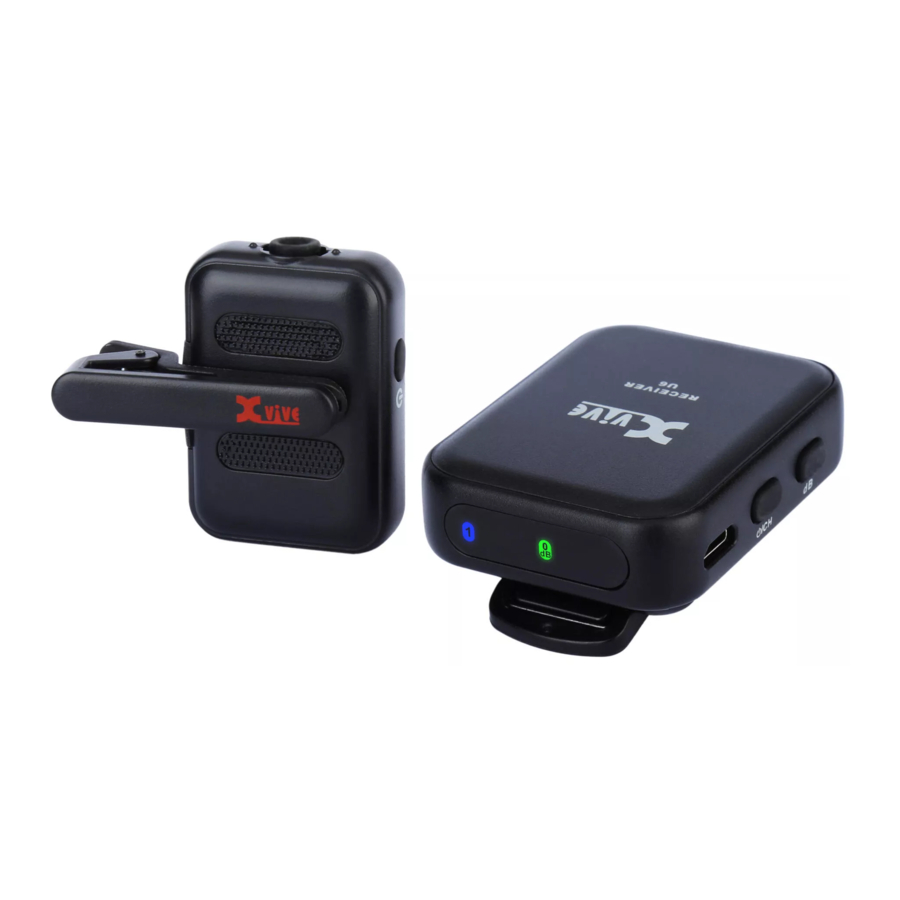
TRANSMITTER

- Channel display
- Power LED
- Microphone
- USB charging port
- Power and Channel switch
- Hook fastener
- Clip sockets
RECEIVER

- Channel display
- Gain display
- Power LED
- Gain switch
- 3.5 mm TRS output
- USB charging port
- Power and Channel switch
- Clip
QUICK START
- POWER AND CHANNEL
Turn the units on by pressing and holding the power button for 3 seconds, until the display screen lights up. Short presses on the power button will change to the next channel (check the 1-4 channel display). Make sure you are set to the same channel on both the transmitter and the receiver. When the units are successfully paired, the green LED on the receiver will illuminate.

- SET UP TRANSMITTER
Please keep the transmitter at least 10 inches away from your mouth or audio source.

- CONNECTING THE RECEIVER TO A DSLR CAMERA
Slide the receiver's foot into the camera's shoe mount. Connect the receiver output to the camera input using the supplied 3.5 mm TRS cable.

- CONNECTING THE RECEIVER TO A SMARTPHONE
To connect to a smartphone with a TRRS 3.5 mm / 1/8" jack, plug one end of the included stereo cable into the receiver, and the other end into the TRS to TRRS adapter. Plug the adapter into the smartphone's headphone jack. If your smartphone has a USB-C or lightning connector, you will need to purchase an additional adapter (TRRS to USB-C or TRRS to lightning). You can use the hook+loop fastener adhesives to attach the receiver to your smartphone or tripod/mount.

- CONNECTING THE RECEIVER TO A SMARTPHONE
- 3-LEVEL OUTPUT GAIN

- BATTERIES AND CHARGING
The U6 system comes with a dual USB charging cable, which charges the transmitter and the receiver at the same time. Plug it into any 5V USB charger adapter or USB power source.
Note: Turn off the power while charging. Please do not use U6 while charging, as this may reduce your battery life.POWER STATUS LED INDICATES POWER STATUS
LED off = 100% ~ 30%
Solid red = 29% ~ 11%
Flickering red = less than 10%
 * Always store at room temperature
* When storing the unit, please check the battery charge level regularly and charge if necessary.


 * Always store at room temperature
TRANSMITTER APPLICATION METHOD
CLIP
Fasten the clip to the transmitter by pressing the round nubs on the clip into the round sockets on the transmitter.
When the transmitter is clipped underneath your shirt or other clothing, it may create a slight protrusion, but will be generally unnoticeable.

HOOK+LOOP
Stick the Hook pieces on the transmitter


Hook fastener material can catch onto knit or loosely woven fabrics (e.g. wool sweaters) and cause damage, so avoid making contact between the hook fastener on the back of the transmitter and your clothing. The adhesive on the back of the loop fastener piece can leave a residue on some fabrics. Avoid leaving the loop fastener stuck on clothing for a long time. Please use with caution.
There are two small hook fastener adhesive strips on the transmitter. Stick a loop sticker on the inside surface of your clothing, or anywhere else within range of the transmitter (about 10 inches from your mouth). Then simply press the transmitter against the loop piece.

2.4 GHZ WIRELESS OVERVIEW AND INTERFERENCE
U6 operates on the 2.4 GHz ISM band, which is also used by Wi-Fi, Bluetooth, and other wireless devices. 2.4 GHz is an open band and, as such, does not require a license to be used worldwide.
Tips and Methods to Improve Wireless System Performance
- Keep more than 3 metres of distance between the U6 receiver unit and Wi-Fi transmitters, such as routers.
- If you experience interference from Wi-Fi devices in the vicinity, try changing to a different channel on the U6 transmitter and receiver.
- If necessary, shorten the distance between the transmitter and receiver units.
IMPORTANT SAFETY INSTRUCTIONS
PLEASE READ THESE INSTRUCTIONS AND KEEP THEM IN A SAFE PLACE
BEFORE USING YOUR XVIVE WIRELESS AUDIO FOR VIDEO SYSTEM, CAREFULLY READ THE OPERATING INSTRUCTIONS:
- Observe all instructions in the U6 manual carefully.
- Do not to perform service operations beyond those described in the U6 manual. Service is required when the apparatus has been damaged in any way, such as:
- Liquid has been spilled or objects have fallen into the apparatus;
- The unit has been exposed to rain or moisture;
- The unit does not operate normally, or performance changes in a significant way;
- The unit is dropped or the enclosure is damaged
- Do not place near heat sources, such as radiators, heat registers, or appliances which produce heat.
- Guard against objects or liquids entering the device.
Do not use or place unit near water. - Clean only with a dry cloth.
- Only use attachments/accessories specified by Xvive.
- Prolonged listening at high volume levels may cause irreparable hearing loss and/or damage. Always be sure to practice "safe listening."
SAFETY INSTRUCTIONS FOR LITHIUM-ION RECHARGEABLE BATTERIES
If abused or misused, the rechargeable batteries may leak. In extreme cases, they may even present a risk of explosion, fire, heat, smoke or gas. Xvive does not accept any liability for damagearising from abuse or misuse.
- Keep away from children.
- Only charge rechargeable batteries with chargers recommended by Xvive.
- Observe correct polarity.
- Pack/store charged rechargeable batteries so that the terminals cannot contact each other (danger of shorting out/fire hazard).
- Do not expose to moisture.
- Switch rechargeable battery-powered products off after use.
- Only charge rechargeable batteries at ambient temperatures between 10°C/50°F and 40°C/104°F.
- When not using rechargeable batteries for extended periods of time, charge them regularly (about every three months).
- Do not mutilate or dismantle.
- Do not heat above 60°C/140°F, e.g. do not expose to sunlight or throw into a fire.
- Immediately remove rechargeable batteries from obviously defective products.
- Do not continue to use defective rechargeable batteries.
- Only use rechargeable batteries specified by Xvive.
- Dispose of rechargeable batteries at special collection points or return them to your specialist dealer.
- Store the products in a cool and dry place at roomtemperature (approx. 20°C/68°F).
- Remove the rechargeable batteries if the products will not be used for extended periods of time.

Documents / ResourcesDownload manual
Here you can download full pdf version of manual, it may contain additional safety instructions, warranty information, FCC rules, etc.
Advertisement


Need help?
Do you have a question about the U6 and is the answer not in the manual?
Questions and answers