Table of Contents
Advertisement
Available languages
Available languages
Quick Links
STEAM GENERATOR IRON / DAMPFBÜGELSTATION /
CENTRALE VAPEUR SDBS 2400 A1
STEAM GENERATOR IRON
Operating instructions
CENTRALE VAPEUR
Mode d'emploi
NAPAŘOVACÍ ŽEHLIČKA
S PARNÍ STANICÍ
Návod k obsluze
PARNÁ ŽEHLIACA STANICA
Návod na obsluhu
STRYGEJERN MED DAMPSTATION
Betjeningsvejledning
IAN 387993_2104
DAMPFBÜGELSTATION
Bedienungsanleitung
STOOMSTRIJKIJZER STATION
Gebruiksaanwijzing
ŻELAZKO ZE STACJĄ PAROWĄ
Instrukcja obsługi
CENTRO DE PLANCHADO DE VAPOR
Instrucciones de uso
Advertisement
Chapters
Table of Contents

Related Manuals for Silvercrest 387993 2104


Summary of Contents for Silvercrest 387993 2104
- Page 1 STEAM GENERATOR IRON / DAMPFBÜGELSTATION / CENTRALE VAPEUR SDBS 2400 A1 STEAM GENERATOR IRON DAMPFBÜGELSTATION Operating instructions Bedienungsanleitung CENTRALE VAPEUR STOOMSTRIJKIJZER STATION Mode d’emploi Gebruiksaanwijzing NAPAŘOVACÍ ŽEHLIČKA ŻELAZKO ZE STACJĄ PAROWĄ Instrukcja obsługi S PARNÍ STANICÍ Návod k obsluze PARNÁ ŽEHLIACA STANICA CENTRO DE PLANCHADO DE VAPOR Návod na obsluhu Instrucciones de uso...
- Page 2 Before reading, unfold the page containing the illustrations and familiarise yourself with all functions of the device. Klappen Sie vor dem Lesen die Seite mit den Abbildungen aus und machen Sie sich anschließend mit allen Funktionen des Gerätes vertraut. Avant de lire le mode d‘emploi, ouvrez la page contenant les illustrations et familiarisez-vous ensuite avec toutes les fonctions de l‘appareil.
-
Page 4: Table Of Contents
Contents Introduction ..........2 Information about these operating instructions . -
Page 5: Introduction
Introduction Information about these operating instructions Congratulations on the purchase of your new appliance. You have selected a high-quality product. The operating instructions are part of this product. They contain important information about safety, usage and disposal. Before using the product, please familiarise yourself with all operating and safety instructions. -
Page 6: Safety
WARNING A warning at this hazard level indicates a potentially hazardous situation. Failure to avoid this hazardous situation could result in injury. ► Follow the instructions in this warning notice to prevent injury. CAUTION A warning notice at this hazard level indicates a risk of material damage. - Page 7 This appliance may be used by children aged 8 years or ■ more and by persons with reduced physical, sensory or mental capabilities or lack of experience and/or knowledge if they are supervised, or have been instructed in the safe use of the appliance and have understood the potential risks.
- Page 8 RISK OF ELECTRICAL SHOCK! The appliance should only be connected to correctly installed ► and earthed mains power sockets. Ensure that the rating for your local power supply corresponds with the details on the rating plate of the appliance. Arrange for customer service to repair or replace connecting ►...
- Page 9 RISK OF ELECTRICAL SHOCK! Protect the appliance from drips or splashes of water. Do not ► place any vessels containing liquid (e.g. flower vases) on or near the appliance. Always pull the plug out of the power socket after completing ►...
-
Page 10: Technical Details
CAUTION PROPERTY DAMAGE Never leave the steam iron unattended while it is connected ► to the mains power supply. Never use water containing carbon dioxide in the appliance. ► Do not operate the appliance without water, otherwise the ► pump could burn out. Ensure that neither the power cable or the connection hose ►... -
Page 11: Operating Elements
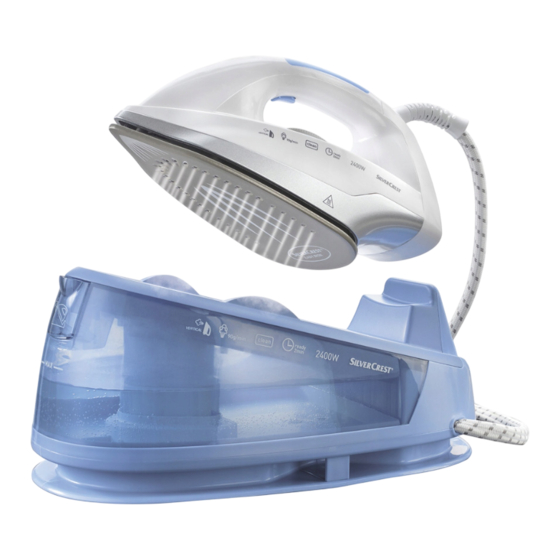
Operating elements (See fold-out page for illustrations) Figure A: 1 Steam button 2 Temperature control 3 Heat-up indicator lamp 4 Connecting hose 5 Placement area 6 Sole of the iron Figure B: 7 Shaft cover 8 Limescale filter 9 Water tank filler cap 0 Water tank Figure C: q "eco"... -
Page 12: Setting Up And Connecting
Setting up and connecting Package contents and transport inspection The appliance is supplied with the following components as a standard: ● Steam Generator Iron ● Velcro tape for fastening the mains cable ● Operating instructions NOTE ► Check the package for completeness and signs of visible damage. ►... -
Page 13: Handling And Use
Handling and use This section provides you with important information on handling and using the appliance. Before first use Clean the sole of the iron 6 using a slightly moist cloth. ♦ ♦ To remove any leftover production residues, iron an old, clean cloth a few times. Filling the water tank NOTE Use only tap water or distilled water. -
Page 14: Ironing Without Steam
Ironing without steam CAUTION! PROPERTY DAMAGE! ► Check the care instructions on the labels in garments to see if they are suit- able for being ironed, and at which temperature setting. ► If the clothing care instructions forbid ironing ( ), the garment must not be ironed. -
Page 15: Steam Ironing
Steam ironing 1) Press the On/Off button t to turn the appliance on. The indicator lamp integrated in the On/Off button t lights up and the “max” steam indicator lamp w flashes. 2) Turn the temperature control 2 to set the required ironing temperature. The temperature control 2 must be set to a minimum of to produce steam. -
Page 16: Vertical Steam Ironing
Vertical steam ironing 1) Hang the fabric to be ironed on a clothes hanger which is hung against a heat-resistant surface. 2) Rotate the temperature control 2 to set the required ironing temperature. The temperature control 2 must be set to a minimum of to produce steam. -
Page 17: Cleaning And Maintenance
Cleaning and maintenance WARNING! ► Before cleaning the appliance, always pull the plug out of the mains power socket. ► Allow the appliance to cool down completely if necessary. ► Never immerse the appliance in water to clean it. CAUTION ►... -
Page 18: Cleaning The Appliance
1) Switch the appliance off using the On/Off button t and allow it to cool down. 2) Remove the power plug from the mains power socket. 3) Remove the iron from the base station and put it to one side. 4) Open the shaft cover 7. -
Page 19: Troubleshooting
Troubleshooting Fault Possible cause Remedy Voltage supply error. Ensure that the plug is firmly inserted into the power socket. The appliance is not working. The appliance is not switched on. Switch the appliance on using the On/Off button t. Fill the water tank with water 0. There is not enough water in the water tank 0. -
Page 20: Storage/Disposal
Storage/disposal Storage ■ Clean the appliance as described above. Fold the connecting hose 4 in middle and push it into the recess in the ■ appliance: ■ Wind the mains cable up and fasten it with the Velcro tape supplied. ■... -
Page 21: Disposal Of The Appliance
Disposal of the appliance Never dispose of the appliance in your normal domestic waste. This product is subject to the provisions of European Directive 2012/19/EU-WEEE (Waste Electrical and Electronic Equipment). Dispose of the appliance via an approved disposal company or your municipal waste facility. -
Page 22: Kompernass Handels Gmbh Warranty
Kompernass Handels GmbH warranty Dear Customer, This appliance has a 3-year warranty valid from the date of purchase. If this product has any faults, you, the buyer, have certain statutory rights. Your statutory rights are not restricted in any way by the warranty described below. Warranty conditions The warranty period starts on the date of purchase. -
Page 23: Service
Warranty claim procedure To ensure quick processing of your case, please observe the following instruc- tions: ■ Please have the till receipt and the item number (IAN) 387993_2104 avail- able as proof of purchase. ■ You will find the item number on the type plate on the product, an engraving on the product, on the front page of the operating instructions (below left) or on the sticker on the rear or bottom of the product. -
Page 24: Ordering Replacement Parts
Ordering replacement parts You can order replacement parts for this product on the Internet at www.kompernass.com. Scan the QR code with your smartphone/tablet. You can use this QR code to go directly to our website to view and order the available spare parts. NOTE ►... - Page 25 SDBS 2400 A1 ■ │ GB │ IE...
- Page 26 Inhaltsverzeichnis Einführung ..........24 Informationen zu dieser Bedienungsanleitung .
-
Page 27: Einführung
Einführung Informationen zu dieser Bedienungsanleitung Herzlichen Glückwunsch zum Kauf Ihres neuen Gerätes. Sie haben sich damit für ein hochwertiges Produkt entschieden. Die Bedienungs- anleitung ist Bestandteil dieses Produkts. Sie enthält wichtige Hinweise für Sicherheit, Gebrauch und Entsorgung. Machen Sie sich vor der Benutzung des Produkts mit allen Bedien- und Sicherheitshinweisen vertraut. -
Page 28: Sicherheit
WARNUNG Ein Warnhinweis dieser Gefahrenstufe kennzeichnet eine mögliche gefährliche Situation. Falls die gefährliche Situation nicht vermieden wird, kann dies zu Verletzungen führen. ► Die Anweisungen in diesem Warnhinweis befolgen, um Verletzungen von Personen zu vermeiden. ACHTUNG Ein Warnhinweis dieser Gefahrenstufe kennzeichnet einen möglichen Sachschaden. - Page 29 Dieses Gerät kann von Kindern ab 8 Jahren und älter und ■ von Personen mit reduzierten physischen, sensorischen oder mentalen Fähigkeiten oder Mangel an Erfahrung und/oder Wissen benutzt werden, wenn sie beaufsichtigt oder bezüglich des sicheren Gebrauchs des Gerätes un- terwiesen wurden und die daraus resultierenden Gefahren verstanden haben.
- Page 30 GEFAHR DURCH ELEKTRISCHEN SCHLAG! Schließen Sie das Gerät nur an eine vorschriftsmäßig instal- ► lierte und geerdete Netzsteckdose an. Die Netzspannung muss mit den Angaben auf dem Typenschild des Gerätes übereinstimmen. Lassen Sie Anschlussleitungen bzw. Geräte, die nicht ein- ► wandfrei funktionieren oder beschädigt wurden, sofort vom Kundendienst reparieren oder austauschen.
- Page 31 GEFAHR DURCH ELEKTRISCHEN SCHLAG! Schützen Sie das Gerät vor Tropf- und Spritzwasser. Stellen ► Sie deshalb keine mit Flüssigkeit gefüllten Gegenstände (z. B. Blumenvasen) auf oder neben das Gerät. Ziehen Sie nach Beenden des Bügelns und vor jeder Reini- ► gung den Netzstecker aus der Netzsteckdose.
-
Page 32: Technische Daten
ACHTUNG SACHBESCHÄDIGUNG Das Dampfbügeleisen darf nicht unbeaufsichtigt gelassen ► werden, während es am Netz angeschlossen ist. Verwenden Sie kein kohlensäurehaltiges Wasser im Gerät. ► Verwenden Sie das Gerät nie ohne Wasser, da sonst die ► Pumpe durchbrennen könnte. Achten Sie darauf, dass weder Netzkabel noch Verbindungs- ►... -
Page 33: Bedienelemente
Bedienelemente (Abbildungen siehe Ausklappseite) Abbildung A: 1 Dampf-Taste 2 Temperaturregler 3 Aufheizkontrollleuchte 4 Verbindungsschlauch 5 Abstellfläche 6 Bügelsohle Abbildung B: 7 Schachtabdeckung 8 Kalkfilter 9 Wassertankverschluss 0 Wassertank Abbildung C: q Dampfkontrollleuchte „eco“ w Dampfkontrollleuchte „max“ e Kontrollleuchte r Taste „reset“ t Taste Ein/Aus z Taste Dampfstärke SDBS 2400 A1... -
Page 34: Aufstellen Und Anschließen
Aufstellen und Anschließen Lieferumfang und Transportinspektion Das Gerät wird standardmäßig mit folgenden Komponenten geliefert: ● Dampfbügelstation ● Klettband zum Fixieren des Netzkabels ● Bedienungsanleitung HINWEIS ► Prüfen Sie die Lieferung auf Vollständigkeit und auf sichtbare Schäden. ► Bei einer unvollständigen Lieferung oder Schäden infolge mangelhafter Verpackung oder durch Transport wenden Sie sich an die Service-Hotline (siehe Kapitel Service). -
Page 35: Bedienung Und Betrieb
Bedienung und Betrieb In diesem Kapitel erhalten Sie wichtige Hinweise zur Bedienung und zum Betrieb des Gerätes. Vor dem ersten Gebrauch Reinigen Sie die Bügelsohle 6 mit einem leicht angefeuchteten Tuch. ♦ ♦ Um etwaige Rückstände von der Produktion zu entfernen, bügeln Sie einige Male über ein altes, sauberes Tuch. -
Page 36: Bügeln Ohne Dampf
HINWEIS Kippen und schwenken Sie die Dampfstation nicht bei vollem Wassertank 0. ► Ansonsten kann das Wasser aus der Einfüllöffnung austreten. 5) Stecken Sie den Netzstecker in eine Netzsteckdose. Bügeln ohne Dampf ACHTUNG! SACHSCHADEN! ► Prüfen Sie die Pflegehinweise auf den Schildern in der Kleidung, ob und bei welcher Temperatureinstellung das Kleidungsstück zum Bügeln geeignet ist. -
Page 37: Dampfbügeln
4) Nach dem Bügeln stellen Sie das Bügeleisen auf die Abstellfläche 5 der Basisstation. Stellen Sie den Temperaturregler 2 auf „min“. 5) Drücken Sie die Taste Ein/Aus t, um das Gerät auszuschalten. Die in der Taste Ein/Aus t integrierte Kontrollleuchte und die Dampfkontrollleuchte „max“... -
Page 38: Senkrechtes Dampfbügeln
Senkrechtes Dampfbügeln 1) Hängen Sie das zu bügelnde Gewebe auf einen Kleiderbügel, der an einer hitzebeständigen Oberfläche hängt. 2) Drehen Sie den Temperaturregler 2 und stellen Sie so die gewünschte Bügeltemperatur ein. Um Dampf zu erzeugen, muss der Temperaturregler 2 mindestens in den Einstellbereich gestellt werden. -
Page 39: Reinigung Und Wartung
Reinigung und Wartung WARNUNG! ► Ziehen Sie vor der Reinigung stets den Netzstecker aus der Netzsteckdose. ► Lassen Sie das Gerät ggf. erst vollständig abkühlen. ► Tauchen Sie das Gerät zum Reinigen auf keinen Fall in Wasser. ACHTUNG ► Stellen Sie sicher, dass bei der Reinigung keine Feuchtigkeit in das Gerät eindringt, um eine irreparable Beschädigung des Gerätes zu vermeiden. -
Page 40: Gerät Reinigen
1) Schalten Sie das Gerät mit der Taste Ein/Aus t aus und lassen Sie es abkühlen. 2) Ziehen Sie den Netzstecker aus der Netzsteckdose. 3) Nehmen Sie das Bügeleisen von der Basisstation und stellen Sie es beiseite. 4) Öffnen Sie die Schachtabdeckung 7. ACHTUNG Beschädigung des Gerätes! Füllen Sie niemals Wasser in den Kalkfilterschacht! -
Page 41: Fehlerbehebung
Fehlerbehebung Fehler Mögliche Ursache Behebung Fehler in der Spannungsversor- Prüfen Sie, ob der Netzstecker fest gung in der Netzsteckdose sitzt. Das Gerät funktio- niert nicht. Das Gerät ist nicht eingeschaltet. Schalten Sie das Gerät mit der Taste Ein/Aus t ein. Es ist nicht ausreichend Wasser Füllen Sie Wasser im Wassertank 0. -
Page 42: Lagerung/Entsorgung
Lagerung/Entsorgung Lagerung ■ Reinigen Sie das Gerät, wie zuvor beschrieben. Legen Sie den Verbindungsschlauch 4 in der Mitte zusammen und schieben ■ Sie ihn in die Vertiefung am Gerät: ■ Wickeln Sie das Netzkabel auf und fixieren Sie es mit dem mitgelieferten Klettband. -
Page 43: Gerät Entsorgen
Gerät entsorgen Werfen Sie das Gerät keinesfalls in den normalen Hausmüll. Dieses Produkt unterliegt der europäischen Richtlinie 2012/19/EU WEEE (Waste Electrical and Electronic Equipment). Entsorgen Sie das Gerät über einen zugelassenen Entsorgungsbetrieb oder über Ihre kommunale Entsorgungseinrichtung. Beachten Sie die aktuell geltenden Vorschriften. -
Page 44: Garantie Der Kompernaß Handels Gmbh
Garantie der Kompernaß Handels GmbH Sehr geehrte Kundin, sehr geehrter Kunde, Sie erhalten auf dieses Gerät 3 Jahre Garantie ab Kaufdatum. Im Falle von Mängeln dieses Produkts stehen Ihnen gegen den Verkäufer des Produkts gesetz- liche Rechte zu. Diese gesetzlichen Rechte werden durch unsere im Folgenden dargestellte Garantie nicht eingeschränkt. -
Page 45: Service
Abwicklung im Garantiefall Um eine schnelle Bearbeitung Ihres Anliegens zu gewährleisten, folgen Sie bitte den folgenden Hinweisen: ■ Bitte halten Sie für alle Anfragen den Kassenbon und die Artikelnummer (IAN) 387993_2104 als Nachweis für den Kauf bereit. ■ Die Artikelnummer entnehmen Sie bitte dem Typenschild am Produkt, einer Gravur am Produkt, dem Titelblatt der Bedienungsanleitung (unten links) oder dem Aufkleber auf der Rück- oder Unterseite des Produktes. -
Page 46: Ersatzteile Bestellen
Ersatzteile bestellen Sie können Ersatzteile für dieses Produkt bequem im Internet unter www.kompernass.com dauerhaft nachbestellen. Scannen Sie den QR-Code mit Ihrem Smartphone/Tablet. Mit diesem QR-Code gelangen Sie direkt auf unsere Webseite und können die verfügbaren Ersatzteile einsehen und bestellen. HINWEIS ►... - Page 47 SDBS 2400 A1 ■ 44 │ DE │ AT │ CH...
- Page 48 Table des matières Introduction ..........46 Informations relatives à...
-
Page 49: Introduction
Introduction Informations relatives à ce mode d'emploi Toutes nos félicitations pour l'achat de votre nouvel appareil. Vous venez ainsi d'opter pour un produit de grande qualité. Le mode d'emploi fait partie intégrante de ce produit. Il contient des remarques importantes concernant la sécurité, l'usage et la mise au rebut. -
Page 50: Sécurité
ATTENTION Un avertissement à ce niveau de danger signale une situation potentiellement dangereuse. Si la situation dangereuse ne peut être écartée, elle peut entraîner des blessures. ► Les consignes de cet avertissement doivent être suivies pour éviter de blesser des personnes. ATTENTION Un avertissement à... - Page 51 Cet appareil peut être utilisé par des enfants d'au moins ■ 8 ans et par des personnes disposant de capacités phy- siques, sensorielles ou mentales réduites ou de peu d'expé- rience et/ou de connaissances, à condition qu'ils soient surveillés ou qu'ils aient été initiés à l'utilisation sécurisée de l'appareil et qu'ils aient compris les dangers en résul- tant.
- Page 52 RISQUE DE CHOC ÉLECTRIQUE ! Ne raccordez l'appareil qu'à une prise secteur correctement ► installée et reliée à la terre. La tension secteur doit corres- pondre aux indications figurant sur la plaque signalétique de l'appareil. Les cordons d'alimentation ou appareils qui ne fonctionnent ►...
- Page 53 RISQUE DE CHOC ÉLECTRIQUE ! Protégez l'appareil contre les gouttes d'eau et éclaboussures. ► Pour cette raison, ne posez pas d'objets contenant du liquide (par exemple des vases) sur ou à côté de l'appareil. Une fois le repassage terminé ou avant chaque nettoyage, ►...
-
Page 54: Caractéristiques Techniques
ATTENTION DOMMAGE MATÉRIEL Le fer à repasser à vapeur ne doit pas être laissé sans sur- ► veillance pendant qu'il est raccordé au réseau. N'utilisez pas d'eau gazeuse dans l'appareil. ► N'utilisez jamais l'appareil sans eau, sans quoi la pompe ►... -
Page 55: Éléments De Commande
Éléments de commande (Figures : voir le volet dépliant) Figure A : 1 Touche vapeur 2 Thermostat 3 Voyant d'échauffement 4 Flexible de raccordement 5 Surface de dépose 6 Semelle de repassage Figure B : 7 Couvercle du logement 8 Filtre antitartre 9 Bouchon du réservoir à eau 0 Réservoir à... -
Page 56: Installation Et Raccordement
Installation et raccordement Matériel livré et inspection après transport L'appareil est livré accompagné standard des composants suivants : ● Centrale vapeur ● Bande velcro pour fixer le cordon d'alimentation ● Mode d'emploi REMARQUE ► Vérifiez si la livraison est au complet et ne présente aucun dégât apparent. ►... -
Page 57: Utilisation Et Fonctionnement
Utilisation et fonctionnement Ce chapitre contient des remarques importantes sur l'utilisation et le fonctionne- ment de l'appareil. Avant la première utilisation Nettoyez la semelle de repassage 6 à l'aide d'un chiffon légèrement ♦ humidifié. ♦ Afin d'éliminer tout résidu de production, repassez plusieurs fois un vieux chiffon propre. -
Page 58: Repasser Sans Vapeur
REMARQUE ► Ne basculez et ne renversez pas la station vapeur avec le réservoir à eau plein 0. Sinon de l'eau peut couler de l'orifice de remplissage. 5) Branchez la fiche secteur dans une prise secteur. Repasser sans vapeur ATTENTION ! RISQUE DE DÉGÂTS MATÉRIELS ! ►... -
Page 59: Repassage À La Vapeur
5) Appuyez sur la touche Marche/Arrêt t pour éteindre l'appareil. Le voyant de contrôle intégré dans la touche Marche/Arrêt t et le voyant de contrôle de la vapeur "max" w s'éteignent. 6) Débranchez la fiche secteur de la prise de courant. Repassage à... -
Page 60: Repassage Vertical À La Vapeur
Repassage vertical à la vapeur 1) Accrochez le vêtement à repasser sur un cintre, suspendu à une surface résistant à la chaleur. 2) Tournez le thermostat 2 afin de régler la température de repassage sou- haitée. Pour produire de la vapeur, le thermostat 2 doit être au moins réglé dans la plage de réglage 3) Attendez jusqu'à... -
Page 61: Nettoyage Et Maintenance
Nettoyage et maintenance AVERTISSEMENT ! ► Avant le nettoyage, retirez toujours la fiche secteur de la prise de courant. ► Laissez l'appareil refroidir complètement. ► Ne plongez jamais l'appareil dans de l'eau pour le nettoyer. ATTENTION ► Lors du nettoyage de l'appareil, veillez à ce qu'aucune humidité ne pénètre dans ce dernier afin d'éviter tous dégâts irréparables. -
Page 62: Nettoyage De L'appareil
1) Éteignez l'appareil avec la touche Marche/Arrêt t et laissez-le refroidir. 2) Débranchez la fiche secteur de la prise secteur. 3) Retirez le fer à repasser de la station et mettez-le de côté. 4) Ouvrez le couvercle du logement 7. ATTENTION Endommagement de l‘appareil ! Ne versez jamais d‘eau dans le logement de filtre antitartre ! -
Page 63: Dépannage
Dépannage Panne Cause possible Suppression Problème d'alimentation Vérifiez si la fiche secteur est correcte- électrique. ment enfichée dans la prise de courant. L'appareil ne fonctionne pas. L'appareil n'est pas allumé. Allumez l'appareil avec la touche Marche/Arrêt t. Il n'y a pas suffisamment d'eau Verser de l'eau dans le réservoir à... -
Page 64: Entreposage/Mise Au Rebut
Entreposage/mise au rebut Entreposage ■ Nettoyez l'appareil comme décrit précédemment. Pliez le flexible de raccordement 4 au centre et poussez-le dans la cavité ■ sur l‘appareil : ■ Enroulez le cordon d'alimentation et fixez-le avec la bande velcro livrée. ■ Rangez l'appareil dans un endroit sec et sans poussières. -
Page 65: Mise Au Rebut De L'appareil
Mise au rebut de l'appareil Ne jetez en aucun cas l'appareil avec les ordures ménagères normales. Ce produit est assujetti à la directive européenne 2012/19/EU-DEEE (déchets d'équipements électriques et électro- niques). Éliminez l'appareil par l'intermédiaire d'une entreprise de traitement des déchets autorisée ou via le service de recyclage de votre commune. -
Page 66: Garantie Pour Kompernass Handels Gmbh Pour La Belgique
Garantie pour Kompernass Handels GmbH pour la Belgique Chère cliente, cher client, Cet appareil est garanti 3 ans à partir de la date d’achat. Si ce produit venait à présenter des vices, vous disposez de droits légaux face au vendeur de ce produit. Vos droits légaux ne sont pas restreints par notre garantie présentée ci-dessous. - Page 67 Procédure en cas de garantie Afin de garantir un traitement rapide de votre demande, veuillez suivre les indications suivantes : ■ Veuillez avoir à portée de main pour toutes questions le ticket de caisse et la référence article (IAN) 387993_2104 en tant que justificatif de votre achat. ■...
-
Page 68: Garantie Pour Kompernass Handels Gmbh Pour La France
Garantie pour Kompernass Handels GmbH pour la France Chère cliente, cher client, Cet appareil est garanti 3 ans à partir de la date d’achat. Si ce produit venait à présenter des vices, vous disposez de droits légaux face au vendeur de ce produit. Vos droits légaux ne sont pas restreints par notre garantie présentée ci-dessous. - Page 69 Article L217-16 du Code de la consommation Lorsque l‘acheteur demande au vendeur, pendant le cours de la garantie com- merciale qui lui a été consentie lors de l‘acquisition ou de la réparation d‘un bien meuble, une remise en état couverte par la garantie, toute période d‘immobilisa- tion d‘au moins sept jours vient s‘ajouter à...
-
Page 70: Service Après-Vente
Article 1648 1er alinéa du Code civil L‘action résultant des vices rédhibitoires doit être intentée par l‘acquéreur dans un délai de deux ans à compter de la découverte du vice. Les pièces détachées indispensables à l’utilisation du produit sont disponibles pendant la durée de la garantie du produit. -
Page 71: Importateur
Importateur Veuillez tenir compte du fait que l’adresse suivante n’est pas une adresse de service après-vente. Veuillez d’abord contacter le service mentionné. KOMPERNASS HANDELS GMBH BURGSTRASSE 21 44867 BOCHUM ALLEMAGNE www.kompernass.com Commander des pièces de rechange Vous pouvez commander des pièces détachées pour ce produit de manière pratique sur Internet sur www.kompernass.com. - Page 72 Inhoud Inleiding ..........70 Informatie bij deze gebruiksaanwijzing .
-
Page 73: Inleiding
Inleiding Informatie bij deze gebruiksaanwijzing Hartelijk gefeliciteerd met de aankoop van uw nieuwe apparaat. U hebt hiermee gekozen voor een hoogwaardig product. De gebruiksaanwijzing maakt deel uit van dit product. Deze bevat belangrijke aanwijzingen voor veilig- heid, gebruik en afvoer. Lees alle bedienings- en veiligheidsaanwijzingen voordat u het product in gebruik neemt. -
Page 74: Veiligheid
WAARSCHUWING Een waarschuwing van dit gevaarniveau duidt op een mogelijk gevaarlijke situatie. Als de gevaarlijke situatie niet wordt vermeden, kan dit letsel tot gevolg hebben. ► Neem de aanwijzingen in deze waarschuwing in acht om persoonlijk letsel te voorkomen. LET OP Een waarschuwing van dit gevaarniveau duidt op mogelijke materiële schade. - Page 75 Dit apparaat kan worden gebruikt door kinderen vanaf ■ 8 jaar en door personen met beperkte fysieke, zintuiglijke of mentale vaardigheden of gebrek aan ervaring en/of kennis, mits zij onder toezicht staan of tevoren zijn geïn- strueerd over het veilige gebruik van het apparaat en de daaruit voortkomende gevaren hebben begrepen.
- Page 76 GEVAAR VOOR EEN ELEKTRISCHE SCHOK! Sluit het apparaat uitsluitend aan op een volgens de voor- ► schriften geïnstalleerd en geaard stopcontact. De netspan- ning moet overeenstemmen met de gegevens op het type- plaatje van het apparaat. Laat aansluitleidingen resp. apparaten die niet naar behoren ►...
- Page 77 GEVAAR VOOR EEN ELEKTRISCHE SCHOK! Bescherm het apparaat tegen lek- en spatwater. Plaats daarom ► geen met vloeistoffen gevulde voorwerpen (bijv. vazen) op of naast het apparaat. Haal na het strijken en bij reiniging altijd de stekker uit het ► stopcontact.
-
Page 78: Technische Gegevens
LET OP MATERIËLE SCHADE Het stoomstrijkijzer mag niet onbeheerd worden gelaten ► terwijl het op het lichtnet is aangesloten. Gebruik geen koolzuurhoudend water in het apparaat. ► Gebruik het apparaat nooit zonder water, omdat anders ► de pomp kan doorbranden. Let erop dat het netsnoer en de verbindingsslang niet in aan- ►... -
Page 79: Bedieningselementen
Bedieningselementen (afbeeldingen: zie uitvouwpagina) Afbeelding A: 1 Stoomtoets 2 Temperatuurregelaar 3 Indicatielampje opwarmen 4 Verbindingsslang 5 Neerzetvlak 6 Strijkzool Afbeelding B: 7 Schachtafdekking 8 Kalkfilter 9 Sluiting waterreservoir 0 Waterreservoir Afbeelding C: q Stoomindicatielampje “eco” w Stoomindicatielampje “max” e Indicatielampje r Toets “reset”... -
Page 80: Opstellen En Aansluiten
Opstellen en aansluiten Inhoud van het pakket en inspectie na transport Het apparaat wordt standaard met de volgende componenten geleverd: ● Stoomstrijkijzer station ● Klittenband voor vastzetten van het netsnoer ● Gebruiksaanwijzing OPMERKING ► Controleer of het pakket compleet is en of er sprake is van zichtbare schade. -
Page 81: Bediening En Gebruik
Bediening en gebruik In dit hoofdstuk krijgt u belangrijke aanwijzingen voor de bediening en het gebruik van het apparaat. Vóór het eerste gebruik Reinig de strijkzool 6 met een licht bevochtigde doek. ♦ ♦ Om eventuele productierestanten te verwijderen, strijkt u enkele malen over een oude, schone doek. -
Page 82: Strijken Zonder Stoom
OPMERKING Kantel en draai het stoomstation niet als het waterreservoir 0 vol is. ► Anders kan er water uit de vulopening komen. 5) Steek de stekker in een stopcontact. Strijken zonder stoom LET OP! MATERIËLE SCHADE! ► Controleer het strijkvoorschrift op het label in de kleding om te weten of en bij welke temperatuurinstelling het kledingstuk mag worden gestreken. -
Page 83: Stoomstrijken
5) Druk op de aan-/uitknop t om het apparaat uit te schakelen. Het in de aan-/uitknop t geïntegreerde indicatielampje en het stoomindicatielampje “max” w doven. 6) Haal de stekker uit het stopcontact. Stoomstrijken 1) Druk op de aan-/uitknop t om het apparaat in te schakelen. Het in de aan-/uitknop t geïntegreerde indicatielampje brandt en het stoomindicatie- lampje “max”... -
Page 84: Verticaal Stoomstrijken
Verticaal stoomstrijken 1) Hang het strijkgoed aan een kleerhanger die aan een hittebestendig oppervlak hangt. 2) Draai de temperatuurregelaar 2 en stel zo de gewenste strijktemperatuur in. Om stoom te produceren, moet de temperatuurregelaar 2 minstens naar het instelbereik worden gedraaid. 3) Wacht totdat het indicatielampje voor opwarmen 3 dooft. -
Page 85: Reiniging En Onderhoud
Reiniging en onderhoud WAARSCHUWING! ► Haal altijd de stekker uit het stopcontact voordat u het apparaat reinigt. ► Laat het apparaat zo nodig eerst volledig afkoelen. ► Dompel het apparaat bij het schoonmaken in geen geval onder in water. LET OP ►... -
Page 86: Apparaat Reinigen
1) Schakel het apparaat uit met de aan-/uitknop t en laat het afkoelen. 2) Trek de stekker uit het stopcontact. 3) Neem het strijkijzer van het basisstation en zet het weg. 4) Open de schachtafdekking 7. LET OP Beschadiging van het apparaat! Giet nooit water in de kalkfilterschacht! 5) Haal het kalkfilter 8 naar boven toe uit de kalkfilterschacht. -
Page 87: Problemen Oplossen
Problemen oplossen Probleem Mogelijke oorzaak Oplossing Fout in de voedingsspanning. Controleer of de stekker correct in het stopcontact zit. Het apparaat werkt niet. Het apparaat is niet ingeschakeld. Schakel het apparaat in met de aan-/uitknop t. Vul het waterreservoir 0 met Er zit niet voldoende water in het waterreservoir 0. -
Page 88: Opbergen/Afvoeren
Opbergen/afvoeren Opbergen ■ Reinig het apparaat zoals eerder beschreven. Vouw de verbindingslang 4 in het midden op en schuif hem in de verdieping ■ van het apparaat: ■ Wikkel het snoer op en maak het vast met het meegeleverde klittenband. ■... -
Page 89: Apparaat Afvoeren
Apparaat afvoeren Deponeer het apparaat in geen geval bij het gewone huisvuil. Dit product is onderworpen aan de Europese richtlijn 2012/19/EU-AEEA (afgedankte elektrische en elektronische apparatuur). Voer het apparaat af via een erkend afvalverwerkingsbedrijf of via uw gemeen- telijke afvalverwerking. Neem de momenteel geldende voorschriften in acht. Neem bij twijfel contact op met uw afvalverwerkingsinstantie. -
Page 90: Garantie Van Kompernaß Handels Gmbh
Garantie van Kompernaß Handels GmbH Geachte klant, U hebt op dit apparaat 3 jaar garantie vanaf de aankoopdatum. In geval van ge breken in dit product hebt u wettelijke rechten tegenover de verkoper van het product. Deze wettelijke rechten worden door onze hierna beschreven garantie niet beperkt. -
Page 91: Service
Afhandeling bij een garantiekwestie Voor een snelle afhandeling van uw aanvraag neemt u de volgende aanwijzingen in acht: ■ Houd voor alle aanvragen de kassabon en het artikelnummer (IAN) 387993_2104 als aankoopbewijs bij de hand. ■ Het artikelnummer vindt u op het typeplaatje van het product, op het product gegraveerd, op de titelpagina van de gebruiksaanwijzing (linksonder) of op de sticker op de achter- of onderkant van het product. -
Page 92: Vervangingsonderdelen Bestellen
Vervangingsonderdelen bestellen Vervangingsonderdelen voor dit product kunt u altijd comfortabel op internet nabe- stellen op www.kompernass.com. Scan de QR-code met uw smartphone/tablet. Met deze QR-code gaat u rechtstreeks naar onze website en kunt u de beschikbare vervangingsonderdelen bestellen. OPMERKING ► Mocht u problemen ondervinden met de online bestelling, dan kunt u telefonisch of via e-mail contact opnemen met ons servicecenter (zie het hoofdstuk Service). - Page 93 SDBS 2400 A1 ■ 90 NL│BE │...
- Page 94 Obsah Úvod ...........92 Informace k tomuto návodu k obsluze .
-
Page 95: Úvod
Úvod Informace k tomuto návodu k obsluze Blahopřejeme Vám k zakoupení nového přístroje. Rozhodli jste se tím pro vysoce kvalitní výrobek. Návod k obsluze je součástí tohoto výrobku. Obsahuje důležité informace o bezpečnosti, použití a likvidaci. Před použitím výrobku se seznamte se všemi provozními a bezpečnostními pokyny. -
Page 96: Bezpečnost
VÝSTRAHA Výstražné upozornění tohoto stupně nebezpečí označuje možnou nebezpečnou situaci. Pokud se takové nebezpečné situaci nezabrání, může vést ke zraněním. ► Pro zabránění zranění osob je proto nutné dodržovat pokyny uvedené v tomto výstražném upozornění. POZOR Výstražné upozornění tohoto stupně nebezpečí označuje možný... - Page 97 Děti od 8 let a osoby s omezenými fyzickými, smyslovými ■ nebo mentálními schopnostmi či nedostatkem zkušeností a/nebo znalostí, mohou používat tento přístroj pouze tehdy, pokud jsou pod dohledem nebo pokud byly poučeny o bezpečném používání přístroje a pokud porozuměly z toho vyplývajícímu nebezpečí. Děti si nesmí s přístrojem hrát.
- Page 98 NEBEZPEČÍ ÚRAZU ELEKTRICKÝM PROUDEM! Přístroj zapojte pouze do řádně nainstalované a uzemněné ► zásuvky. Síťové napětí se musí shodovat s údaji na typovém štítku přístroje. Přípojné vedení resp. přístroje, které nefungují správně nebo ► byly poškozeny, nechte okamžitě opravit nebo vyměnit zákaznickým servisem.
- Page 99 NEBEZPEČÍ ÚRAZU ELEKTRICKÝM PROUDEM! Chraňte přístroj před odkapávající a stříkající vodou. Na ► přístroj nebo vedle přístroje proto nestavte žádné předměty (např. vázy) naplněné tekutinou. Po ukončení použití a před každým čištěním vytáhněte síťový ► kabel ze zásuvky. Zástrčka se musí vytáhnout ze zásuvky ještě před tím, než se ►...
-
Page 100: Technické Údaje
POZOR POŠKOZENÍ MAJETKU Když je napařovací žehlička zapojena do sítě, nesmí být ► ponechána bez dozoru. Nepoužívejte v přístroji vodu nasycenou oxidem uhličitým. ► Přístroj nikdy nepoužívejte bez vody, protože jinak by se ► čerpadlo mohlo propálit. Dbejte na to, aby ani síťový kabel a ani spojovací hadice ►... -
Page 101: Ovládací Prvky
Ovládací prvky (zobrazení viz výklopná strana) Obrázek A: 1 tlačítko páry 2 regulátor teploty 3 kontrolka zahřívání 4 spojovací hadice 5 odstavná plocha 6 žehlící plocha Obrázek B: 7 šachtový poklop 8 filtr proti vodnímu kameni 9 uzávěr nádržky na vodu 0 nádržka na vodu Obrázek C: q kontrolka páry „eco“... -
Page 102: Umístění A Zapojení
Umístění a zapojení Rozsah dodávky a kontrola po přepravě Přístroj se standardně dodává s následujícími komponentami: ● napařovací žehlička s parní stanicí ● suchý zip pro upevnění síťového kabelu ● návod k obsluze UPOZORNĚNÍ ► Zkontrolujte kompletnost dodávky a zda není viditelně poškozená. ►... -
Page 103: Obsluha A Provoz
Obsluha a provoz V této kapitole obdržíte důležité pokyny a informace k obsluze a provozu přístroje. Před prvním použitím Vyčistěte žehlící plochu 6 lehce navlhčeným hadříkem. ♦ ♦ K odstranění případných zbytků z výroby přejděte žehličkou několikrát přes starý čistý hadřík. Naplnění nádobky na vodu UPOZORNĚNÍ... -
Page 104: Žehlení Bez Páry
Žehlení bez páry POZOR! HMOTNÉ ŠKODY! ► Zkontrolujte pokyny k ošetřování na štítcích na oděvu, zda a při jaké teplo- tě je možné oděv žehlit. ► Pokud pokyny k ošetřování uvedené na oblečení žehlení zakazují nesmíte tento kus oděvu žehlit. V opačném případě byste mohli oblečení poškodit. -
Page 105: Parní Žehlení
Parní žehlení 1) Pro zapnutí přístroje stiskněte tlačítko zap/vyp t. Kontrolka integrovaná v tlačítku zap/vyp t svítí a kontrolka páry „max“ w bliká. 2) Otočte regulátorem teploty 2 a nastavte tak požadovanou žehlicí teplotu. K vytvoření páry musí být regulátor teploty 2 nastaven minimálně v rozsahu nastavení... -
Page 106: Kolmé Parní Žehlení
Kolmé parní žehlení 1) Zavěste textilii, kterou chcete žehlit, na ramínko, které visí na povrchu odolném proti teplu. 2) Otočte regulátorem teploty 2 a nastavte tak požadovanou žehlicí teplotu. K vytvoření páry musí být regulátor teploty 2 nastaven minimálně v rozsahu nastavení... -
Page 107: Čištění A Údržba
Čištění a údržba VÝSTRAHA! ► Před čištěním vždy vytáhněte síťovou zástrčku ze zásuvky. ► Přístroj příp. nechte zcela vychladnout. ► Za žádných okolností přístroj při čištění neponořujte do vody. POZOR ► Při čištění zabraňte vniknutí vlhkosti do přístroje, aby nedošlo k jeho neo- pravitelnému poškození. -
Page 108: Čištění Přístroje
1) Vypněte přístroj tlačítkem zap/vyp t a nechte jej vychladnout. 2) Vytáhněte síťovou zástrčku ze zásuvky. 3) Odeberte žehličku ze základní stanice a odstavte ji stranou. 4) Otevřete šachtový poklop 7. POZOR Poškození přístroje! Do šachty na filtr proti vodnímu kameni nikdy nenalévejte vodu! 5) Vytáhněte filtr proti vodnímu kameni 8 směrem nahoru ze šachty na filtr proti vodnímu kameni. -
Page 109: Odstranění Závad
Odstranění závad Závada Možná příčina Odstranění Porucha v napájení napětím. Zkontrolujte, zda je síťová zástrčka správně zastrčena do zásuvky. Přístroj nefunguje. Přístroj není zapnutý. Zapněte přístroj tlačítkem zap/ vyp t. Nalijte do nádržky na vodu 0 Není dostatek vody v nádržce na vodu 0. -
Page 110: Skladování/Likvidace
Skladování/likvidace Skladování ■ Vyčistěte přístroj tak, jak je popsáno výše. Spojovací hadici 4 uprostřed spojte a zasuňte ji do prohloubeniny na přístroji: ■ ■ Naviňte síťový kabel a upevněte jej dodaným suchým zipem. ■ Přístroj uchovávejte na suchém a čistém místě. ... -
Page 111: Likvidace Přístroje
Likvidace přístroje V žádném případě nevyhazujte přístroj do normálního domovního odpadu. Tento výrobek podléhá evropské směrnici č. 2012/19/EU- WEEE (Waste Electrical and Electronic Equipment). Zlikvidujte přístroj prostřednictvím schváleného likvidačního podniku nebo vašeho komunálního sběrného dvora. Dodržujte aktuálně platné předpisy. V případě pochybností se informujte ve svém sběrném dvoře. Informace o možnostech likvidace vysloužilého výrobku Vám podá... -
Page 112: Záruka Společnosti Kompernass Handels Gmbh
Záruka společnosti Kompernass Handels GmbH Vážená zákaznice, vážený zákazníku, na tento přístroj získáváte záruku v trvání 3 let od data zakoupení. V případě závad tohoto výrobku máte zákonná práva vůči prodejci výrobku. Tato zákonná práva nejsou omezena naší níže uvedenou zárukou. Záruční... -
Page 113: Servis
Vyřízení v případě záruky Pro zajištění rychlého Vaší žádosti postupujte podle následujících pokynů: ■ Pro všechny dotazy mějte připraven pokladní lístek a číslo výrobku (IAN) 387993_2104 jako doklad o koupi. ■ Číslo výrobku naleznete na typovém štítku na výrobku, rytině na výrobku, na titulní... -
Page 114: Objednávání Náhradních Dílů
Objednávání náhradních dílů Náhradní díly k tomuto výrobku si můžete dodatečně objednat vždy pohodlně na internetu na adrese www.kompernass.com. Naskenujte QR kód pomocí chytrého telefonu / tabletu. Pomocí tohoto kódu QR se dostanete přímo na naši webovou stránku a můžete si prohlédnout a objednat dostupné... - Page 115 SDBS 2400 A1 ■ 112 │...
- Page 116 Spis treści Wstęp ..........114 Informacje o niniejszej instrukcji obsługi .
-
Page 117: Wstęp
Wstęp Informacje o niniejszej instrukcji obsługi Serdecznie gratulujemy zakupu nowego urządzenia. Wybrany produkt charakteryzuje się wysoką jakością. Instrukcja obsługi jest częścią składową produktu. Zawiera ona ważne informacje na temat bezpieczeń- stwa, użytkowania i utylizacji. Przed rozpoczęciem użytkowania produktu należy zapoznać się ze wszystkimi wskazówkami dotyczącymi obsługi i bezpieczeń- stwa. -
Page 118: Bezpieczeństwo
OSTRZEŻENIE Informacja o tym stopniu zagrożenia oznacza możliwą sytuację niebezpieczną. Zignorowanie tego ostrzeżenia może doprowadzić do powstania obrażeń. ► Należy przestrzegać instrukcji zawartych w tym ostrzeżeniu, by uniknąć obrażeń u osób. UWAGA Ostrzeżenie o tym stopniu zagrożenia oznacza możliwość powstania szkody materialnej. Nieuniknięcie niebezpiecznej sytuacji może doprowadzić do powstania szkód materialnych. - Page 119 To urządzenie może być używane przez dzieci od 8 roku ■ życia oraz przez osoby o zmniejszonych zdolnościach fizycznych, sensorycznych lub umysłowych lub też osoby nieposiadające odpowiedniego doświadczenia i/lub wiedzy, wyłącznie pod nadzorem lub po przeszkoleniu w zakresie bezpiecznego używania urządzenia oraz wyni- kających z niego zagrożeń.
- Page 120 NIEBEZPIECZEŃSTWO PORAŻENIA PRĄDEM ELEKTRYCZNYM! Podłączaj urządzenie tylko i wyłącznie do prawidłowo zain- ► stalowanego i uziemionego gniazda zasilania. Napięcie w sieci elektrycznej musi być zgodne z danymi podanymi na tabliczce znamionowej urządzenia. Wszystkie przewody połączeniowe lub urządzenia, które nie ► działają...
- Page 121 NIEBEZPIECZEŃSTWO PORAŻENIA PRĄDEM ELEKTRYCZNYM! Urządzenie należy chronić przed kroplami i rozpryskami ► wody. Na urządzeniu lub obok niego nie należy stawiać naczyń wypełnionych wodą, np. wazonów. Po zakończeniu prasowania i przed każdym czyszczeniem ► wyciągnij wtyk sieciowy z gniazda zasilania. Przed napełnieniem zbiornika na wodę...
-
Page 122: Dane Techniczne
UWAGA SZKODY MATERIALNE Nie wolno pozostawiać żelazka parowego bez nadzoru, ► gdy jest podłączone do sieci. Nie używać w urządzeniu gazowanej wody. ► Nigdy nie korzystać z urządzenia przy braku wody w zbior- ► niczku, ponieważ może to spowodować spalenie się pompki. Uważać... -
Page 123: Elementy Obsługowe
Elementy obsługowe (ilustracje - patrz rozkładana okładka) Rysunek A: 1 Przycisk uderzenia pary 2 Regulator temperatury 3 Lampka kontrolna nagrzewania 4 Wąż połączeniowy 5 Powierzchnia odstawcza 6 Stopa żelazka Rysunek B: 7 Osłona kanału 8 Filtr przeciwkamieniowy 9 Pokrywka zbiornika na wodę 0 Zbiornik na wodę... -
Page 124: Ustawianie I Podłączanie
Ustawianie i podłączanie Zakres dostawy i przegląd po rozpakowaniu Urządzenie dostarczane jest standardowo z następującymi elementami: ● Żelazko ze stacją parową ● Taśma na rzep do mocowania kabla zasilającego ● Instrukcja obsługi WSKAZÓWKA ► Należy sprawdzić kompletność dostawy i obecność widocznych uszko- dzeń. -
Page 125: Obsługa I Eksploatacja
Obsługa i eksploatacja W niniejszym rozdziale podano ważne wskazówki dotyczące obsługi i użytko- wania urządzenia. Przed pierwszym użyciem Wyczyść stopę żelazka 6 lekko zwilżoną szmatką. ♦ ♦ Aby usunąć wszelkie pozostałości z produkcji, przeprasuj kilka razy starą, czystą szmatkę. Napełnianie zbiornika na wodę WSKAZÓWKA Używaj tylko wody z kranu lub wody destylowanej. -
Page 126: Prasowanie Bez Pary
WSKAZÓWKA Przy pełnym zbiorniku na wodę 0 nie wolno przechylać ani kołysać ► stacji dokującej. W przeciwnym razie może dojść do wydostania się wody z otworu do napełniania. 5) Włóż wtyk sieciowy do gniazda zasilania. Prasowanie bez pary UWAGA! SZKODY MATERIALNE! ►... -
Page 127: Prasowanie Z Parą
4) Po prasowaniu odstaw żelazko na powierzchnię odstawczą 5 stacji doku- jącej. Ustaw regulator temperatury 2 na „min“. 5) Naciśnij przycisk wł./wył. t, aby wyłączyć urządzenie. Wbudowana w przycisku wł./wył. t lampka kontrolna oraz lampka kontrolna pary „max“ w zgasną. 6) Wyciągnij wtyk sieciowy z gniazda zasilania. -
Page 128: Prasowanie Pionowe
Prasowanie pionowe 1) Zawieś przeznaczoną do wyprasowania tkaninę na wieszaku, który powie- szony jest na odpornej na działanie wysokich temperatur powierzchni. 2) Obróć regulator temperatury 2 i ustaw w ten sposób żądaną temperaturę prasowania. Aby wytworzyć parę, regulator temperatury 2 musi być usta- wiony przynajmniej w zakresie ustawień... -
Page 129: Czyszczenie I Konserwacja
Czyszczenie i konserwacja OSTRZEŻENIE! ► Przed rozpoczęciem czyszczenia wyciągnij wtyczkę z gniazda sieciowego. ► Zanim przystąpisz do czyszczenia urządzenia odczekaj, aż ostygnie. ► Podczas czyszczenia nie zanurzaj urządzenia pod żadnym pozorem w wodzie. UWAGA ► Podczas czyszczenia zwróć uwagę, aby do wnętrza urządzenia nie prze- dostała się... -
Page 130: Czyszczenie Urządzenia
1) Wyłącz urządzenie przyciskiem wł./wył. t i pozostaw je do ostygnięcia. 2) Wyciągnij wtyk sieciowy z gniazda zasilania. 3) Zdejmij żelazko ze stacji dokującej i odstaw je na bok. 4) Otwórz pokrywkę kanału 7. UWAGA Uszkodzenie urządzenia! Nigdy nie wlewaj wody do kanału filtra przeciwkamieniowego! 5) Wyciągnij filtr przeciwkamieniowy 8 do góry z kanału filtra przeciwkamie- niowego. -
Page 131: Usuwanie Usterek
Usuwanie usterek Usterka Możliwa przyczyna Sposób usunięcia Błąd w napięciu zasilania. Sprawdź, czy wtyk sieciowy jest dobrze włożony do gniazda Urządzenie nie zasilania. działa. Urządzenie nie jest włączone. Wyłącz urządzenie przyciskiem wł./wył. t. Nie ma wystarczającej ilości Nalej wody do zbiornika na wody w zbiorniku na wodę... -
Page 132: Przechowywanie/Utylizacja
Przechowywanie/utylizacja Przechowywanie ■ Czyść urządzenie w sposób opisany powyżej. Umieścić wąż połączeniowy 4 w środku i wsuń go do wnęki na urządzeniu: ■ ■ Zwiń kabel zasilający na spodzie urządzenia i zamocuj go za pomocą taśmy na rzep. ■ Urządzenie przechowywać w suchym i czystym miejscu. │... -
Page 133: Utylizacja Urządzenia
Utylizacja urządzenia W żadnym przypadku nie wyrzucaj urządzenia do zwykłych śmieci domowych. Ten produkt podlega przepisom dyrektywy europejskiej 2012/19/EU w sprawie zużytego sprzętu elektrycz- nego i elektronicznego (WEEE). Zużyte urządzenie należy oddać do certyfikowanego zakładu utylizacji odpa- dów lub do komunalnego zakładu oczyszczania. Należy przestrzegać aktualnie obowiązujących przepisów. -
Page 134: Gwarancja Kompernaß Handels Gmbh
Gwarancja Kompernaß Handels GmbH Szanowny Kliencie, To urządzenie objęte jest 3-letnią gwarancją, licząc od daty zakupu. W przy- padku wad tego produktu, masz gwarantowane ustawowo prawa w stosunku sprzedawcy. Te ustawowe prawa nie są ograniczone przez nasze opisane poniżej warunki gwarancji. Warunki gwarancji Okres gwarancji rozpoczyna się... -
Page 135: Serwis
Realizacja zobowiązań gwarancyjnych W celu zapewnienia szybkiego załatwienia sprawy, postępuj zgodnie z poniż- szymi wskazówkami: ■ W przypadku wszelkich pytań przygotuj paragon fiskalny oraz numer artykułu (IAN) 387993_2104 jako dowód zakupu. ■ Numer artykułu można znaleźć na tabliczce znamionowej na produkcie, wy- grawerowany na urządzeniu, zapisany na stronie tytułowej instrukcji obsługi (w dolnym lewym rogu) lub na naklejce z tyłu bądź... -
Page 136: Zamawianie Części Zamiennych
Zamawianie części zamiennych Części zapasowe dla tego produktu można zamawiać przez cały czas w Inter- necie na stronie www.kompernass.com. Zeskanuj kod QR za pomocą swojego smartfonu/tabletu. Za pomocą tego kodu QR możesz przejść bezpośrednio do naszej strony internetowej i przeglądać oraz zamawiać dostępne części zamienne. - Page 137 SDBS 2400 A1 ■ 134 │...
- Page 138 Obsah Úvod ..........136 Informácie o tomto návode na obsluhu .
-
Page 139: Úvod
Úvod Informácie o tomto návode na obsluhu Srdečne vám gratulujeme ku kúpe vášho nového prístroja. Touto kúpou ste sa rozhodli pre výrobok vysokej kvality. Návod na obsluhu je súčasťou tohto výrobku. Obsahuje dôležité upozornenia týkajúce sa bezpeč- nosti, používania a likvidácie. Pred použitím výrobku sa oboznámte so všetkými pokynmi na obsluhu a bezpečnostnými pokynmi. -
Page 140: Bezpečnosť
VÝSTRAHA Výstražné upozornenie tohto stupňa nebezpečenstva označuje možnú nebezpečnú situáciu. Ak sa tejto nebezpečnej situácii nezabráni, môže to mať za následok zranenia. ► Aby sa zabránilo zraneniam osôb, musia sa dodržiavať pokyny uvedené v tomto výstražnom upozornení. POZOR Výstražné upozornenie tohto stupňa nebezpečenstva označuje možné... - Page 141 Tento prístroj môžu používať deti staršie ako 8 rokov a osoby ■ so zníženými fyzickými, senzorickými alebo mentálnymi schopnosťami, príp. s nedostatkom skúseností a/alebo vedomostí, keď sú pod dohľadom alebo boli poučené o bezpečnom používaní prístroja a pochopili z toho vyplý- vajúce nebezpečenstvá.
- Page 142 NEBEZPEČENSTVO ZÁSAHU ELEKTRICKÝM PRÚDOM! Prístroj zapojte iba do takej sieťovej zásuvky, ktorá je nain- ► štalovaná a uzemnená podľa predpisov. Sieťové napätie musí súhlasiť s údajmi uvedenými na typovom štítku prístroja. Pripojovacie káble alebo prístroje, ktoré sa poškodili alebo ► nefungujú bezchybne, nechajte okamžite opraviť alebo vymeniť...
- Page 143 NEBEZPEČENSTVO ZÁSAHU ELEKTRICKÝM PRÚDOM! Chráňte prístroj pred vniknutím kvapkajúcej a striekajúcej ► vody. Neklaďte na prístroj alebo vedľa neho žiadne pred- mety naplnené tekutinami (napr. vázy na kvety). Po žehlení a pred každým čistením vytiahnite sieťovú zástrčku ► zo sieťovej zásuvky. Skôr než...
-
Page 144: Technické Údaje
POZOR: MATERIÁLNE ŠKODY Naparovaciu žehličku nesmiete nechať bez dozoru, pokiaľ ► je pripojená do elektrickej siete. Do prístroja nedávajte perlivú vodu. ► Prístroj nikdy nepoužívajte bez vody, lebo by sa mohlo ► prepáliť čerpadlo. Dávajte pozor, aby sa sieťový kábel ani spojovacia hadica ►... -
Page 145: Ovládacie Prvky
Ovládacie prvky (obrázky sú na roztváracej strane) Obrázok A: 1 tlačidlo pary 2 regulátor teploty 3 kontrolka zohrievania 4 spojovacia hadica 5 odkladacia plocha 6 žehliaca plocha Obrázok B: 7 kryt 8 filter vodného kameňa 9 kryt nádržky na vodu 0 nádržka na vodu Obrázok C: q kontrolka pary „eco“... -
Page 146: Umiestnenie A Pripojenie
Umiestnenie a pripojenie Rozsah dodávky a kontrola po preprave Prístroj sa štandardne dodáva s nasledujúcimi komponentmi: ● parná stanica ● upínacia páska na zaistenie sieťového kábla ● návod na obsluhu UPOZORNENIE ► Skontrolujte kompletnosť dodávky a viditeľné poškodenia. ► V prípade nekompletnej dodávky alebo poškodení spôsobených nedosta- točným balením alebo prepravou sa obráťte na zákaznícku linku servisu (pozri kapitolu Servis). -
Page 147: Obsluha A Prevádzka
Obsluha a prevádzka V tejto kapitole sú uvedené dôležité informácie o obsluhe a prevádzke prístroja. Pred prvým použitím Žehliacu plochu 6 očistite vlhkou handričkou. ♦ ♦ Niekoľkokrát prejdite žehličkou po starej čistej handre, aby sa odstránili prípadné zvyšky z výroby. Naplnenie nádržky na vodu UPOZORNENIE Použite iba vodu z vodovodu alebo destilovanú... -
Page 148: Žehlenie Bez Pary
Žehlenie bez pary POZOR! VECNÉ ŠKODY! ► Na pokynoch pre ošetrovanie na štítkoch na oblečení skontrolujte, či a pri akej teplote je vhodné odev žehliť. ► Ak pokyny na ošetrovanie na oblečení zakazujú žehlenie ( ), nesmiete odev žehliť. V opačnom prípade by ste mohli odev poškodiť. UPOZORNENIE Pred zapnutím prístroja vždy nastavte regulátor teploty 2 na najnižší... -
Page 149: Žehlenie S Naparovaním
Žehlenie s naparovaním 1) Prístroj zapnete stlačením tlačidla Zap/Vyp t. Rozsvieti sa kontrolka zabu- dovaná do tlačidla Zap/Vyp t a začne blikať kontrolka pary „max“ w. 2) Otočte regulátor teploty 2 a nastavte požadovanú teplotu žehlenia. Na vytvorenie pary nastavte regulátor teploty 2 minimálne na rozsah 3) Počas zohrievania svieti kontrolka zohrievania 3. -
Page 150: Zvislé Žehlenie S Naparovaním
Zvislé žehlenie s naparovaním 1) Žehlený odev zaveste na ramienko, ktoré bude visieť na ploche odolnej proti vysokým teplotám. 2) Otočte regulátor teploty 2 a nastavte požadovanú teplotu žehlenia. Na vytvorenie pary nastavte regulátor teploty 2 minimálne na rozsah 3) Počkajte, kým kontrolka zohrievania 3 zhasne. 4) Stlačte tlačidlo intenzity pary z a nastavte želanú... -
Page 151: Čistenie A Údržba
Čistenie a údržba VÝSTRAHA! ► Pred čistením vždy vytiahnite sieťovú zástrčku zo sieťovej zásuvky. ► Prístroj nechajte najprv úplne vychladnúť. ► Pri čistení v žiadnom prípade neponárajte prístroj do vody. POZOR ► Zabezpečte, aby sa pri čistení nedostala do prístroja žiadna vlhkosť, aby sa tak zabránilo jeho neopraviteľnému poškodeniu. -
Page 152: Čistenie Prístroja
1) Vypnite prístroj tlačidlom Zap/Vyp t a nechajte ho vychladnúť. 2) Vytiahnite sieťovú zástrčku zo sieťovej zásuvky. 3) Vyberte žehličku zo základnej stanice a odložte ju nabok. 4) Otvorte kryt 7. POZOR Poškodenie prístroja! Do otvoru na filter vodného kameňa nikdy nelejte vodu! 5) Vytiahnite filter vodného kameňa 8 z otvoru na filter nahor. -
Page 153: Odstraňovanie Porúch
Odstraňovanie porúch Chyba Možná príčina Odstránenie Chyba v napájacom napätí. Skontrolujte, či je sieťová zástrčka dobre zastrčená do sieťovej zásuvky. Prístroj nefunguje. Prístroj nie je zapnutý. Prístroj zapnite tlačidlom Zap/Vyp t. V nádržke na vodu 0 nie je Do nádržky na vodu 0 nalejte dostatočné... -
Page 154: Skladovanie A Likvidácia
Skladovanie a likvidácia Skladovanie ■ Prístroj vyčistite podľa uvedeného postupu. Spojovaciu hadicu 4 uprostred spojte a zasuňte ju do výčnelku na prístroji: ■ ■ Oviňte sieťový kábel a zafixujte ho dodanou upínacou páskou. ■ Prístroj skladujte na suchom a čistom mieste. │... -
Page 155: Likvidácia Prístroja
Likvidácia prístroja Prístroj v žiadnom prípade nevyhadzujte do bežného komunál- neho odpadu. Na tento výrobok sa vzťahuje európska smernica č. 2012/19/EU-WEEE o odpade z elektrických a elektronických zariadení (Waste Electrical and Electronic Equipment). Prístroj zlikvidujte v autorizovanej prevádzke na likvidáciu odpadov alebo vo vašom miestnom zbernom dvore na likvidáciu odpadov. -
Page 156: Záruka Spoločnosti Kompernass Handels Gmbh
Záruka spoločnosti Kompernass Handels GmbH Vážená zákazníčka, vážený zákazník, na tento prístroj máte záruku 3 roky od dátumu zakúpenia. V prípade nedo- statkov tohto výrobku máte práva vyplývajúce zo zákona voči predajcovi tohto výrobku. Tieto Vaše práva vyplývajúce zo zákona nie sú obmedzené našou zárukou, uvedenou nižšie. -
Page 157: Servis
Vybavenie v prípade záruky Na zaručenie rýchleho vybavenia Vašej žiadosti postupujte podľa nasledujúcich pokynov: ■ Na všetky otázky majte pripravený pokladničný doklad a číslo výrobku (IAN) 387993_2104 ako doklad o nákupe. ■ Číslo výrobku nájdete na typovom štítku na výrobku, na gravúre na výrobku, na titulnej stránke návodu na obsluhu (dole vľavo) alebo ako nálepku na zadnej alebo spodnej strane výrobku. -
Page 158: Objednávanie Náhradných Dielov
Objednávanie náhradných dielov Náhradné diely pre tento produkt si môžete trvalo pohodlne doobjednať na internete na www.kompernass.com. Naskenujte QR kód pomocou vášho smartfónu/tabletu. Pomocou tohto QR kódu sa dostanete priamo na našu webovú stránku a môžete si prezrieť a objednať dostupné náhradné... - Page 159 SDBS 2400 A1 ■ 156 │ ...
- Page 160 Índice Introducción ..........158 Información sobre estas instrucciones de uso .
-
Page 161: Introducción
Introducción Información sobre estas instrucciones de uso Felicidades por la compra de su aparato nuevo. Ha adquirido un producto de alta calidad. Las instrucciones de uso forman parte del producto y contienen indicaciones importantes acerca de la seguridad, el uso y el desecho de este aparato. Antes de usar el producto, familiarícese con todas las indicaciones de manejo y de seguridad. -
Page 162: Seguridad
ADVERTENCIA Una advertencia de este nivel de peligro indica una posible situación de peligro. Si no se evita la situación de peligro, pueden producirse lesiones. ► Deben cumplirse las instrucciones de esta advertencia para evitar lesiones personales. ATENCIÓN Una advertencia de este nivel de peligro indica un posible daño material. - Page 163 Este aparato puede ser utilizado por niños a partir de ■ 8 años y por personas cuyas facultades físicas, sensoriales o mentales sean reducidas o carezcan de los conocimientos y de la experiencia necesaria siempre que sean vigilados o hayan sido instruidos correctamente sobre el uso seguro del aparato y hayan comprendido los peligros que entraña.
- Page 164 ¡PELIGRO DE DESCARGA ELÉCTRICA! Conecte el aparato exclusivamente a una base de enchufe ► instalada y conectada a tierra de acuerdo con la normativa. La tensión de red debe coincidir con los datos de la placa de características del aparato. Encomiende al servicio de asistencia técnica la reparación ►...
- Page 165 ¡PELIGRO DE DESCARGA ELÉCTRICA! Proteja el aparato contra el goteo y las salpicaduras de ► agua. En consecuencia, no coloque ningún recipiente que contenga líquido (p. ej., un jarrón) encima del aparato o en sus inmediaciones. Desconecte la clavija de red de la base de enchufe tras ►...
-
Page 166: Características Técnicas
ATENCIÓN: DAÑOS MATERIALES La plancha de vapor no debe dejarse nunca sin vigilancia ► mientras esté conectada a la red eléctrica. No utilice agua con gas en el aparato. ► No utilice nunca el aparato sin agua, ya que, de lo contrario, ►... -
Page 167: Elementos De Mando
Elementos de mando (Consulte las ilustraciones de la página desplegable) Figura A: 1 Botón del vapor 2 Regulador de temperatura 3 Piloto de control del calentamiento 4 Conducto de conexión 5 Superficie de apoyo 6 Suela Figura B: 7 Tapa 8 Filtro antical 9 Cierre del depósito de agua 0 Depósito de agua... -
Page 168: Colocación Y Conexión
Colocación y conexión Volumen de suministro e inspección de transporte El aparato se suministra de serie con los siguientes componentes: ● Centro de planchado de vapor ● Tira de velcro para la fijación del cable de red ● Instrucciones de uso INDICACIÓN ►... -
Page 169: Manejo Y Funcionamiento
Manejo y funcionamiento En este capítulo, se proporcionan indicaciones importantes sobre el manejo y funcionamiento del aparato. Antes del primer uso Limpie la suela 6 con un paño ligeramente húmedo. ♦ ♦ Para eliminar cualquier resto de fabricación, planche varias veces un paño viejo y limpio. -
Page 170: Planchado Sin Vapor
INDICACIÓN ► Compruebe en las indicaciones de cuidado de las etiquetas de las pren- das de ropa si estas admiten el planchado y a qué temperatura. No incline ni oscile la estación de vapor con el depósito de agua 0 lleno. ►... -
Page 171: Planchado Con Vapor
4) Después del planchado, coloque la plancha sobre la superficie de apoyo 5 de la estación de base. Ajuste el regulador de temperatura 2 en "min". 5) Pulse el botón de encendido/apagado t para apagar el aparato. A continuación, el piloto de control integrado en el interruptor de encendi- do/apagado t y el piloto de control del vapor "max"... -
Page 172: Planchado Vertical Con Vapor
Planchado vertical con vapor 1) Cuelgue el tejido que desee planchar en una percha y cuélguela de una superficie termorresistente. 2) Gire el regulador de temperatura 2 y ajuste la temperatura deseada. Para generar vapor, debe ajustarse el regulador de temperatura 2 como mínimo en el rango de ajuste 3) Espere a que el piloto de control del calentamiento 3 se apague. -
Page 173: Limpieza Y Mantenimiento
Limpieza y mantenimiento ¡ADVERTENCIA! ► Antes de proceder a la limpieza, desenchufe siempre la clavija de red de la base de enchufe. ► En caso necesario, deje que el aparato se enfríe completamente. ► No sumerja nunca el aparato en agua para la limpieza. ATENCIÓN ►... -
Page 174: Limpieza Del Aparato
1) Apague el aparato con el botón de encendido/apagado t y deje que se enfríe. 2) Extraiga la clavija de red de la base de enchufe. 3) Retire la plancha de la estación de base y déjela a un lado. 4) Abra la tapa 7. -
Page 175: Eliminación De Fallos
Eliminación de fallos Fallo Posible causa Solución Fallo en la alimentación de Compruebe si la clavija de red tensión. está bien conectada en la base El aparato no de enchufe. funciona. El aparato no está encendido. Encienda el aparato con el botón de encendido/apagado t. -
Page 176: Almacenamiento/Desecho
Almacenamiento/desecho Almacenamiento ■ Limpie el aparato de la manera descrita. Pliegue el conducto de conexión 4 por el centro e insértelo en el alojamiento ■ del aparato: ■ Enrolle el cable de red y fíjelo con la tira de velcro suministrada. ■... -
Page 177: Desecho Del Aparato
Desecho del aparato No deseche nunca el aparato con la basura doméstica. Este producto está sujeto a la Directiva europea 2012/19/EU-RAEE (residuos de aparatos eléctricos y electrónicos). Deseche el aparato en un centro de residuos autorizado o a través de las instalaciones municipales de desecho de residuos. -
Page 178: Garantía De Kompernass Handels Gmbh
Garantía de Kompernass Handels GmbH Estimado cliente: Este aparato cuenta con una garantía de 3 años a partir de la fecha de compra. Si se detectan defectos en el producto, puede ejercer sus derechos legales frente al vendedor. Estos derechos legales no se ven limitados por la garantía descrita a continuación. -
Page 179: Asistencia Técnica
Proceso de reclamación conforme a la garantía Para garantizar una tramitación rápida de su reclamación, le rogamos que observe las siguientes indicaciones: ■ Mantenga siempre a mano el comprobante de caja y el número de artículo (IAN) 387993_2104 como justificante de compra. ■... -
Page 180: Pedido De Recambios
Pedido de recambios Puede pedir recambios para este producto cómodamente por Internet en www.kompernass.com de forma permanente. Escanee el código QR con su smartphone/tableta. Con este código QR, podrá acceder directamente a nuestra página web, ver los recambios disponibles y solicitarlos. - Page 181 SDBS 2400 A1 ■ 178 │...
- Page 182 Indholdsfortegnelse Introduktion ..........180 Informationer om denne betjeningsvejledning .
-
Page 183: Introduktion
Introduktion Informationer om denne betjeningsvejledning Tillykke med købet af dit nye produkt. Du har valgt et produkt af høj kvalitet. Betjeningsvejledningen er en del af dette produkt. Den indeholder vigtige informationer om sikkerhed, anvendelse og bortskaffelse. Du bør sætte dig ind i alle produktets betjenings- og sikkerheds- anvisninger før brug. -
Page 184: Sikkerhed
ADVARSEL En advarsel på dette faretrin angiver en potentielt farlig situation. Hvis den farlige situation ikke undgås, kan det føre til personskader. ► Følg anvisningerne i denne advarsel for at undgå, at personer kommer til skade. En advarsel på dette faretrin angiver en mulig materiel skade. Hvis situationen ikke undgås, kan det føre til materielle skader. - Page 185 Dette produkt kan bruges af børn fra 8 år og opefter og ■ af personer med nedsatte fysiske, sensoriske eller mentale evner eller mangel på erfaring og/eller viden, hvis de er under opsyn eller undervises i sikker brug af produktet og har forstået de farer, der kan være forbundet med det.
- Page 186 FARE PÅ GRUND AF ELEKTRISK STØD! Tilslut kun produktet til en forskriftsmæssigt installeret og ► jordet stikkontakt. Lysnettets spænding skal stemme overens med oplysningerne på produktets typeskilt. Få omgående tilslutningsledninger eller produkter, som ikke ► fungerer korrekt, eller som er blevet beskadiget, repareret eller udskiftet af kundeservicen.
- Page 187 FARE PÅ GRUND AF ELEKTRISK STØD! Beskyt produktet mod dryp- og stænkvand. Stil derfor ikke ► genstande, som er fyldt med vand (f.eks. blomstervaser) på eller ved siden af produktet. Efter endt strygning og før enhver rengøring skal stikket ► trækkes ud af stikkontakten.
-
Page 188: Tekniske Data
OBS – MATERIELLE SKADER Dampstrygejernet må ikke være uden opsyn, mens det er ► sluttet til nettet. Brug ikke kulsyreholdigt vand i produktet. ► Anvend aldrig produktet uden vand, da det kan føre til, at ► pumpen brænder sammen. Sørg for at hverken ledningen eller forbindelsesslangen ►... -
Page 189: Betjeningselementer
Betjeningselementer (Se billederne på klap-ud-siden) Figur A: 1 Dampknap 2 Termostat 3 Kontrollampe for opvarmning 4 Forbindelsesslange 5 Frastillingsflade 6 Strygesål Figur B: 7 Skaktafdækning 8 Kalkfilter 9 Låg til vandbeholder 0 Vandbeholder Figur C: q Dampkontrollampe "eco" w Dampkontrollampe "max" e Kontrollampe r "Reset"-knap t Tænd-/sluk-knap... -
Page 190: Opstilling Og Tilslutning
Opstilling og tilslutning Pakkens indhold og transporteftersyn Produktet leveres som standard med følgende dele: ● Strygejern med dampstation ● Burrebånd til fiksering af strømledning ● Betjeningsvejledning BEMÆRK ► Kontrollér, at alle dele er leveret med, og at de ikke har synlige skader. ►... -
Page 191: Betjening Og Funktion
Betjening og funktion Dette kapitel indeholder vigtige oplysninger om betjening og brug af produktet. Før produktet bruges første gang Rengør strygesålen 6 med en let fugtet klud. ♦ ♦ Eventuelle produktionsrester kan fjernes ved at stryge nogle gange over en gammel, ren klud. -
Page 192: Strygning Uden Damp
Strygning uden damp OBS! MATERIELLE SKADER! ► Følg anvisningerne på mærkerne i tøjet, så du ved, hvilken temperaturind- stilling tøjet skal stryges ved. ► Stryg ikke tøjet, hvis det er angivet på det , at det ikke må stryges. Ellers kan tøjet blive ødelagt. BEMÆRK Indstil altid termostaten 2 på... -
Page 193: Dampstrygning
Dampstrygning 1) Tryk på tænd-/sluk-knappen t for at tænde for produktet. Kontrollampen, som er integreret i tænd-/sluk-knappen t, lyser, og dampkontrollampen "max" w blinker. 2) Drej termostaten 2, og indstil den ønskede strygetemperatur. For at produ- cere damp skal termostaten 2 mindst stilles i indstillingsintervallet 3) Opvarmningskontrollampen 3 lyser under opvarmningen. -
Page 194: Lodret Dampstrygning
Lodret dampstrygning 1) Hæng det tøj, som skal stryges, på en bøjle, der hænger på en varmebestandig overflade. 2) Drej termostaten 2, og indstil den ønskede strygetemperatur. For at produ- cere damp skal termostaten 2 mindst stilles i indstillingsintervallet 3) Vent til opvarmningskontrollampen 3 slukker. 4) Tryk på... -
Page 195: Rengøring Og Vedligeholdelse
Rengøring og vedligeholdelse ADVARSEL! ► Tag altid stikket ud af stikkontakten før rengøring. ► Lad evt. først produktet køle helt af. ► Læg aldrig produktet ned i vand eller andre væsker for at rengøre det. ► Sørg for, at der ikke trænger fugt ind i produktet ved rengøring, så du undgår permanente skader. -
Page 196: Rengøring Af Produktet
1) Sluk for produktet med tænd-/sluk-knappen t og lad det køle af. 2) Tag stikket ud af stikkontakten. 3) Tag strygejernet af basestationen og sæt det til side. 4) Åbn skaktafdækningen 7. Skader på produktet! Hæld aldrig vand i kalkfilterskakten! 5) Tag kalkfiltret 8 ud af kalkfilterskakten oppefra. -
Page 197: Afhjælpning Af Fejl
Afhjælpning af fejl Fejl Mulig årsag Afhjælpning Fejl i spændingsforsyningen. Kontrollér om stikket sidder korrekt i stikkontakten. Produktet fungerer ikke. Produktet er ikke tændt. Tænd for produktet med tænd-/ sluk-knappen t. Hæld vand i vandbeholderen 0. Der er ikke vand nok i vandbe- holderen 0. -
Page 198: Opbevaring/Bortskaffelse
Opbevaring/bortskaffelse Opbevaring ■ Rengør produktet som ovenfor beskrevet. Læg forbindelsesslangen 4 sammen på midten, og sæt den ind i fordybnin- ■ gen på produktet: ■ Vikl strømledningen op, og fastgør det med det medfølgende burrebånd. ■ Opbevar produktet på et tørt og rent sted. │... -
Page 199: Bortskaffelse Af Produktet
Bortskaffelse af produktet Bortskaf ikke produktet sammen med det almindelige hushold- ningsaffald. Dette produkt er underlagt det europæiske direktiv 2012/19/EU-WEEE (Waste Electrical and Electronic Equipment). Bortskaf produktet via en godkendt bortskaffelsesvirksomhed eller den kommuna- le genbrugsstation. Følg de aktuelt gældende regler. Henvend dig i tvivlstilfælde til den lokale genbrugsplads. -
Page 200: Garanti For Kompernass Handels Gmbh
Garanti for Kompernass Handels GmbH Kære kunde På dette produkt får du 3 års garanti fra købsdatoen. I tilfælde af mangler ved produktet har du en række juridiske rettigheder i forhold til sælgeren af produktet. Dine juridiske rettigheder forringes ikke af den nedenfor anførte garanti. Garantibetingelser Garantiperioden begynder på... -
Page 201: Service
Afvikling af garantisager For at sikre en hurtig behandling af din anmeldelse bør du følge nedenstående anvisninger: ■ Ved alle forespørgsler bedes du have kvitteringen og artikelnummeret (IAN) 387993_2104 klar som dokumentation for købet. ■ Artikelnummeret kan du finde på typeskiltet på produktet, som indgravering på... -
Page 202: Bestilling Af Reservedele
Bestilling af reservedele Du kan altid bestille reservedele til dette produkt på internettet på www.kompernass.com. Scan QR-koden med din smartphone/tablet. Med denne QR-kode kommer du direkte til vores webside og kan se og bestille de tilgængelige reservedele. BEMÆRK ► Hvis du har problemer med online-bestillingen, kan du henvende dig telefonisk eller pr. - Page 203 SDBS 2400 A1 ■ 200 │ ...
- Page 204 KOMPERNASS HANDELS GMBH BURGSTRASSE 21 44867 BOCHUM GERMANY www.kompernass.com Last Information Update · Stand der Informationen · Version des informations · Stand van de informatie Stav informací · Stan informacji · Stav informácií · Estado de las informaciones · Tilstand af information: 07 / 2021 ·...
Need help?
Do you have a question about the 387993 2104 and is the answer not in the manual?
Questions and answers