Epson Pro Cinema LS10500 - Home Theater Projector Quick Setup Guide
- Quick setup (4 pages) ,
- User manual (197 pages)
Advertisement
Choose a location

Keep the projector level and place it at a height so its lens is even with the top or bottom of the screen and is centered horizontally. If this isn't possible, use the lens shift feature or the keystone correction button on the projector to reposition the image (see "Adjust the image").
To view 3D images correctly, RF 3D glasses must be worn within 32 feet (10 m) of the projector. Use the image to determine the viewing distance for 3D projection (the shading represents the 3D viewing area):
For more information on where to place your projector, see the online User's Guide.
Connect the projector
Follow the steps below to connect a video device. For additional connection types, see the online User's Guide.
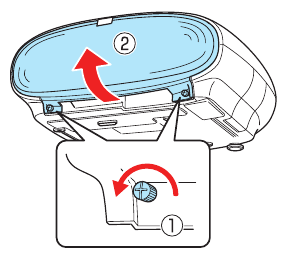
- Loosen the two screws at the bottom of the cable cover, then pull the cover forward.
![]()
- Remove the cable cover from the grooves at the top of the projector.

- Connect multiple video devices and use the Source buttons on the remote control or the Source button on the projector to switch between them.


Turn on your equipment
- Turn on your video source.
- Plug in the projector.

- Press the
![]() power button on the projector or the On button on the remote control. The shutter opens and the power light flashes blue, then stays on.
power button on the projector or the On button on the remote control. The shutter opens and the power light flashes blue, then stays on.

Note: To shut down the projector, press the![]() power button on the projector or the Standby button on the remote control.
power button on the projector or the Standby button on the remote control. - The default language of the menu system is English. To select another language, press the Menu button on the projector or remote control. Select Settings and press Enter. Select Language and press Enter. Select your language and press Enter. Press the Menu button to exit. Using the remote control

 power button on the projector or the On button on the remote control. The shutter opens and the power light flashes blue, then stays on.
Using the remote control
Install two AA batteries as shown.

For more information on using the remote control, see the online User's Guide.
Adjust the image
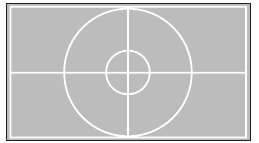
- Press the Pattern button on the remote control to display a test pattern.
![]()
- To raise the image or correct a tilted image, adjust the front feet as shown below.

- Press the Lens button on the remote control and use the
![]() and
and ![]() buttons to focus the image.
buttons to focus the image.

- Press the Lens button on the remote control again
![]() and
and ![]() use the buttons to reduce or enlarge the image.
use the buttons to reduce or enlarge the image.

- Press the Lens button on the remote control again and use the
![]() ,
, ![]() ,
, ![]() and
and ![]() buttons to reposition the image.
buttons to reposition the image.

- If your image looks like
![]() or
or ![]() , you can use the
, you can use the ![]() button on the projector to correct this.
button on the projector to correct this.

Note: Using the keystone adjustment can affect the size and effective resolution of your image. If possible, change the position of your projector to eliminate the keystone effect and use the lens shift option to position the image as necessary. - Press the Esc button on the remote control to exit.

 and
and  buttons to focus the image.


 ,
,  ,
,  and
and  buttons to reposition the image.


Viewing 3D images
To view 3D content, you must first connect a 3D-compatible video device to one of the HDMI ports on your projector.
- Turn on and begin playback on the 3D-compatible video device.
Note: Make sure you set the video device to play content in 3D mode. - Press the 2D/3D button on the remote control, if necessary.
- Slide the power switch on your 3D glasses to the On position.


Note: If the glasses don't automatically display 3D content, you may need to pair them with the projector. Move the glasses within 10 feet (3 m) of the projector, then press and hold the Pairing button on the 3D glasses for at least 3 seconds. The status light on the glasses will alternately flash green and red, then remain green for 10 seconds if pairing is successful.

You can also automatically convert 2D HDMI content to 3D. To enable the 2D-to-3D Conversion option, press the Menu button on the projector or remote control. Select Signal and press Enter, then select 3D Setup and press Enter. Select 2D-to-3D Conversion and press Enter. Select the Weak, Medium, or Strong setting, then press Enter.
For more information on adjusting 3D images, see the online User's Guide.
Troubleshooting
If you see a blank screen or the No signal message after turning on your video device or computer, check the following:
- Make sure the power light on the projector is blue and not flashing.
- Press the Source button on the projector or one of the Source buttons on the remote control to switch to the correct image source, if necessary
- On some Windows® laptops, you may need to hold down the Fn key and press F7 or the function key that lets you display on an external monitor. It may be labeled CRT/LCD or have an icon such as
![]() .
. - On Windows 7 or later, hold down the Windows key and press P at the same time, then click Duplicate.
- On a Mac, open System Preferences and select Displays. Click the Arrangement tab and select the Mirror Displays checkbox.
If 3D images aren't displaying properly, check the following:
- Press the 2D/3D button to switch to 3D viewing mode, if necessary.
- Make sure that you are within the 3D viewing range. For more information, see "Choose a location" on the front of this sheet or the online User's Guide.
- Check that your 3D glasses are charged and have not entered standby mode. Slide the power switch on the 3D glasses to the Off position, then back to the On position.
- Press the Menu button on your remote control, select the Signal menu, select 3D Setup, and then select 3D Format. Make sure that the Auto option is selected.
- Check that your video device and media are both 3D-compatible. For more information, refer to the documentation that came with your video device.
Where to get help
Manual
For more information about using the projector, click the icon on your desktop to access the online User's Guide (requires an Internet connection). If you don't have a User's Guide icon, you can install it from the projector CD or go to your product's support page, as described below.
Telephone support services
To use the Epson PrivateLine® Support service, call (800) 637-7661. This service is available for the duration of your warranty period. You may also speak with a support specialist by calling (562) 276-4394 (U.S.) or (905) 709-3839 (Canada).
Support hours are 6 am to 8 pm, Pacific Time, Monday through Friday, and 7 am to 4 pm, Pacific Time, Saturday. Days and hours of support are subject to change without notice. Toll or long distance charges may apply.
Internet support
Visit www.epson.com/support (U.S.) or www.epson.ca/support (Canada) and search for your product for solutions to common problems. You can download utilities and documentation, get FAQs and troubleshooting advice, or e-mail Epson.
Registration
Register today to get product updates and exclusive offers. You can use the CD included with your projector or register online at www.epson.com/webreg.
Optional accessories
For a list of optional accessories, see the online User's Guide.
You can purchase additional RF 3D glasses (part number V12H548006) or other accessories from an Epson authorized reseller. To find the nearest reseller, call 800-GO-EPSON (800-463-7766). Or you can purchase online at www.epsonstore.com (U.S. sales) or www.epson.ca (Canadian sales).

Documents / Resources
References
Epson® Official Support
Epson® Official Support
![www.epson.com]() Epson Product Registration
Epson Product RegistrationBuy Direct from Epson | Epson US
Epson Canada | Homepage
Download manual
Here you can download full pdf version of manual, it may contain additional safety instructions, warranty information, FCC rules, etc.
Download Epson Pro Cinema LS10500 - Home Theater Projector Quick Setup Guide
Advertisement


Need help?
Do you have a question about the Pro Cinema LS10500 and is the answer not in the manual?
Questions and answers