
Related Manuals for Canarm PENTA-LITE 6LEC Series


Summary of Contents for Canarm PENTA-LITE 6LEC Series
- Page 1 HEXA-LITE FANS 6LEC SERIES Patent pending 10’-24’ Models INSTALLATION MANUAL Custom Designed Reduced Maintenance STOL Technology...
- Page 2 IMPORTANT READ AND SAVE THESE INSTRUCTIONS. A printable, electronic version is available online at www.canarm.com. WARNING/AVERTISSEMENT Improper installation, adjustment, alteration, service or maintenance can cause property damage, injury or death. Read and understand the installation, operating and maintenance instructions thoroughly before installing or servicing this equipment.
- Page 3 Children shall not play with the appliance. Cleaning and user maintenance shall not be made by children without supervision. Canarm Hexa-Lite 6LEC Series - 10’-24’ Models...
-
Page 4: Table Of Contents
150 lbs. (68 kg.) 6L24EC-[V][P] 24’ / 7.3M Fan 24” (610mm) 144” (3657mm) 17” (432mm) 180 lbs. (82 kg.) *[V] = 120, 230, or 460 Volts, [P] = 1 or 3 Phase. Sample Model Number: 6L10EC-4603 Canarm Hexa-Lite 6LEC Series - 10’-24' Models... - Page 5 Materials not included in the fan contents (e.g., Grade 5 hardware, etc.) are the responsibility of the installer. Notify your product representative or Canarm of any discrepancy or missing kit contents prior to installing unit.
-
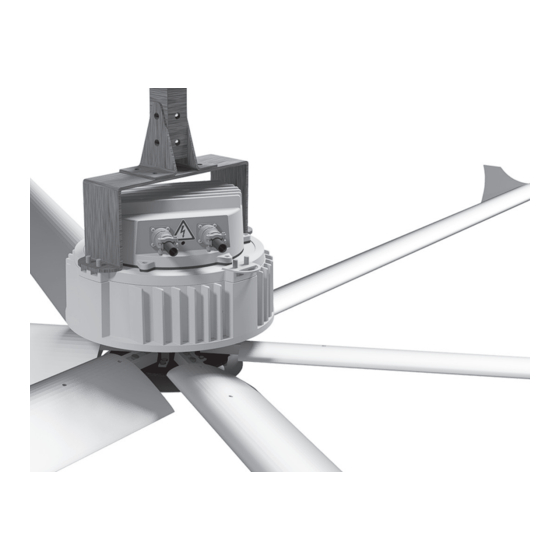
Page 6: Fan Diagram
Factory 230V/3Ph 230V/3Ph 230V/3Ph 230V/3Ph 230V/3Ph 230V/3Ph 230V/3Ph INPUT 460V/3Ph 460V/3Ph 460V/3Ph 460V/3Ph 460V/3Ph 460V/3Ph 460V/3Ph Model Number Ordering Format: SERIES-DIAMETER-BLADES-INPUT VOLTAGE-PHASE Sample Model Number: 6L10EC-4603 NOTE: 277V power source is not accepted. Canarm Hexa-Lite 6LEC Series - 10’-24' Models... -
Page 7: Important Information
When mounting a fan in an area where objects may be lifted or moved into the path of the fan, Canarm recommends marking or painting hash lines on the floor to alert personnel of the above movement of the fan. -
Page 8: Mounting Considerations
3.3 Safety Cable A Canarm fan should never be run without proper installation of Safety Cables. These are supplied with every fan. You must install safety cable for warranty to be in effect. -
Page 9: Preparing The Work Site
Canarm fans can be hung from an I-beam, angle irons, or unistrut. See installation instructions on the following page. Do not mount the fan to single purlins, trusses, or bar joists. Consult a structural engineer for installation methods not covered in the manual. -
Page 10: Mounting Method 1: I-Beam
état, et capable de supporter des charges de jusqu’à 650 lb (295 kg). Il est de la seule responsabilité du client de vérifier que la structure du bâtiment est suffisante pour l’installation du ventilateur. Canarm recommande de consulter un ingénieur en structure avant d’attiser installation. -
Page 11: Mounting Method 2: Angle Iron
.25”(.6cm) 3”(7.6cm) over 8’ (2.4m) - x 3”(7.6cm) 12’ (3.7m) x.25”(.6cm) *2 pairs of angle irons. Pairs should be placed back to back and fastened in center (see step 2). Height Thickness Width Canarm Hexa-Lite 6LEC Series - 10’-24’ Models... - Page 12 Align the angle irons to each other and tighten the bolts to 90 ft-lb (122 N-m) using a 3/4” socket with torque wrench. Proceed to step 6.4b. Grade 5 Hardware (customer supplied) a. (2) 1/2”-13 GR 5 Bolt b. (4) 1/2” Flat Washer c. (2) 1/2” Nylock Nut Canarm Hexa-Lite 6LEC Series - 10’-24' Models...
- Page 13 (4) 1/2”-13 GR 5 Bolt b. (8) 1/2” Flat Washer c. (4) 2-1/2” Square Washer (see diagram) d. (4) 1/2” Nylock Nut 2.5” (6.4 cm) 9/16” Dia. (1.4 cm) 2.5” (6.4 cm) Canarm Hexa-Lite 6LEC Series - 10’-24’ Models...
- Page 14 8e année, comme illustré. Proceed to step 6.5. Grade 5 Hardware (customer supplied): a. (4) 1/2”-13 GR 5 Bolt b. (8) 1/2” Flat Washer c. (4) 2-1/2” Square Washer (see diagram) d. (4) 1/2” Nylock Nut Canarm Hexa-Lite 6LEC Series - 10’-24' Models...
- Page 15 (4) 1/2”-13x2-1/2” GR 5 Bolt b. (8) 1/2” Flat Washer c. (4) 1/2”-13 Nylock Nut 11 1/4” (28.32cm) Upper Yoke Top View 5 1/2” 13 3/4” (34.9cm) x 8” (20.32cm) (13.97cm) Upper Yoke Side View Canarm Hexa-Lite 6LEC Series - 10’-24’ Models...
-
Page 16: Mounting Method 3: Purlins
MOUNTING METHOD 3: PURLINS NOTE: Purlin brackets and hardware are available from Canarm upon request and not included standard. 6.6 Selecting Proper Angle Irons Select the proper angle irons based on the requirements stated under section 6.1. 6.7 Pre-Drill Purlins Drill four 9/16”... - Page 17 Purlin Bracket Hardware (per set, supplied): a. (2) 1/4” Formed Steel Purlin Bracket b. (2) 1/4” Steel Purlin Backplate c. (16) 1/2”-13-1 3/4” GR 5 Bolt d. (16) 1/2” Nylock Nut e. (32) 1/2” Flat Washer Canarm Hexa-Lite 6LEC Series - 10’-24’ Models...
-
Page 18: Mounting Method 4: Upper Truss
Weight calculations must be done to select the proper size unistrut. Failure to do so may result in damages to the fan and building or even personal harm. Canarm is NOT liable for any damages or injury resulting from improper installation. - Page 19 8”x 9”x 1/4” Flat Steel Plates b. (2) 1/4” Steel C Channel Bars c. (8) 1/2” Threaded Rods d. (16) 1/2” Nylock Nuts e. (16) 1/2” Washers f. (2) Steel Safety Cables g. (4) 1/8” Wire Rope Clips Canarm Hexa-Lite 6LEC Series - 10’-24’ Models...
-
Page 20: Hanging The Fan
The safety cable is a critical safety feature of the fan and must be installed correctly. Le câble de sécurité est une caractéristique de sécurité essentielle de la soufflante qui doit être installé correctement. Cable End Detail Canarm Hexa-Lite 6LEC Series - 10’-24' Models... - Page 21 Tighten bolts to 90 ft. lbs. (122 N-m) using a 3/4” socket with torque wrench. Motor Chassis Hardware (supplied): a. (4) 1/2”-13x1-1/2” GR 5 Bolt b. (8) 1/2” Flat Washer c. (4) 1/2”-13 Nylock Nut Canarm Hexa-Lite 6LEC Series - 10’-24’ Models...
-
Page 22: Installing Guy Wires/Gripple
1. Slide the gripple fastener (as supplied) over the opposite end of the wire. 2. Feed the end of the guy wire through the guy wire loop on the fan motor and then through the gripple, removing any slack from the cable. Canarm Hexa-Lite 6LEC Series - 10’-24' Models... - Page 23 Eye Hook (Ceiling) Gripple Hook Tab (Motor) a Beam Clamp a Gripple Hook Tab b Eye Hook b Guy Wire c Gripple Wire Loop c Gripple Fastener Gripple Maximum Angle Ceiling/Beam Guy Wire 45° Maximum Canarm Hexa-Lite 6LEC Series - 10’-24’ Models...
-
Page 24: Installing Blades And Motor Hub
INSTALLING BLADES 9.1 Attach Blades to Hub: Slide blade onto struts until blade holes and strut holes are aligned. Canarm Hexa-Lite 6LEC Series - 10’-24' Models... - Page 25 Thoroughly inspect the hub, the bolts and brackets within the hub to guarantee clear and proper rotation. If you find that the fan has a bracket that is hitting another object on the hub, contact Canarm for a resolution. Canarm Hexa-Lite 6LEC Series - 10’-24’ Models...
- Page 26 Ne pas insérer d’objets étrangers entre les pales du ventilateur. Blade Hardware Kit (supplied): a. (6) 5/16”- 24x1-2/4” GR5 Bolt b. (6) 5/16”- 24x2” GR5 Bolt c. (24) 5/16” Flat Washer d. (12) 5/16”-18 Nylock Nut Canarm Hexa-Lite 6LEC Series - 10’-24' Models...
- Page 27 Install wingtip on end of blade after blade has been securely attached to the strut. Using a Phillips- head screwdriver, fasten wingtip to blade using a #6 x 5/8” Flat Phil Screw. Screw Blade Wingtip Wingtip Wingtip Hardware Kit (supplied): a. (6) #6 x 5/8” Flat Phil Screw Canarm Hexa-Lite 6LEC Series - 10’-24’ Models...
-
Page 28: Electrical
CAUTION/ATTENTION Canarm is not liable for any voltage disturbances with explicit reference to electronic magnetic interference (EMI). Voltage disturbance refers to transient overvoltage, voltage unbalance, voltage swells, rapid voltage change, flicker, superimposed signals, harmonic voltages, supply voltage variations, voltage dips and frequency/time deviation. - Page 29 à l’état solide. The installation of a Canarm fan must be in accordance with the National Electrical Code, ANSI/NFPA 70-1999, and all local codes. The procedures and techniques outlined in this manual are merely a guide for proper installation.
- Page 30 Pour éviter un court-circuit, faire très attention de ne pas obtenir des copeaux de métal dans le contrôle. The Canarm fan product warranty will not cover equipment damage or failure that is caused by improper installation. La garantie des produits Canarm ne couvrira pas les dommages à l’équipement ou de l’échec qui est causé...
- Page 31 10.2 Running the Motor Wire The Canarm 6LEC Series’ custom designed chassis makes for running the motor wire in an incognito fashion. The motor wire slot on the top of the chassis allows the power wire to be ran through (or affixed to the side) of the extension bar, then conveniently through the top plate of the chassis and directly in to the motor electrical box.
- Page 32 ELECTRICAL INSTALLATION 10.3 Input Power Cable Wiring Schematics IMPORTANT: Grounding of the incoming power on the motor is required. NOTE: Canarm suggests using a field supplied fused disconnect switch. 1 Phase Voltage: 230V/1Ph Black - Phase 1 White - Phase 2...
- Page 33 If the installation of the fan is required to be wired to a fire alarm emergency shut-off, an external relay feed and the fan(s). will have to be placed by a fire suppression specialist between the voltage line Power Supply MOTOR Canarm Hexa-Lite 6LEC Series - 10’-24’ Models...
-
Page 34: Troubleshooting
Fix incorrect wiring. Check all brackets and bolts. Ensure bolts are torqued to the proper rating and brackets are free to spin without collisions. Is the fan making End of any noise? troubleshooting. Canarm Hexa-Lite 6LEC Series - 10’-24' Models... - Page 35 • If the wrong fuse is placed on the breaker and a spike occurs the drive may have been blown. Driver will need to be replaced . Contact Factory NOTE: Fan blades must be ON in order to troubleshoot. Canarm Hexa-Lite 6LEC Series - 10’-24’ Models...
- Page 36 Do not run your controller and sensitive equipment on the same power line. c. Install properly sized EM/RFI filter. d. Contact Customer Service at 1-613-342-5424. 5. LED indicator is not blinking in normal fashion. Please contact Canarm customer service to resolve issue. Canarm Hexa-Lite 6LEC Series - 10’-24' Models...
-
Page 37: User Servicing Instructions
8. Administer proper cleaning techniques such as dusting blades, motor, reducer and chassis. If desired, used a water based cleaner to polish blades. If you have any questions, please contact customer service at 1-613-342-5424. Canarm Hexa-Lite 6LEC Series - 10’-24’ Models... - Page 38 USER SERVICING INSTRUCTIONS Replacement Part List: PART NO. DESCRIPTION Maintenance Log: DATE: MAINTENANCE PERFORMED REPLACEMENT PARTS REQUIRED Canarm Hexa-Lite 6LEC Series - 10’-24' Models...
- Page 39 NOTES Canarm Hexa-Lite 6LEC Series - 10’-24’ Models...
- Page 40 PHONE: 1-613-342-5424 FAX: 1-800-263-4598 E-Mail: hvacsales@canarm.ca LIM6LEC.0123_02...
Need help?
Do you have a question about the PENTA-LITE 6LEC Series and is the answer not in the manual?
Questions and answers