Advertisement
Product Introduction
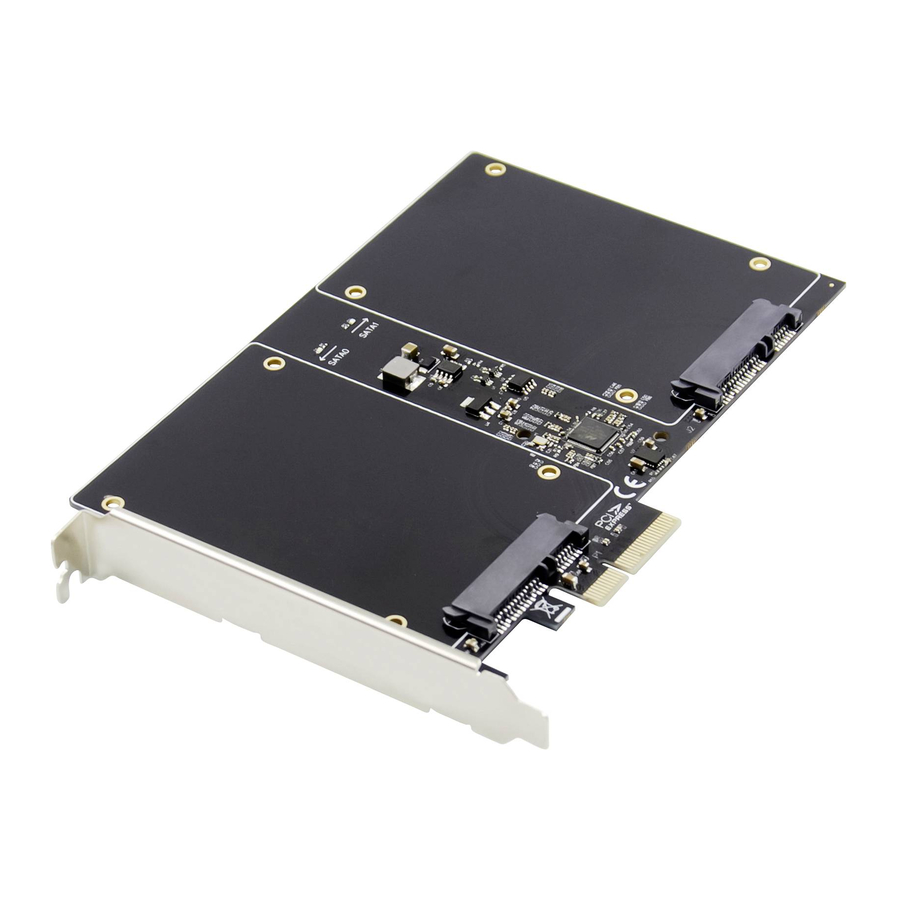
The SATAIII RAID PCI Express Add-On Card has two SATA GEN III 6Gb/s channels host controller within 2.5-inch full-size SSD/HDD interface that brings server-class features to the desktop. This board enable the use of the industry's newest and fastest hard drivers at 6Gb/s while providing backward compatibility to legacy SATA1.5Gb/s or 3Gb/s drives. It will enhance system performance for every type of computer user. Each PCI-Express 2.0 lane provides up to 500MB/S of throughput. Using the RAID function, the SATA drivers attached to this controller can be easily configured as 2 individual ports with NO RAID or with RAID0, RAID1, HyperDuo.
Specification
- Compliant with PCI-Express Specification V2.0 and backward compatible with PCI-Express 1.x
- Supports communication speed of 2.5Gbps and 5Gbps
- Compliant with Serial ATA Specification 3.1
- PCI Express x2 interface and compatible with PCI Express X4, X8 and X16 slots
- Supports communication speeds of 6Gbps, 3Gbps, 1.5Gbps
- Supports Gen1i, Gen2i, Gen2m, Gen2x, and Gen3i
- Hot plug and Hot swap
- Support two ports full-size 2.5 inch SSD/HDD interface
- Compatible with SATA6G, 3G and 1.5G hard drives
- Support Native Command Queue(NCQ)
- Support Port Multiplier FIS based switching or command based switching
- Support Partial and Slumber Power Management states
- Support RAID function: RAID0, RAID1 and HyperDuo
- Chipset: 88SE9230
- Drivers support for Windows XP/ VISTA/ Win7/ Win8/ Server2003/
- Server2008 R2, Linux2.6.x and above
Package content
- 1 x SATAIII RAID PCI Express Add-On Card
- 1 x User's Manual
- 1 x CD driver
System Requirements
- Supports Windows® XP/ Vista/ Win7/ Win8/ Server2003/ Server2008 R2. Linux2.6.x and above
- One available PCI Express x4/ x8/ x16 slot
Hardware installation
- Turn off the power to your computer.
- Unplug the power cord and remove your computer's cover.
- Insert the 2.5 inch HDD or SSD into the RAID card and install the attached screws to the hard drive to hold it in place.
- Locate to an empty PCI Express x4/ x8/ x16 slot on the motherboard.
- To install the board, carefully align the card's bus connector with the selected PCI-E slot on the motherboard. Push the board down firmly.
- Replace the Slot bracket's holding screw to secure the card.
- Replace the computer cover and reconnect the power cord.
Marvell BIOS Utility for RAID/ HyperDuo setup

All the data on the hard disks connected to the controller card will be permanently erase in the following actions.
To create a RAID/ HyperDuo virtual disk
- Power up your computer, skip this section if you are not going to create a RAID/HyperDuo virtual disk.
- Press the [ctrl]+[M] key on the keyboard at the same time to enter the Marvell BIOS utility
- Once the BIOS is entered, scroll to HBA: Marvell 0 in the topology pane by the up and arrow key on the keyboard and press Enter
- Choose Configuration Wizard and press Enter to start creating the RAID/ HyperDuo virtual disk
- Select the free physical disk available by using the arrow keys to scroll though the disks and press Space Bar. After selecting all the disks needed, press Enter to continue.
- Choose the RAID Option:
RAID LEVEL:
RAID 0- striping
RAID 1-Disk Mirroring
Stripe size: 32k, 64k
Name: any value for the user to input - Choose the HyperDuo option:
HyperDuo mode:
Safe-mirrored protection
Capacity-cost-Optimized
Keep original data:
Yes, No (only available in safe mode)
Preserve the data currently on your HDD or erase all data
Threshold (%):
10-100 for the users to input
The number defines to percentage of your SSD the Bios uses to optimize performance. Default is 90 - Choose NEXT and press [Y] key to start creating the virtual disk
- Press F10 and [Y] key to exit the Marvell bios utility
Note: A HyperDuo virtual disk must at least contain one SSD and one HDD
To rebuild a virtual disk
- When a hard disk in a RAID 1 virtual disk or a SSD in a hyperDuo safe mode virtual disk is defective or the data inside are corrupted, the Marvell Bios Utility will mark the virtual disk as degrade.
- Replace the defective hard disk /SSD with an identical hard disk/SSD or a hard disk /SSD which has a smaller size within the allowable value set for the virtual disk.
- Press the [ctrl] + [M] key on the keyboard at the same time to enter the BIOS.
- In the Topology pane. Scroll to the virtual disk, Press Enter and select the Rebuild option.
- Select the available replacement hard disk /SSD to be rebuilt to by pressing Space Bar and then Enter
- Press [Y] key to start. The utility will show the rebuild status and the completed percentage. This will take a long time to finish the whole process and it depends on the size to be rebuilt
Note: HyperDuo virtual disk created in safe mode can be partially rebuilt if the SSD fails, but not if the HDD fails.
Driver installation
For Windows® Vista, Server 2008, Win7, Win8, Server 2008 R2 Operating Systems:
- Start windows and insert the driver CD into the CD-ROM drive, assume drive A.
- Windows will automatically detect the SATA card, Right-click Marvell console SATA Device with yellow mark in the Other Devices and select Update Driver Software.
- Select "Browse my computer for driver software"
- Browse to the following folder on the driver CD according to your operating system:
- Windows vista, server2008, windows7, Windows 8 32-bit:
A:\2010A2\Marvell\92xx\Windows vista_2008_7_8\i386 - Windows vista, server 2008, Windows7, Windows 8 64-bit and server 2008 R2:
A: \2010A2\Marvell\92xx\Windows vista_2008_7_8\amd64
- Windows vista, server2008, windows7, Windows 8 32-bit:
- Follow the on-screen instruction to install the driver.
- After successful installation, the device is list in the Device Manager as Marvell unify configuration (under system devices)
For Windows® XP, SERVER 2003 operation system:
- Start windows and insert driver CD into the CD-ROM drive, assume drive A
- Windows will automatically detect the SATA card, select "No, not this time" and click the NEXT button to continue
- Select "install from a list or specific location (Advance)" and click on the Next button.
- Browse to the following folder on the driver CD according to your operating system:
- Windows XP 32-bit and Server 2003 32-bit:
A:\2010A2\Marvell\92XX\Windows2003_XP\i386 - Windows XP64-bit and server2003 64-bit:
A:\2010A2\Marvell\92XX\Windows2003_XP\amd64
- Windows XP 32-bit and Server 2003 32-bit:
- Follow the on-screen instruction to install the driver.
- After successful installation, The SATA controller is listed in the Device Manager as Marvell 92xx SATA 6G controller (under SCSI and RAID controllers)
- For this controller an additional device Marvell Console SCSI Processor device is detected, select "No, not this time" and click the next button to continue
- Select "install form a list or specific location (Advance)" and click on the Next button.
- Browse to the following folder on the driver CD according to your operating system:
- Windows XP 32-bit and Server 2003 32-bit:
A:\2010A2\Marvell\92xx\Windows2003_xp\i386 - Windows xp 64-bit and server2003 64-bit:
A:\2010A2\Marvell\92xx\Windows2003_xp\amd64
- Windows XP 32-bit and Server 2003 32-bit:
- Follow the on-screen instruction to install the driver.
- After successful installation, the device is listed in the Device Manager as Marvell Unify configuration (under system devices)
For Linux OS
Linux distributions contain Inbox drivers for AHCI devices. The drivers are installed automatically during the Linux OS installation.
Support
If you have further questions, please contact our customer support and you can find more information on our homepage: www.assmann.com
www.assmann.com
Assmann Electronic GmbH
Auf dem Schüffel 3
58513 Lüdenscheid
Germany

Documents / Resources
References
Download manual
Here you can download full pdf version of manual, it may contain additional safety instructions, warranty information, FCC rules, etc.
Download Digitus DS-33160 - SATAIII RAID PCI Express Add-On Card Manual
Advertisement


Need help?
Do you have a question about the DS-33160 and is the answer not in the manual?
Questions and answers