Dymo XTL 500 - Industrial Labeller Quick Start Guide
- User manual (62 pages) ,
- Quick start manual (61 pages)
Advertisement
Registering Your Label Maker
Visit www.dymo.com/register to register your label maker online. During the registration process, you will need the serial number, which is located under the label compartment cover.
Register your label maker to receive these benefits:
- Notification of software upgrades by email
- Special offers and new product announcements

Download the latest version of DYMO ID ™ software from the DYMO Web site at support.dymo.com.
You will receive notifications through DYMO ID ™ software when software and label maker updates are available.
Unpacking Your Label Maker
Do not connect the label maker to your computer until after the software installation is complete.
- Unpack your label maker and save the packing materials.
- Make sure you have all the items shown in Figure 1.
![]()

Package Contents
- XTL 500 label maker
- Rechargeable lithium polymer battery (installed)
- Carrying case
- USB cable
- AC power adapter and power cord
- Software download card
- Quick Start Guide
- XTL label cartridges (quantity and type may vary)
Inserting the Label Cartridge
Your label maker uses DYMO XTLTM label cartridges, available in a variety of widths and materials including continuous tape and pre-sized labels. Visit www.dymo.com for information about purchasing label cartridges.
- Press the button on the top of the label maker and lift the label compartment cover. See Figure 2.

- Make sure the tape and ribbon are taut across the mouth of the label cartridge and that the tape passes between the label guides. See Figure 3.

To tighten the ribbon, turn the ribbon rewind spool in the direction indicated by the arrow on the cartridge.
![caution]()
Do not touch the electronic chip on the side of the label cartridge. - Insert the label cartridge and press firmly until the cartridge 'clicks' into place.
- Close the label compartment cover.


Charging the Battery
The label maker is powered by a rechargeable, Lithium Polymer (LiPo) battery. The battery, included with your label maker, is already installed and is partially charged.
A power adapter is included with your label maker for recharging the battery. Fully charging the battery will take approximately 3.5 hours.
- Lift the connector cover on the side of the label maker and turn clockwise. See Figure 4.

- Plug the power cord into the power adapter. See Figure 5.
- Plug the power adapter into the power connector, and then plug the power cord into a power outlet. See Figure 5.


Make sure to read the LiPo Safety Precautions found.
Printing Your First Label
The first time you turn on the power, you are asked to select the language and units of measure. These selections remain set until you change them.
- Press
![]() to turn on the label maker.
to turn on the label maker.

- If necessary, change the language and units of measure when prompted.
- Tap
![]() General, and select the label orientation and length.
General, and select the label orientation and length. - Enter some text.
Tap![]() to change the text size and formatting as desired.
to change the text size and formatting as desired.

- Press
![]() to print. The label is automatically cut.
to print. The label is automatically cut.
Press and hold![]() to change the print and cut options.
to change the print and cut options.

- Remove the paper backing from the label to expose the adhesive and place the label on a clean, dry surface


Refer to the User Guide available at support.dymo.com for complete details on using your label maker.
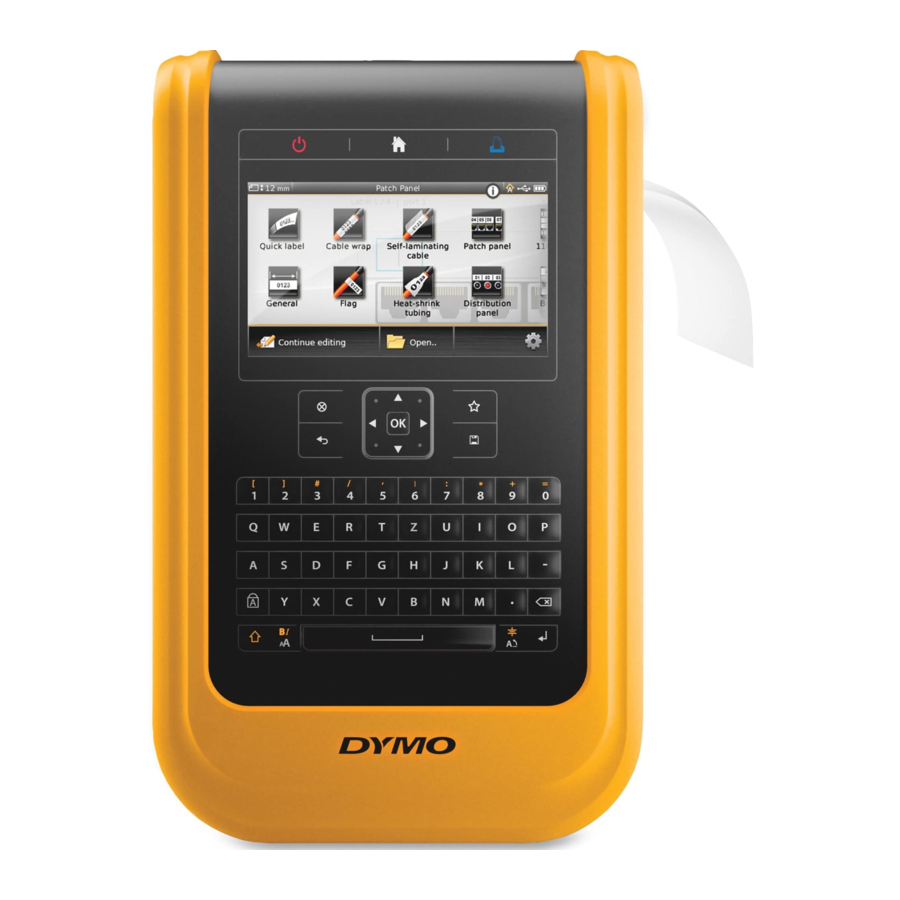
Getting to Know Your Label Maker
Become familiar with the features shown.

- On/Off (Cancel printing)
- Home
- Print/Print options
- Touch screen display
- Favorites
- Save
- Backspace/Delete
- Return
- Rotate/Align
- Space bar
- Text size/Text style
- Shift
- Caps lock
- Navigation
- Back
- New label/Clear
- OK
- Power/USB connectors
Home Screen
The following figure shows the major features available from the Home screen.

A number of label applications are available for your specific labeling job:

Tips:
- Tap once to choose a label application.
- You can create any label by selecting the appropriate label application with a compatible label cartridge inserted.
- A caution symbol
![]() appears when a label application and the inserted label cartridge are not compatible.
appears when a label application and the inserted label cartridge are not compatible. - Label applications appropriate for the currently inserted label cartridge will appear to the left of those label applications that cannot be printed on the label cartridge.
Label Editor
The following figure shows the features common to most of the label editors.

Using the Touch Screen
You can control the touch screen by using your fingers, or a plastic stylus with a rounded tip, to tap, double-tap, drag, and swipe items on the screen.

| Tap | To select an action or object, or to move the cursor position within text. |
| Double-tap | To select a word, edit a barcode, change a shape or image object. |
| Drag | To select more or less text in a text object. To move selected text or an object. |
| Swipe | To scroll through menus, lists, and wizard steps. |
Refer to the User Guide at support.dymo.com for complete details on using your label maker.
Using the Label Maker with Your Computer
Your label maker can be used to print labels standalone, or you can transfer or print labels directly from your computer using the latest version of DYMO ID™ software.
Downloading and Installing DYMO ID™ Software
Do not connect the label maker to your computer until after the software installation is complete.
To install the software
- Download the latest version of DYMO ID™ software from the DYMO Web site at support.dymo.com.
- Follow the instructions in the installer.
Connecting the Label Maker to your Computer
The label maker connects to your computer using the USB connection located on the left side of the label maker.
![]() Do not connect the label maker to your computer until after the software installation is complete.
Do not connect the label maker to your computer until after the software installation is complete.
To connect the label maker to your computer
- Lift the connector cover on the left side of the label maker and slide the cover clockwise to expose the connectors.

- Plug the USB cable into the USB connector on the label maker and into an available USB port on your computer.

You can now print directly from DYMO ID™ software or transfer labels to the label maker for printing later.
Using DYMO ID™ Software
Your label maker can be used as a standalone label maker or you can print labels directly from your computer using the latest version of DYMO ID™ software.
Using DYMO ID™ software is the recommended method for producing a high volume of labels.
The figure below shows some major features available in DYMO ID™ software.

To print a label
- Click
![]() General on the Home screen.
General on the Home screen. - Type some text.
- Click
![]() to print the label.
to print the label.
 General on the Home screen.
For complete details on using the software, refer to the DYMO ID™ Help.
From the Help menu, you can view the following:
- DYMO ID™ Help
- DYMO ID™ User Guide
- XTL™ 500 User Guide
Safety Precautions for Lithium Polymer Battery
Battery Type: LiPolymer 14.8 V 2000 mAh 29.6 Wh
Inaccurate handling of a lithium polymer rechargeable battery may cause leakage, heat, smoke, an explosion, or fire. This could cause deterioration of performance or failure. This may also damage the protection device installed in the battery. This could damage equipment or injure users. Thoroughly follow the instructions below.
While Charging the Battery

To reduce the risks associated with fire and explosion, which if not avoided, could result in serious injury or death:
- Danger of explosion if a battery is incorrectly handled, charged, disposed or replaced. Replace only with the same or equivalent type recommended by DYMO.
- When charging the battery, use only the power adapter provided and follow the instructions in this guide.
- Do not connect directly to an electric outlet or cigarette lighter charger.
- Do not store the battery close to fire or at extremely high temperatures over 140°F (60°C) (for example, a vehicle, strong direct sunlight).
- Do not short-circuit the batteries under any circumstances.
- Never charge batteries near highly flammable objects.

To reduce the risks associated with fire and explosion, which if not avoided, could result in serious injury or death and/or property damage:
- Stop charging the battery if charging is not completed within the specified time.
- Never leave the battery unattended during charging. Do not attempt to charge a battery that is damaged.
- Immediately remove the battery from the device or battery charger and stop use if the battery gives off an odor, generates heat, becomes discolored or deformed, or in any way appears abnormal during use.


To reduce the risks associated with various hazards, which if not avoided, may result in minor or moderate injury and/or property damage:
- Thoroughly read the User Guide before charging the battery.
- Lithium battery must be completely discharged before disposal.
- Always dispose of the battery in a manner consistent with local, regional and national regulation.
- Battery can only be charged within a temperature range of 32°F (0°C) to 113°F (45°C).
While Discharging the Battery
To reduce the risks associated with fire and explosion, which if not avoided, could result in serious injury or death and/or property damage:
- Use the battery only in the specified equipment.
- Do not discharge the battery close to fire or at extremely high temperatures over 140°F (60°C) (for example, a vehicle, strong direct sunlight).
To reduce the risks associated with various hazards, which if not avoided, may result in minor or moderate injury and/or property damage:
- Battery can only be used within a temperature range of 14°F (-10°C) to 140°F (60°C).
VideosHow to Make a Label with the DYMO XTL 500 Video
Documents / ResourcesDownload manual
Here you can download full pdf version of manual, it may contain additional safety instructions, warranty information, FCC rules, etc.
Download Dymo XTL 500 - Industrial Labeller Quick Start Guide
Advertisement


Need help?
Do you have a question about the XTL 500 and is the answer not in the manual?
Questions and answers