Dymo LabelManager 220P - Portable Thermal Label Maker With Keyboard Manual
- User manual (26 pages) ,
- Quick manual (2 pages) ,
- Manual (26 pages)
Advertisement
- 1 Overview
- 2 About Your New Device
- 3 Getting Started
- 4 Using the Device for the First Time
- 5 Getting to Know the Device
- 6 Formatting Your Label
- 7 Using Symbols and Special Characters
- 8 Printing Options
- 9 Using the Unit Memory
- 10 Caring for Your Device
- 11 Troubleshooting
- 12 Technical Information
- 13 Documentation Feedback
- 14 Environmental Information
- 15 Documents / Resources
Overview

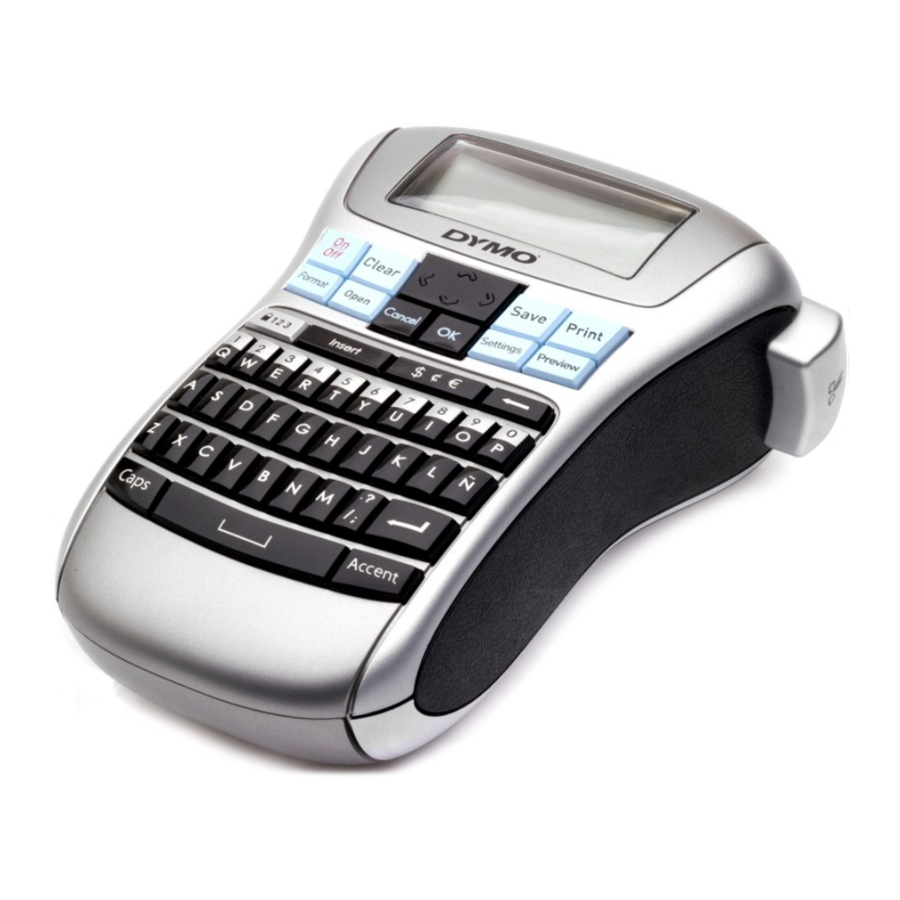
Figure 1 LabelManager 220P Electronic Label Maker
- Tape cutter button
- Preview
- OK
- Backspace
- Enter
- Accented character
- Punctuation
- Currency
- Space bar
- Insert
- CAPS
- Number lock
- Cancel
- Format
- Power
- AC power connector
- Clear
- Recall
- Navigation
- LCD display
- Settings
- Save
- Tape exit
About Your New Device
With the DYMO LabelManager 220P electronic label maker, you can create a wide variety of high-quality, self-adhesive labels. You can choose to print your labels in many different font sizes and styles. The label maker uses DYMO D1 tape cassettes in widths of 6 mm, 9 mm, or 12 mm. These tape cassettes are available in a wide range of colors.
Visit www.dymo.com for information on obtaining labels and accessories for your label maker.
Product Registration
Visit www.dymo.com/registration to register your label maker online.
Getting Started
Follow the instructions in this section to print your first label.
Connecting the Power
The label maker is powered by standard batteries or an AC power adapter. To save power, the label maker will automatically turn off after two minutes of inactivity.
Inserting the Batteries
The label maker uses six high-capacity AA alkaline batteries.
To insert the batteries
- Slide the battery compartment cover away from the label maker.
![]()
- Insert the batteries following the polarity markings (+ and –).
- Replace the cover.
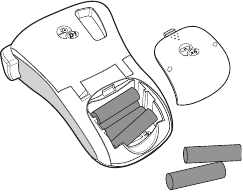
 Remove the batteries if the label maker will not be used for a long time.
Connecting the Optional Power Adapter
An optional 9 Volt, 1.5 A power adapter can also be used to power the label maker.
Connecting the AC adapter disconnects the batteries as a power source.
To connect the power adapter
- Plug the power adapter into the power connector on the top, left side of the label maker.
- Plug the other end of the adapter into a power outlet.
Make sure the label maker power is turned off before you disconnect the power adapter from the main power source. Otherwise, your most recent memory settings will be lost.
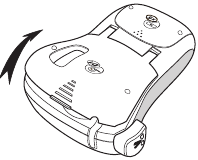
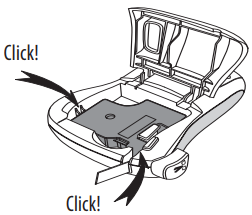
Inserting the Tape Cassette
Your label maker comes with one tape cassette. You can purchase additional tape cassettes from your local office supply retailer.
To insert the tape cassette
- Lift the tape cassette cover to open the tape compartment.
![]()
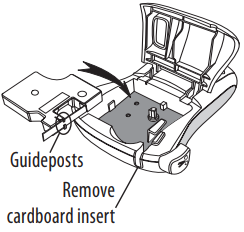
![information]() Before using the label maker for the first time, remove the protective cardboard insert from the tape exit slot.
Before using the label maker for the first time, remove the protective cardboard insert from the tape exit slot.
![]()
- Insert the cassette with the label facing up and the tape positioned between the guideposts.
- Press firmly until the cassette clicks into place.
![]()
- Close the tape cassette cover.
Using the Device for the First Time
The first time you turn on the power, you are asked to select the language and units of measure. These selections will remain set until you change them, or until the label maker is reset. You can change these selections using the Settings key.
To set up the label maker
- Press
![]() to turn on the power.
to turn on the power. - Select the language and press
![]() .
.
By default, the language is set to English. The language option you choose determines the character set that is available. - Select inches or mm and press
![]() .
. - Select the width of the tape cassette currently inserted in the label maker. You are now ready to print your first label.
 to turn on the power.
To print a label
- Enter text to create a simple label.
- Press
![]() .
. - Select the number of copies.
- Press
![]() to print.
to print. - Press the cutter button to cut the label.
 .
.Congratulations! You printed your first label. Continue reading to learn more about the options available for creating labels.
Getting to Know the Device
Become familiar with the location of the feature and function keys on your label maker. Refer to Figure 1. The following sections describe each feature in detail.
Power
The  button turns the power on and off. After two minutes of no activity, the power is switched off automatically. The last label created is remembered and displayed when the power is turned back on. The previously selected style settings are also restored.
LCD Display
You can enter up to 99 characters and spaces. The display shows about thirteen characters at a time. The number of characters displayed will vary due to proportional spacing.
With DYMO's exclusive graphical display, most of the formatting you add is visible instantly. For example, the italics and rounded border added to the text below is clearly displayed.

Feature indicators along the top of the LCD display appear black to let you know when a feature is selected.
Format
The  key displays the Font Size, Clear Format, Mirror, Label Length, Alignment, Underline, Borders, and Style submenus. These formatting features are described later in this User Guide.
Insert
The  key allows you to insert symbols or saved text on your label. These features are described later in this User Guide.
Settings
The  key displays the Language, Units, Label Width and Contrast submenus. These features are described later in this User Guide.
CAPS Mode
The  key toggles capitalization on or off. When CAPS mode is turned on, the CAPS mode indicator is shown on the display and all letters that you enter will be capitalized. The default setting is CAPS mode on. When CAPS mode is off, all letters appear in lower case.
Num Lock
The  key provides access to the numbers located on some of the alphabetic keys. When Num Lock mode is turned on, the Num Lock indicator is shown on the display and the numbers 0 through 9 appear when you press the corresponding letter keys. Num Lock is turned off by default.
Backspace
The  key removes the character to the left of the cursor.
Clear
The  key gives you a choice to clear all label text, just the text formatting, or both.
Navigation Keys
You can review and edit your label using the left and right arrow keys. You can also navigate through menu selections using the up and down arrow keys, and then press  to make a selection.
Cancel
The  key allows you to exit from a menu without making a selection or to cancel an action.
Formatting Your Label
You can choose from a number of formatting options to enhance the appearance of your labels.
Changing the Font Size
Six font sizes are available for your labels:

The font size you select applies to all characters on a label.
To set the font size
- Press
![]() .
. - Select Font Size and press
![]() .
. - Select the desired font size and press
![]() .
.
 .
.The font size indicator on the display changes as you select font sizes.
Adding Font Styles
You can choose from six different font styles:
| AaBbCc | Normal |  | Outline |
| AaBbCc | Bold |  | Shadow |
| AaBbCc | Italic |  | Vertical |
The style you select applies to all characters. Styles can be used with alphanumeric characters and some symbols.
To set the font style
- Press
![]() .
. - Select Style and press
![]() .
. - Select a font style and press
![]() .
.
 .
.Adding Borders and Underline Styles
You can highlight your text by choosing a border or underline style.
 | Underline |  | Parchment |
 | Square |  | Callout |
 | Rounded |  | Flowers |
 | Edged |  | Crocodile |
 | Pointed | ||
A label can be underlined or enclosed in a border, but not both together.
To add a border style
- Press
![]() .
. - Select Borders and press
![]() .
. - Select a border style and press
![]() .
.
 .
.When using borders on two-line labels, both lines are enclosed in one border.
To add an underline
- Press
![]() .
. - Select Underline and press
![]() .
. - Press
![]() again when the underlined text is shown in the display.
again when the underlined text is shown in the display.
On two-line labels, both lines are underlined.
Creating Two-Line Labels
You can print a maximum of two lines on labels.
To create a two-line label
- Type the text for the first line and press
![]() .
.
A multi-line symbol![]() is inserted at the end of the first line, but will not print on the label.
is inserted at the end of the first line, but will not print on the label. - Type the text for the second line.
- Press
![]() to print.
to print.
 .
. is inserted at the end of the first line, but will not print on the label.
 to print.
Aligning the Text
You can align the text to print centered, left justified, or right justified on the label.
The default alignment is centered.
To change the alignment
- Press
![]() .
. - Select Alignment and press
![]() .
. - Select right, left, or centered alignment and press
![]() .
.
Creating Fixed-Length Labels
Normally, the length of the label is determined by the length of the text. However, you can choose to set the length of the label for a specific application.
When you choose a fixed label length, the label text is automatically resized to fit the label. If the text cannot be adjusted to fit within the fixed label length, a message is displayed showing the smallest possible label length for this text. You can choose a fixed length label up to 400 mm long.
To make your label a fixed length
- Press
![]() .
. - Select Label Length and press
![]() .
. - Select Fixed and press
![]() .
. - Select the length for your label and press
![]() .
.
Using Mirror Text
The mirror format allows you to print text which reads from right to left, as you would see it in a mirror.
To turn on mirror text
- Press
![]() .
. - Select Mirror and press
![]() .
. - Select On and press
![]() .
.
Using Symbols and Special Characters
Symbols, punctuation, and other special characters can be added to your labels.
Adding Symbols
The label maker supports the extended symbol set shown below.

To insert a symbol
- Press
![]() .
. - Select Symbols and press
![]() .
. - Select the symbol category and press
![]() .
. - Use the left and right arrow keys to move to your desired symbol.
The left and right arrows move horizontally along a row of symbols. The up and down arrow keys scroll vertically through the rows of symbol types. - When you locate the symbol, press
![]() to add the symbol to your label.
to add the symbol to your label.
 .
.Adding Punctuation
You can quickly add punctuation using the punctuation shortcut key.
To insert punctuation
- Press
![]() .
. - Select the punctuation mark you want and press
![]() .
.
 .
.Using the Currency Key
You can quickly add a currency symbol using the currency shortcut key.
To insert a currency symbol
- Press
![]() .
. - Select the currency symbol you want and press
![]() .
.
Adding International Characters
The label maker supports the extended Latin character set using RACE technology. After pressing the ![]() key, repeatedly pressing a letter scrolls through the available variations of that letter.
key, repeatedly pressing a letter scrolls through the available variations of that letter.
For example, if French is selected as the language and you press the letter a, you will see a à â æ and so on through all the variations available. The character variations and the order in which they appear depend on the language you use.
To add accented characters
- Press
![]() .
.
The accented character indicator is shown on the display. - Press an alpha character.
The accent variations are displayed. - When the desired accented character appears, wait a few seconds for the cursor to move beyond the character to continue entering text.
Printing Options
You can preview your label, print multiple labels, and adjust the print contrast.
Previewing Your Label
You can preview your label prior to printing. A two-line label is previewed as a single-line label with a line break character between the two lines.
To preview your label
- Press
![]() .
.
 .
.The label length is displayed, then the text of the label scrolls across the display.
Printing Multiple Labels
Each time you print, you are asked how many copies to print. You can print up to ten copies at one time.
To print multiple labels
- Press
![]() .
. - Select the number of copies to print.
- Press
![]() .
.
 .
.When printing is finished, the number of copies to print returns to the default value of 1.
Adjusting the Print Contrast
You can adjust the print contrast to fine tune the print quality of your label.
To set the contrast
- Press
![]() .
. - Select Contrast and press
![]() .
. - Use the arrow keys to select a contrast setting between 1 (less contrast) and 5 (more contrast), and press
![]() .
.
 .
.Using the Unit Memory
The label maker has a powerful memory feature that allows you to save the text of up to nine frequently-used labels. You can recall saved labels and insert saved text into a label.
Saving a Label
You can save up to nine frequently-used labels. When you save a label, the text and all formatting are saved.
To save the current label
- Press
![]() .
.
The first available memory location is displayed. - Use the arrow keys to move through the locations.
You can store new text in any of the memory locations. - Select a memory location and press
![]() .
.
 .
.Your label text is saved and you are returned to the label.
Opening Saved Labels
You can easily open labels saved in memory to use at a later time.
To open saved labels
- Press
![]() .
.
A message is displayed to confirm you want to overwrite the current label. - Press
![]() .
.
The first memory location is displayed. - Use the arrow keys to select a label to open and press }.
 .
.To clear a memory location, first select a memory location and then press  .
.
Inserting Saved Text
You can insert the text of a saved label into the current label. Only the saved text is inserted, not the formatting.
To insert saved text
- Position the cursor at the location in the current label where you want to insert the text.
- Press
![]() .
.
The first memory location is displayed. - Use the arrow keys to select the text you want to insert.
- Press
![]() . The text is inserted in the current label.
. The text is inserted in the current label.
 .
.Caring for Your Device
Your label maker is designed to give you long and trouble-free service, while requiring very little maintenance. Clean your label maker from time to time to keep it working properly. Clean the cutter blade each time you replace the tape cassette.
To clean the cutter blade
- Remove the tape cassette. Print head Cutter button
- Press and hold down the cutter lever to expose the cutter blade.
![]()
- Use a cotton ball and alcohol to clean both sides of the blade.

 The cutter blade is extremely sharp. Use caution when cleaning.
To clean the print head
- Remove the tape cassette.
- Remove the cleaning tool from inside the tape compartment cover.
- Gently wipe the padded side of the tool across the print head.
Troubleshooting
Review the following solutions if you have a problem while using your label maker.
| Problem/Error Message | Solution |
| No display |
|
| Poor Print Quality |
|
| Poor Cutter Performance | Clean the cutter blade. See Caring for Your Device. |
| Printing... | No action required. Message disappears when printing is finished. |
| Too many characters Exceeded maximum number of characters | Delete some or all of the text. |
| Too many lines Exceed maximum number of lines |
|
 Batteries almost discharged | Replace batteries or connect AC power adapter. |
| Tape Jam Motor is stalled due to label jam |
|
If you still need assistance, contact DYMO Customer Support. See Contacting Customer Support at the back of this User Guide to locate the contact number for your country.
Technical Information
| DYMO D1 Tape Cassettes | |||
| Width: | 6 mm | 9 mm | 12 mm |
| Length: | 7 m | 7 m | 7 m |
| Black/Clear | S0720770/ 43610 | S0720670 40910 | S0720500 45010 |
| Blue/Clear | ___ | ___ | S0720510 45011 |
| Red/Clear | ___ | ___ | S0720520 45012 |
| Black/White | S0720780 43613 | S0720680 40913 | S0720530 45013 |
| Blue/White | ___ | S0720690 40914 | S0720540 45014 |
| Red/White | ___ | S0720700 40915 | S0720550 45015 |
| Black/Blue | ___ | S0720710 40916 | S0720560 45016 |
| Black/Red | ___ | S0720720 40917 | S0720570 45017 |
| Black/Yellow | S0720790 43618 | S0720730 40918 | S0720580 45018 |
| Black/Green | ___ | S0720740 40919 | S0720590 45019 |
| White/Clear | ___ | ___ | S0720600 45020 |
| White/Black | ___ | ___ | S0720610 45021 |
| Width: | 6 mm | 9 mm | 12 mm |
| Length: | 3,5 m | 3,5 m | 3,5 m |
| Flexible labels for curved surfaces | ___ | ___ | S0718040 16957 |
| Width: | 6 mm | 9 mm | 12 mm |
| Length: | 5,5 m | 5,5 m | 5,5 m |
| Permanent labels | ___ | ___ | S0718060 16959 |
| Power Adapter | |||
| European Adapter | S0721440/40076 | UK Adapter | S0721430/40075 |
| AUS Adapter | 40078 | ||
Documentation Feedback
We are constantly working to produce the highest quality documentation for our products. We welcome your feedback.
Send us your comments or suggestions about our user guides. Please include the following information with your feedback:
- Product name, version number, and page number
- Brief description of content (instructions that are inaccurate or unclear, areas where more detail is needed, and so on)
We also welcome your suggestions about additional topics you would like to see covered in the documentation.
Send email messages to: documentation@dymo.com.
Please keep in mind that this email address is only for documentation feedback. If you have a technical question, please contact Customer Support.
Environmental Information
The equipment that you have bought requires the extraction and use of natural resources for its production. It may contain substances that are hazardous to health and the environment.
In order to avoid the dissemination of those substances in our environment, and to diminish the pressure on natural resources, we encourage you to use the appropriate take-back systems. These systems will reuse or recycle most of the materials of your end-of-life equipment in an environmentally sound way.
The crossed-bin symbol marked on your device indicates you should use these systems.

If you need more information on the collection, reuse, and recycling of this product, please contact your local or regional waste administration.
You can also contact us for more information on the environmental performance of our products.
This product is CE marked in accordance with the EMC directive and the low voltage directive and is designed to conform with the following international standards:
US FCC Class B Compatibility
Safety - UL, CUL, TUV, CE, T-Mark, SAA, BABT, C-Tick
EMC - EMI Compatibility
EN 55022; EN 61000 (+ addendums)
RoHS 2002/95/EC
Documents / ResourcesDownload manual
Here you can download full pdf version of manual, it may contain additional safety instructions, warranty information, FCC rules, etc.
Download Dymo LabelManager 220P - Portable Thermal Label Maker With Keyboard Manual
Advertisement


Need help?
Do you have a question about the LabelManager 220P and is the answer not in the manual?
Questions and answers