Advertisement
- 1 Overview
- 2 About Your New Label Maker
- 3 Getting Started
- 4 Using the Label Maker for the First Time
- 5 Getting to Know the Label Maker
- 6 Formatting Your Label
- 7 Adding Special Characters
- 8 Using the Label Maker Memory
- 9 Caring for Your Label Maker
- 10 Troubleshooting
- 11 Symbols
- 12 Clip Art
- 13 Environmental Information
- 14 Electrical Ratings
- 15 Documents / Resources
Overview

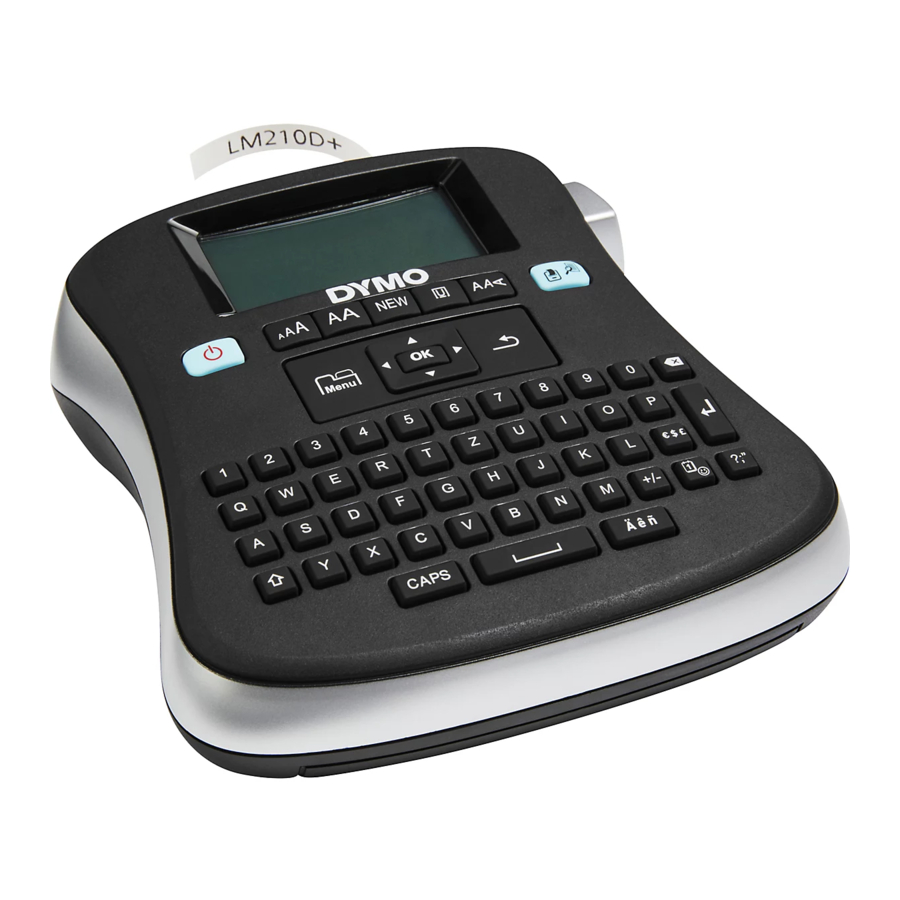
Figure 1DYMO LabelManager 210D+ Label Maker
- AC power connector
- LCD display
- New label
- Underline/Boxes
- Style
- Cutter button
- Print/Print preview
- Cancel
- OK
- Backspace
- Return
- Currency
- Symbols
- Clip art
- Math
- Accented characters
- Space bar
- CAPS
- Shift
- Navigation
- Menu
- On/Off
- Font size
- Font width
About Your New Label Maker
With the DYMO® LabelManager 210D+ electronic label maker, you can create a wide variety of high-quality, self-adhesive labels. You can choose to print your labels in many different font sizes and styles. The label maker uses DYMO D1 label cassettes in widths of 1/4" (6 mm), 3/8" (9 mm), or 1/2" (12 mm). These label cassettes are available in a wide range of colors.
Visit www.dymo.com for information on obtaining labels and accessories for your label maker.
Product Registration
Visit www.dymo.com/register to register your label maker online. During the registration process, you will need the serial number, which is located inside the back cover of the label maker
Getting Started
Follow the instructions in this section to print your first label.
Connecting the Power
The label maker is powered by standard batteries or an AC power adapter. To save power, the label maker automatically turns off after two minutes of inactivity.
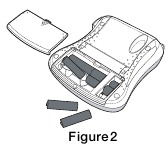
Inserting the Batteries
The label maker uses six high-capacity AA alkaline batteries.
To insert the batteries
- Slide the battery compartment cover away from the label maker. See Figure 2.
![]()
- Insert the batteries following the polarity markings (+ and –).
- Replace the cover.
 Remove the batteries if the label maker will not be used for a long period of time.
Safety Precautions
- Do not mix old and new batteries.
- Do not mix alkaline, standard (carbon-zinc), or rechargeable (ni-cad, ni-mh, etc.) batteries.
- Remove the batteries if the printer will not be used for a long period of time.
Connecting the Optional Power Adapter
An optional 9 Volt, 2 Amp power adapter can also be used to power the label maker. Connecting the AC adapter to the label maker disconnects the batteries as a power source.
Use only power the adapter listed in this user guide:
Adapter model DSA-18PFM-09 Fc 090200 (note: "c" can be EU, UP, UK, US, UJ, JP, CH, IN, AU, KA, KR, AN, AR, BZ, SA, AF or CA) from Dee Van Enterprise Co., Ltd.
To connect the power adapter
- Plug the power adapter into the power connector on the top, left side of the label maker.
- Plug the other end of the power adapter into a power outlet.
Make sure the label maker power is turned off before you disconnect the power adapter from the main power source. Otherwise, your most recent memory settings will be lost.
Inserting the Label Cassette
Your label maker comes with one label cassette. Visit www.dymo.com for information about purchasing additional label cassettes.
![]() The cutter blade is extremely sharp. While replacing the label cassette, keep fingers and other body parts away from cutter blade and do not press the cutter button.
The cutter blade is extremely sharp. While replacing the label cassette, keep fingers and other body parts away from cutter blade and do not press the cutter button.
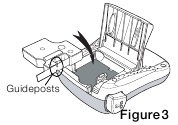
To insert the label cassette
- Lift the label cassette cover to open the tape compartment.
- Insert the cassette with the label facing up and positioned between the guideposts. See Figure 3.
![]()
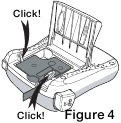
- Press firmly until cassette clicks into place. See Figure 4.
![]()
- Close the label cassette cover.
Each time you change the label cassette, you are prompted to enter the label width.
Using the Label Maker for the First Time
The first time you turn on the power, you are asked to select the language. This selection will remain set until you change it, or until the label maker is reset. You can change this selection in Settings.
To set up the label maker
Press ![]() to turn on the power.
to turn on the power.
- Select the language and press
![]() .
. - By default, the language is set to English.
- Select the width of the tape cassette currently in the label maker and press
![]() .
.
You are now ready to print your first label.
To print a label
- Enter text to create a simple label.
- Press
![]() .
. - Select the number of copies.
- Press
![]() to print.
to print. - Press the cutter button to cut the label.
 .
. to print.
Congratulations! You printed your first label. Continue reading to learn more about the options available for creating labels.
Getting to Know the Label Maker
Become familiar with the location of the feature and function keys on your label maker. Refer to Figure 1. The following sections describe each feature in detail.
Power
The  button turns the power on and off. After two minutes of no activity, the power is switched off automatically. The last label created is remembered and displayed when the power is turned back on. The previously selected style settings are also restored.
LCD Display
You can enter up to 99 characters and spaces. The display shows about 13 characters at a time. The number of characters displayed will vary due to proportional spacing.
Feature indicators along the top and bottom of the LCD display appear black when a feature or setting is selected.
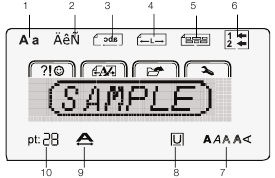
- Uppercase/lowercase
- Accented characters
- Mirror
- Fixed length
- Alignment
- Current line
- Font style
- Boxes/Underline
- Font width
- Font size
Navigation Keys
You can review and edit your label using the left and right navigation keys. You can move through menu selections using all four navigation keys, and then press ![]() to make a selection.
to make a selection.
CAPS
The CAPS key toggles between upper and lower case character entry. The default is lowercase.
Shift
Pressing and holding the  key and then pressing a character, enters an uppercase character and when in uppercase or CAPS mode enters an lowercase character.
NEW
The  key clears the current text and formatting from the display, creating a new label.
Backspace
The  key deletes the character to the left of the cursor. Holding the key deletes multiple characters.
Menu
The  key displays the Symbols/Clip Art, Format, Memory, and Settings tabs.
Pressing the key repeatedly scrolls through the tabs.
- Use the
![]() symbols and clip art menu to insert symbols and clip art on your labels. You can also use the short cut keys to quickly add symbols. See Adding Special Characters.
symbols and clip art menu to insert symbols and clip art on your labels. You can also use the short cut keys to quickly add symbols. See Adding Special Characters. - Use the
![]() format menu to set fixed label length, mirror text, or alignment.
format menu to set fixed label length, mirror text, or alignment. - Use the
![]() memory menu to open or save labels.
memory menu to open or save labels. - Use the
![]() settings menu to change the language and label width settings.
settings menu to change the language and label width settings.
 symbols and clip art menu to insert symbols and clip art on your labels. You can also use the short cut keys to quickly add symbols. See Adding Special Characters.
 format menu to set fixed label length, mirror text, or alignment.
 memory menu to open or save labels.
 settings menu to change the language and label width settings.
Cancel
The  key exits from a menu without making a selection or cancels an action, such as printing.
The  key prints your label after asking you how many copies you want to print. The maximum number of copies you can print is 9.
Pressing  + will display a preview of the label.
Formatting Your Label
You can choose from several format options to enhance the appearance of your labels.
Changing the Font Size
Five font sizes are available for your labels. The font size applies to all characters on a label.
The font sizes that you can use depend on the label width selected and whether a box or underline is added.
To change the font size
- Press
![]() until the desired font size is displayed.
until the desired font size is displayed.
 until the desired font size is displayed.
Changing the Font Width
Two font widths are available: normal and wide.
To change the font width
- Press
![]() to toggle the font width from normal to wide.
to toggle the font width from normal to wide.
Adding Font Styles
You can choose from six different font styles:
 | Normal |  | Outline |
 | Bold |  | Shadow |
 | Italic |  | Vertical |
The style you select applies to all characters. Styles can be used with alphanumeric characters and some symbols.
To change the font style
- Press
![]() until the desired font style is displayed.
until the desired font style is displayed.
Adding Borders and Underline Styles
You can highlight your text by choosing a border or underline style.
 | Underline |  | Parchment |
 | Square |  | Call Out |
 | Rounded |  | Flowers |
 | Edged |  | Crocodile |
 | Pointed |
To add a box or underline
- Press
![]() until the desired box or underline style is displayed and press
until the desired box or underline style is displayed and press ![]() .
.
 until the desired box or underline style is displayed and press
 A label can be underlined or enclosed within a box, but not both together.
When adding an underline on a two-line label, each line is underlined. When adding a box on a two-line label, both lines are enclosed in a single box.
Creating Two-Line Labels
You can print a maximum of two lines on a label. Only one line of text can be printed on 6 mm (1/4") labels.
To create a two-line label
- Enter text for the first line and press
![]() .
. - Enter text for the second line.
The![]() icon on the LCD indicates which line is currently displayed.
icon on the LCD indicates which line is currently displayed. - Press
![]() to print.
to print.
 icon on the LCD indicates which line is currently displayed.
 to print.
Aligning the Text
You can align the text to print left or right justified on the label. The default alignment is centered.
To change the alignment
- Press
![]() until the
until the ![]() menu appears.
menu appears. - Use the navigation keys to select Alignment and press
![]() .
. - Select right, left, or centered alignment and press
![]()
Using Mirror Text
The mirror format allows you to print text which reads from right to left, as you would see it in a mirror.
To turn on mirror text
- Press
![]() until the
until the ![]() menu appears.
menu appears. - Select Mirror and press
![]() .
. - Select one of the two options and press
![]() .
.
 menu appears.
Adding Special Characters
Symbols, clip art, and other special characters can be added to your labels.
Adding Symbols and Punctuation
The complete list of symbols available. The short cut keys will take you quickly to the type of symbol you are looking for.
 | Pressing the symbols short cut key takes you quickly to the first row of the symbols table which begins with the punctuation symbols. |
 | Pressing the currency short cut key takes you quickly to the currency symbols. |
 | Pressing the math short cut key takes you quickly to the math symbols. |
To insert symbols
- Press the short cut key for the type of symbol you wish to add.
You can also press![]() and select Symbols to view all the symbols available.
and select Symbols to view all the symbols available. - Use the navigation keys to select the desired image. Press
![]() or
or ![]() to move across a row; press
to move across a row; press ![]() or
or ![]() to move from row to row.
to move from row to row. - Press
![]() to add the image to your label.
to add the image to your label.
 or
or  to move across a row; press
  or
or  to move from row to row.
Adding Clip Art
The label maker includes the clip art.
To insert clip art
- Press
![]() .
. - Use the navigation keys to select the desired image. Press
![]() or
or ![]() to move across a row; press
to move across a row; press ![]() or
or ![]() to move from row to row.
to move from row to row. - Press
![]() to add the image to your label.
to add the image to your label.
Adding International Characters
The label maker supports the extended Latin character set using RACE technology.
After pressing the ![]() key, repeatedly pressing a letter scrolls through the available variations of that letter.
key, repeatedly pressing a letter scrolls through the available variations of that letter.
For example, if you press the letter a, you will see a à â æ and so on through all the variations available.
To add accented characters
- Press
![]() . The accented character indicator is shown on the display.
. The accented character indicator is shown on the display. - Press an alpha character. The accent variations are displayed.
- When the desired accented character appears, wait a few seconds for the cursor to move beyond the character to continue entering text.
Creating Fixed-Length Labels
Normally, the length of the label is determined by the length of the text. However, you can choose to set the length of the label for a specific application.
If the text you entered does not fit within the fixed label length, a message is displayed showing the smallest possible label length for this text. You can choose a fixed length label from 1.5" (40 mm) up to 15" (400 mm) long.
To set the label length
- Press
![]() until the
until the ![]() menu appears.
menu appears. - Use the navigation keys to select Length and press
![]() .
. - Select Fixed and press
![]() .
. - Set the length for your label and press
![]() .
.
 menu appears.
Using the Label Maker Memory
The label maker has a powerful memory feature that allows you to save the text of up to nine frequently-used labels. You can recall saved labels and you can insert saved text into a label.
Saving a Label
You can save up to nine frequently-used labels. When you save a label, the text and all formatting are saved.
To save the current label
- Press
![]() until the
until the ![]() menu appears.
menu appears. - Use the navigation keys to select Save and press
![]() . The first available memory location is displayed.
. The first available memory location is displayed. - Use the navigation keys to move through the locations. You can store new text in any of the memory locations.
- Select a memory location and press
![]() .
.
Your label text is saved and you are returned to the label.
Opening Saved Labels
You can easily open labels saved in memory to use at a later time.
To open saved labels
- Press
![]() until the
until the ![]() menu appears.
menu appears. - Use the navigation keys to select Open and press
![]() . The first memory location is displayed.
. The first memory location is displayed. - Use the navigation keys to select a label to open and press
![]() . If the display currently contains label content, a message is displayed to confirm you want to overwrite the current label.
. If the display currently contains label content, a message is displayed to confirm you want to overwrite the current label.
Caring for Your Label Maker
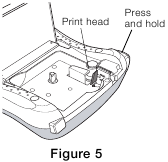
Your label maker is designed to give you long and trouble-free service, while requiring very little maintenance. Clean your label maker from time to time to keep it working properly. Clean the cutter blade each time you replace the label cassette.
 Cutter blade is extremely sharp.
To clean the cutter blade
- Remove the label cassette.
- Press and hold the cutter button to expose the cutter blade. See Figure 5.
![]()
- Use a cotton ball and alcohol to clean both sides of the blade.
Troubleshooting
![]() Review the following possible solutions if you encounter a problem while using your label maker.
Review the following possible solutions if you encounter a problem while using your label maker.
| Problem/Error Message | Solution |
| No display |
|
| Poor Print Quality |
|
| Poor Cutter Performance | Clean the cutter blade. See Caring for Your Label Maker. |
| Printing. . . | No action required. Message disappears when printing is finished. |
| Too many characters Exceeded maximum number of characters in buffer. | Delete some or all of the buffer text. |
| Too many lines Exceeded maximum number of lines |
|
| Batteries almost discharged. | Replace batteries or connect AC power adapter. |
| Tape Jam Motor is stalled due to label jam. |
|
If you still need assistance, contact DYMO Customer Support at http://support.dymo.com.
Symbols

Clip Art

Environmental Information
The equipment that you have bought requires the extraction and use of natural resources for its production.
It may contain substances that are hazardous to health and the environment. In order to avoid the dissemination of those substances in our environment, and to diminish the pressure on natural resources, we encourage you to use the appropriate take-back systems. These systems will reuse or recycle most of the materials of your end-of-life equipment in an environmentally sound way.
The crossed-bin symbol marked on your device indicates you should use these systems.
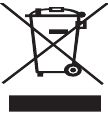
If you need more information on the collection, reuse, and recycling of this product, please contact your local or regional waste administration.
You can also contact DYMO for more information on the environmental performance of our products.
Electrical Ratings
| Printer Power Rating | Input: 9VDC, 2.0A |
| Power Adapter Rating | Input: 100-240Vac 50/60Hz 0.6A Output: 9VDC 2.0A |
Documents / ResourcesDownload manual
Here you can download full pdf version of manual, it may contain additional safety instructions, warranty information, FCC rules, etc.
Download Dymo LabelManager 210D+ - Electronic Label Maker Manual
Advertisement


Need help?
Do you have a question about the LabelManager 210D+ and is the answer not in the manual?
Questions and answers