
Related Manuals for Noble House Home Furnishings KITCHEN CART


Summary of Contents for Noble House Home Furnishings KITCHEN CART
- Page 1 Caution : You must read this before you proceed KITCHEN CART Page 1 OF 15 Noble house Home Furnishings LLC...
- Page 2 Label Picture Description Left Side Panel Right Side Panel Top Panel Partition Upper Shelf Shelf Upper Cross Bar Cross Bar Left Back Panel Right Back Panel Page 2 OF 15 Noble house Home Furnishings LLC...
- Page 3 Drawer Left Side Panel Drawer Right Side Panel Drawer Bottom Panel Drawer Front Panel Label Picture Description ① Cam Bolt ② Cam Lock Screw ③ (M4x35mm) ④ Dowel Screw ⑤ (M3x12mm) ⑥ Magnet Page 3 OF 15 Noble house Home Furnishings LLC...
- Page 4 Wheel ⑧ (with brake) ⑨ Wheel ⑩ Handle Screw ⑪ (M3x14mm) ⑫ Door Pin ⑬ Bracket Screw ⑭ (M4x30mm) ⑮ Cabinet Slider ⑯ Drawer Slider ⑰ Buckle Screwdriver ⑱ (Not provided) Page 4 OF 15 Noble house Home Furnishings LLC...
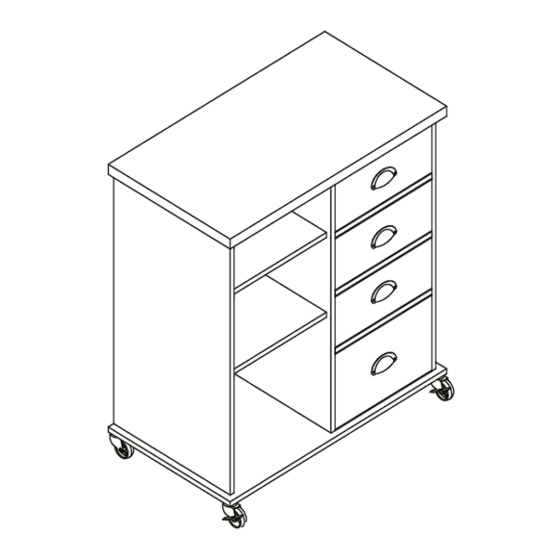
- Page 5 Before Beginning Assembly: Overview Drawer Front Top Panel(C) Panel(Q) Right Side Panel(B) Left Side Door Panel(L) Panel(A) FRONT FACING Page 5 OF 15 Noble house Home Furnishings LLC...
- Page 6 This Kitchen Cart has multiple parts and may require up to 60 minutes to assemble. To give you an overview of the Kitchen Cart parts, the above picture is to help you put the various parts into perspective. Please read through the instructions below to familiarise yourself with the parts and steps before assembly.
- Page 7 Insert Cam Bolt(①) into the mounting positions on the Right Side Panel(B) and Partition(D) using Screwdriver(⑱) as shown. Step 5 Insert Cam Bolt(①) into the mounting positions on the Left Side Panel(A) and Partition(D) using Screwdriver(⑱) as shown. Page 7 OF 15 Noble house Home Furnishings LLC...
- Page 8 1).Attach Magnets (⑥) to Cross Bar (H) using Screws(⑪) with Screwdriver(⑱). 2).Attach Bracket(⑬) to Door Panel (L) using Screws (⑤) with Screwdriver(⑱). 3).Attach Handle (⑩) to Door panel (L) using Screws (⑤) with Screwdriver(⑱) as shown. Page 8 OF 15 Noble house Home Furnishings LLC...
- Page 9 Cross Bar (H) using Screwdriver(⑱) as shown. 3).Insert Dowels (④) into the mounting positions on the Left Side Panel (A) Right Side Panel (B) and partition panel (D). Step 9 Page 9 OF 15 Noble house Home Furnishings LLC...
- Page 10 Door Pins (⑫) on Door Panel (L),then using screws(③) with Screwdriver(⑱) as shown. Step 10 Attach Wheel(with brake) (⑧) and Wheel (⑨) to Bottom Panel (K) with Screws (⑦) using Screwdriver(⑱). Step 11 Page 10 OF 15 Noble house Home Furnishings LLC...
- Page 11 Step 12 Insert the Cam Bolt(①) into Top Panel(C) with Screwdriver(⑱). Step 13 Insert Cam Lock(②) into the Left Side Panel(A),Partition(D) and Right Side Panel(B) using Screwdriver(⑱) as shown. Page 11 OF 15 Noble house Home Furnishings LLC...
- Page 12 Drawer Left Side Panel(N) and Drawer Right Side Panel(O) using Screwdriver(⑱) as shown. Do not fully tighten Cam Locks(②). 15.3)Insert Drawer Bottom Panel(P) by sliding in the panel into the grooving as shown. then tighten the Cam Locks(②) with Screwdriver(⑱) Page 12 OF 15 Noble house Home Furnishings LLC...
- Page 13 17.1)Attach Drawer Slider(⑯) to Drawer Left Side Panel(N) using Screw(⑤) with Screwdriver(⑱). Repeat this step for the Drawer Right Side Panel(O). 17.2)Attach Handle(⑩) to Drawer Front Panel(Q) using Screw(⑤) with Screwdriver(⑱). Page 13 OF 15 Noble house Home Furnishings LLC...
- Page 14 Step 18 Page 14 OF 15 Noble house Home Furnishings LLC...
- Page 15 Stains may be removed with mild soap solution and ● damp cloth. Children should not climb or jump on the furniture. ● Dust and pick-up spills using a clean, non-colored, ● lint-free cloth. Page 15 OF 15 Noble house Home Furnishings LLC...
Need help?
Do you have a question about the KITCHEN CART and is the answer not in the manual?
Questions and answers