Table of Contents
Advertisement
Quick Links
Advertisement
Table of Contents

Related Manuals for Kramer RK-19


Summary of Contents for Kramer RK-19
- Page 1 Kramer Electronics, Ltd. USER MANUAL Rack Adapter Model: RK-1...
-
Page 2: Table Of Contents
RK-1 Installation combinations 3.1.1 Using Blank Panels Recommendations for Best Performance Your Kramer RK-1 Rack Adapter Mounting on the Kramer RK-1 Rack Adapter Mounting Units that do not have Underside Screw Holes Connecting a Blank Panel to the RK-1 Technical Specifications Figures Figure 1: RK-1 Rack Adapter Figure 2: RK-1 Rack Adapter –... -
Page 3: Introduction
Congratulations on purchasing your Kramer RK-1 rack adapter, which is ideal for mounting combinations of several 1U Kramer products in a 19" rack. These include 1/2-19" 1U units, 1/4-19" 1U units, 1/8-19" 1U units and separately, up to two 6.5"-1U units. -
Page 4: Installation Combinations
• Two 102xl units • Two PS-1DVI units • Two PT-1PS units • One FC-31xl unit • Three PS-1DVI units • Three PT-1PS units • Four PS-1DVI units • Four PT-1PS units 1 Each product is measured in inches KRAMER: SIMPLE CREATIVE TECHNOLOGY... -
Page 5: Using Blank Panels
Overview You can mount one or two Kramer 6.5”products in a 19" 1U rack using the RK-1 rack adapter (see in Table 2) and close-up the empty space(s) with blank panels (see in Table Table 2: Using the RK-1 for 6.5"-1U Units Mounting Kramer 6.5"-1U products on the RK-1... -
Page 6: Recommendations For Best Performance
Table 4 indicate how to install different products together with blanks: Table 4: Using the RK-1 with Blank Panels Mounting Kramer Products with Blank Panels on the RK-1 For example: • One PIP-4 unit • One 1/2 19” blank panel •... -
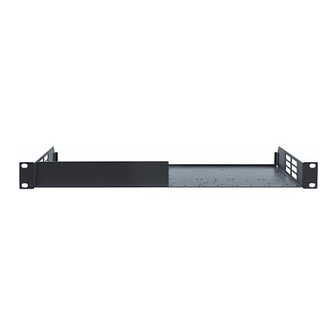
Page 7: Your Kramer Rk-1 Rack Adapter
• One 1/2-19" unit (for example, the Kramer PIP-4) • One 1/4-19” 1U unit (for example, the Kramer MultiTOOLS® FC-31xl) • Two 1/8-19” 1U units (for example, two Kramer MultiTOOLS® PS-1DVI) Figure 1: RK-1 Rack Adapter You can order additional blank panels to cover a 1/4-19”... -
Page 8: Mounting On The Kramer Rk-1 Rack Adapter
4. Tighten the screws. 5. Rotate the RK-1 horizontally with the unit connected. 6. Place the next unit (for example, the Kramer PS-1DVI) next to the unit that is already mounted. 7. Repeat steps 2 to 6 for each other unit. -
Page 9: Mounting Units That Do Not Have Underside Screw Holes
Kramer VP-5xl or the VA-50P), which will be attached to the side panel of the RK-1. 2. Place the unit on the rack (for example, the Kramer VP-5xl or the VA-50P), adjacent to the inner side panel of the RK-1. -
Page 10: Figure 4: Mounting A 6.5" Machine Via Screws On The Rk-1 Side Panel 104B (Fc-31Xl)
Mounting on the Kramer RK-1 Rack Adapter Figure 4: Mounting a 6.5” Machine via Screws on the RK-1 Side Panel 104B (FC-31xl) KRAMER: SIMPLE CREATIVE TECHNOLOGY... -
Page 11: Connecting A Blank Panel To The
Technical Specifications 5.2 Connecting a Blank Panel to the RK-1 to the RK-1 to cover any empty spaces, as the You can connect a blank panel example in Figure 5 illustrates: Figure 5: RK-1 Rack Adapter – Connecting a Blank Panel Technical Specifications Table 5 includes the technical specifications:... - Page 12 EXCLUSION OF DAMAGES The liability of Kramer for any effective products is limited to the repair or replacement of the product at our option. Kramer shall not be liable for: 1. Damage to other property caused by defects in this product, damages based upon inconvenience, loss of use of the product, loss of time, commercial loss;...
- Page 13 For the latest information on our products and a list of Kramer distributors, visit our Web site: www.kramerelectronics.com, where updates to this user manual may be found. We welcome your questions, comments and feedback. Safety Warning: Disconnect the unit from the power supply before opening/servicing.
Need help?
Do you have a question about the RK-19 and is the answer not in the manual?
Questions and answers