
Related Manuals for Kramer RK-6PS


Summary of Contents for Kramer RK-6PS
- Page 1 K R A ME R E LE CT R O N IC S L TD . USER MANUAL MODEL: RK-6PS Rack Adapter with Power Supplies P/N: 2900-300466 Rev 1...
-
Page 4: Table Of Contents
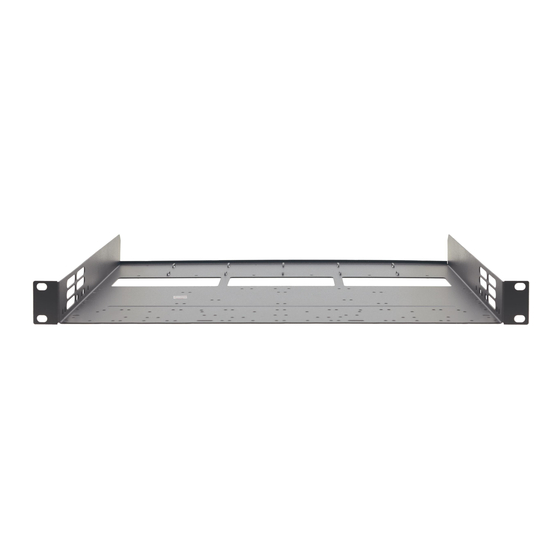
Figure 1: RK-6PS Rack Adapter Figure 2: RK-6PS Rack Adapter – Underside Figure 3: Mounting a half-19" Device via Screws on the RK-6PS Side Panel Figure 4: Mounting a 6.5” Device via Screws on the RK-6PS Side Panel Figure 5: RK-6PS Rack Adapter – Connecting a Blank Panel... -
Page 5: Introduction
Congratulations on purchasing your Kramer RK-6PS Rack Adapter with Power Supplies, which is ideal for mounting combinations of several 1U Kramer products in a 19" rack together with the Kramer RK-PS1 adapter for a power supply unit (purchased separately), per product. These include 1/2-19" 1U units, 1/3-19" 1U units, 1/4-19"... -
Page 6: Getting Started
Avoid interference from neighboring electrical appliances that may adversely influence signal quality Position your Kramer RK-6PS away from moisture, excessive sunlight and dust This equipment is to be used only inside a building. It may only be connected to other equipment that is installed inside a building. -
Page 7: Overview
Overview The RK-6PS is a 19” 1U rack adapter for mounting a combination of several Kramer TOOLS together with RK-PS1 power supply adapters (purchased separately) that are attached to the rack adapter. These include: Up to 6 RK-PS1 adapters with power supply units ... -
Page 8: Defining The Rk-6Ps
One 1/2-19" unit (for example, the Kramer VP-31) One 1/4-19” 1U unit (for example, the Kramer MultiTOOLS® 907xl) Two 1/8-19” 1U units (for example, two Kramer MultiTOOLS® FC-50) Figure 1: RK-6PS Rack Adapter You can order additional blank panels to cover a 1/4-19”... -
Page 9: Rk-6Ps Installation Combinations
RK-6PS Installation Combinations This section describes the RK-6PS installation combinations. 4.1.1 MultiTOOL Installation combinations You can use the RK-6PS to mount different combinations of products: Mounting Kramer Products on the RK-6PS (measured in inches) For example: 2 PIP-4, or ... -
Page 10: Using Blank Panels
6.5” Installation combinations 4.1.2 You can mount one or two Kramer 6.5” products in a 19" 1U rack using the RK-6PS rack adapter and close-up the empty space(s) with blank panels (see in Section 4.1.3). Mounting Kramer 6.5"-1U Devices on the RK-6PS... - Page 11 The following table shows examples of how to install different products together with blanks: Mounting Kramer Products with Blank Panels on the RK-6PS For example: 1 PIP-4 1 1/2 19” blank panel 1 1/2 19” blank panel ...
-
Page 12: Mounting The Devices On The Rack Adapter
1, do the following: 1. Place the first device on the rack (for example, the Kramer 907xl). 2. Hold both the 907xl and the RK-6PS with your hands and turn them upside down. 3. Insert and the appropriate amount of screws through the holes on the... -
Page 13: Mounting Devices With No Underside Screw Holes
VA-50P), adjacent to the inner side panel of the RK-6PS. 3. Insert the two M3x8 screws (supplied with the unit) through the holes on the side panel of the RK-6PS that fit the holes on the side panel of the unit (as illustrated in... -
Page 14: Figure 3: Mounting A Half-19" Device Via Screws On The Rk-6Ps Side Panel
Figure 3: Mounting a half-19" Device via Screws on the RK-6PS Side Panel Figure 4: Mounting a 6.5” Device via Screws on the RK-6PS Side Panel RK-6PS - Mounting the Devices on the Rack Adapter... -
Page 15: Connecting A Blank Panel To The Rk-6Ps
Connecting a Blank Panel to the RK-6PS You can connect a blank panel to the RK-6PS to cover any empty spaces, as the example in Figure 5 illustrates. One 1/2U-19" blank panel is supplied with the RK-6PS package; otherwise, you need to purchase a blank panel separately, as detailed in Section 4.1.3. -
Page 16: Mounting The Rk-Ps1 Onto The Rk-6Ps
6.1.2) or directly to the rack shelf (download the separate RK-PS1 user manual from our Web site). Mounting the RK-PS1 The devices mounted onto the RK-6PS are powered via individual power supplies that are attached to RK-6PS by the RK-PS1. 6.1.1... - Page 17 Insert the power supply into the RK-PS1. Adjust the height of the RK-PS1 by partially releasing and then tightening the two nuts on the sides so that the power supply fits well. Remove the power supply. RK-6PS - Mounting the RK-PS1 onto the RK-6PS...
-
Page 18: Figure 6: Attaching The Rk-Ps1
Up to six RK-PS1 units can be mounted onto the RK-6PS, providing power to up to six mounted devices. To mount the RK-PS1 onto the RK-6PS: 1. Insert the RK-PS1 and tighten with two M3x5 screws (supplied with the unit) to the RK-6PS. -
Page 19: Figure 8: Setting The Adjustment Plate
Figure 8: Setting the Adjustment Plate 4. Connect the power supply cable according to the specific instructions (if required) in the user manual of the Kramer product. Figure 9: Connecting the power cable to the Device 5. In the same way attach additional RK-PS1 adapters. -
Page 20: Figure 10: Connecting Additional Rk-Ps1 Adapters
6. Connect the power cables to each of the devices. Figure 11: Connecting the Power Supply to the other Devices 7. Connect the C14 cable cord from each power supply to the mains electricity. RK-6PS - Mounting the RK-PS1 onto the RK-6PS... -
Page 21: Technical Specifications
100-240V AC, 50/60Hz 100-240V AC, 50/60Hz OPERATING TEMPERATURE: 0° to +40°C (32° to 104°F) STORAGE TEMPERATURE: -40° to +70°C (-40° to 158°F) HUMIDITY: 10% to 90%, RHL non-condensing Specifications are subject to change without notice RK-6PS - Technical Specifications... - Page 23 For the latest information on our products and a list of Kramer distributors, visit our Web site where updates to this user manual may be found. We welcome your questions, comments, and feedback. Web site: www.kramerelectronics.com E-mail: info@kramerel.com SAFETY WARNING...
Need help?
Do you have a question about the RK-6PS and is the answer not in the manual?
Questions and answers