
Related Manuals for Logia LOWSC7110FWB8


Summary of Contents for Logia LOWSC7110FWB8
- Page 1 7-IN-1 WIRELESS 24-HOUR/10-DAY FORECAST WEATHER STATION WITH WI-FI®, BUILT-IN SOLAR PANEL, AND 8” FULL-COLOR LCD DISPLAY USER GUIDE LOWSC7110FWB8...
-
Page 2: Table Of Contents
Thank you for purchasing the Logia 7-in-1 Wireless 24-Hour/10-Day Forecast Weather Station with Wi-fi®, Built-In Solar Panel, and 8” Full-Color LCD Display. This User Guide is intended to provide you with guidelines to ensure that operation of this product is safe and does not pose risk to the user. -
Page 3: Safety Precautions
SAFETY PRECAUTIONS WARNING! Please read and understand all safety precautions, operating instructions, and care/maintenance instructions before operating this appliance. Keep this manual for future reference. • This product is not a toy. Keep out of the reach of children. • This product is designed for use in the home only as an indication of weather conditions. This product is not to be used for medical purposes or public information. -
Page 4: Product Features
TIPS FOR SENSOR SITE SELECTION • Rain collector must be cleaned every few months. • Batteries in the sensor must be changed every two to two and a half (2 – 2.5) years. • Sensor should be installed at least 5’ (1.5 m) away from any building or structure. •... -
Page 5: Package Contents
PACKAGE CONTENTS 24H 10-Day Forecast 1. Weather display console 6. 2 x screws (for clamp) 2. Console power adapter 7. 2 x hexagonal nuts (for clamp) 3. Console CR2032 battery 8. 2 x rubber pads (for clamp) 4. 7-in-1 outdoor weather sensor 9. -
Page 6: Product Overview
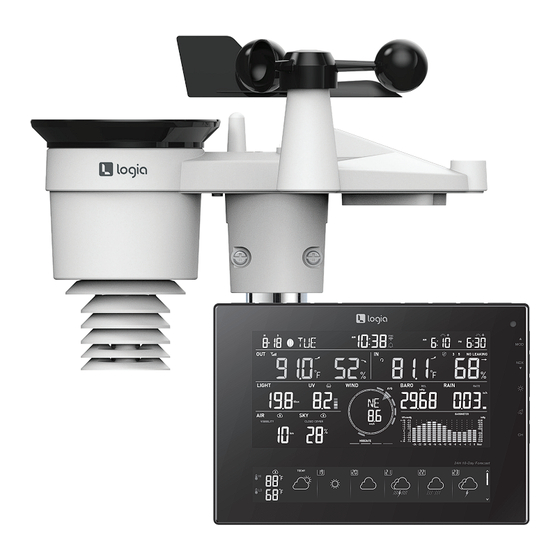
PRODUCT OVERVIEW WIRELESS SENSOR OVERVIEW Antenna Bubble level Radiation shield & hygro-thermo sensor Rain collector Mounting base Wind vane Battery door 10. UV/Light sensor Reset button 11. Solar panel Transmission status LED 12. Wind cups... - Page 7 ALARM / SNOOZE RAIN GRAPH 24H 10-Day Forecast C&A Marketing Inc. Model No.:LOWSC7110FWB8 2AD2W-LOWSC5711FABI This device complies with Part 15 of the FCC Rules. Operation is subject to the following two conditions: (1) this device may not cause harmful interference, and (2) this device must accept any interference received, including interference that may cause undesired operation.
- Page 8 SCREEN DISPLAY OVERVIEW 24H 10-Day Forecast 1. Moon phase, time & date, sunrise/sunset, 7. Barometric pressure moon rise/moon set 8. Rain rate & rainfall 2. Outdoor temperature & humidity 9. Cloud cover/lightning 3. Indoor temperature & humidity 10. Visibility/air quality 4.
-
Page 9: Installation Instructions
INSTALLATION INSTRUCTIONS The wireless 7-in-1 outdoor sensor measures wind speed, wind direction, rainfall, UV, light intensity, temperature, and humidity for you. SETTING UP THE WIRELESS 7-IN-1 OUTDOOR SENSOR INSTALLING THE RAIN FUNNEL 1. Align the lock grooves on the rain funnel with the lock grooves in the rain collector. 2. - Page 10 MOUNTING THE SENSOR ON A POLE 1. Stick the rubber pads on the inside of the mounting clamp and mounting base of the sensor. 2. Insert two (2) screws into the mounting base and clamp. Then, loosely tighten the screws using included nuts.
- Page 11 2. Set hemisphere to South in the Time & Date settings. (Please refer to section for setup details) NOTES: Changing the hemisphere setting will automatically switch the direction of the moon phases on the display. Pointing the wireless weather sensor toward the south will allow maximum sunlight on the solar panel, especially during the winter season in the Southern Hemisphere.
- Page 12 PAIRING THE CONSOLE WITH THE WIRELESS 7-IN-1 SENSOR 1. Once your display console powers on, it should automatically enter AP mode and search for the wireless weather sensor. If the console does not connect within the first 15 minutes, press the SENSOR/WIFI button to manually pair the sensor and console.
-
Page 13: Operating Instructions
OPERATING INSTRUCTIONS FORECAST Up to 19 different weather icons are provided according to the weather forecasted: SUNNY CLEAR SKY* PARTLY CLOUDY PARTLY CLOUDY* CLOUDY / FOGGY PARTLY CLOUDY WITH OVERCAST WINDY LIGHT RAIN HEAVY RAIN LIGHT RAIN PARTLY CLOUDY WITH PARTLY CLOUDY WITH PARTLY CLOUDY WITH THUNDERY... - Page 14 MULTI-DAY WEATHER FORECAST CHART Based on the longitude and latitude of the device in your ProWeatherLive (PWL) account, (refer to PWL section for setup), the console indicates the weather forecasts for today and the next 10 days. To switch between the coming 5 days and the following 5 days, press and hold the DAY button. HIGH/LOW TEMPERATURE FORECAST By default, the console shows the high (HI) and low (LO) temperatures of the current day.
- Page 15 AVERAGE TEMPERATURE WITH CHANCE OF RAIN FOR TODAY & NEXT 10 DAYS Instead of HI and LO temperature, the user can simply press the ^/MOD button to switch between HI/LO temperatures mode and average temperature (AVG) and chance of rain mode. HI / LO TEMPERATURES AVG TEMPERATURE / CHANCE OF RAIN To view the average temperature and chance of rain from today to the next 10 days, simply...
- Page 16 WEATHER FORECAST FOR PRESENT TIME & NEXT 23 HOURS The console also indicates the weather forecasts for the present time and the next 23 hours. Press the HOUR button to switch to 24-hour forecast. To view the weather forecast for all 24 hours in 6-hour intervals, simply press &...
- Page 17 NOTE: If the Wi-Fi connectivity is not stable for over three (3) hours, the weather forecast, cloud cover, and visibility will not be shown, and the icon will disappear. BAROMETRIC PRESSURE The atmospheric pressure is the pressure at any location of the earth caused by the weight of the column of air above it.
- Page 18 TEMPERATURE & HUMIDITY OUTDOOR TEMPERATURE & HUMIDITY 1. Temperature index indicator 2. Outdoor sensor low battery indicator 3. Outdoor sensor signal indicator to show the signal receiving strength 4. Outdoor temperature reading 5. Outdoor temperature trend 6. Outdoor humidity reading 7.
- Page 19 FEELS LIKE The Feels Like temperature index determines what temperature it actually feels like outside, taking into account factors like wind chill and the heat index. HEAT INDEX The heat index is determined by the wireless weather sensor’s temperature and humidity readings when the temperature is between 79 °F (26 °C) and 120 °F (50 °C).
- Page 20 INDOOR/CHANNEL TEMPERATURE & HUMIDITY This section can show the reading and status of the optional indoor hygro-thermo sensor(s) and water leak sensor(s). 1. Channel (CH) number 2. Low battery indicator for CH sensor 3. Sensor signal strength icon 4. Indoor/CH sensor temperature trend 5.
- Page 21 MULTI-CHANNEL AND SCROLL MODE FOR OPTIONAL SENSORS Users can add up to seven (7) additional hygro-thermo sensors to the display console. Press the CH button to switch between indoor and channels 1 to 7. For the auto-scroll function, just press and hold the CH button for three (3) seconds and the icon will appear next to CH.
- Page 22 WIND WIND SPEED AND DIRECTION OVERVIEW 1. High wind speed alert indicator 2. Gust indicator 3. Real-time wind direction indicator (16 points) 4. Average/gust wind speed or Beaufort scale WIND SPEED, GUST, AND BEAUFORT SCALE DISPLAY Press the WIND button to switch between the average wind speed measurement, gust wind speed measurement, and BFT measurement.
- Page 23 BEAUFORT SCALE The Beaufort scale below is an international scale of wind velocities from 0 (Calm) to 12 (Hurricane force).
- Page 24 RAIN This section shows the rainfall or rain rate information. 1. Period of rainfall and rain rate 2. Reading of rainfall or rain rate 3. Rain rate level SELECT THE RAINFALL DISPLAY MODE Press the RAIN button to toggle between: •...
- Page 25 Level Description Light rain Moderate rain Heavy rain Violent rain Range (mm/h) 0.1 ~ 2.5 2.51 ~ 10.0 10.01 ~ 50.0 >50.0 RESET THE RAINFALL RECORDS While in normal mode, press and hold the RAIN button for two (2) seconds to reset the rainfall records.
- Page 26 LIGHT INTENSITY 1. Sunlight intensity AIR QUALITY This section shows the visibility distance according to the device’s location inputted into ProWeatherLive (PWL). If you have optional PM2.5/10, HCHO / VOC, CO and/or CO sensor(s), you can also view the corresponding data in this section by pressing the AIR button to check the readings in the following display sequence: Visibility >...
- Page 27 Step Mode Display VOC (Volatile Organic Compound) mode If you paired the HCHO/VOC optional sensor. The console can display VOC level 1 ~ 5. PM2.5/10 mode If you paired the PM2.5/10 optional sensor. The console can display PM2.5 /10 or relevant AQI readings. The PM2.5 /10 sensor has a default display in PM2.5.
- Page 28 SKY CONDITION The sky condition section shows the % of cloud cover according to the device’s location inputted into PWL. If you have an optional lightning sensor, you can also view the lightning detection instantly. CLOUD COVER MODE Cloud cover is an important component of understanding and predicting the weather. NOTE: If the Wi-Fi connectivity is not stable for over three (3) hours, the cloud cover will not appear on the display and the icon will disappear.
- Page 29 ACTIVATE THE AUTO LOOP FOR SKY CONDITION To activate the auto-loop function in this section, just press and hold the SKY button for two (2) seconds and the icon will show near the CH number and display the connected channels’ reading at four (4) second intervals.
- Page 30 Step Mode Display Past 24 hours indoor humidity graph Past 24 hours outdoor humidity graph MAX/MIN MAX/MIN DATA RECORD The display console can record the daily MAX/MIN weather data or MAX/MIN data since last reset. Daily MAX reading Daily MIN reading MAX reading since MIN reading since last reset...
- Page 31 MOON PHASE The sun-lit area of the moon moves from right to left in the Northern Hemisphere, while in the Southern Hemisphere, it moves from left to right. Below is the table which illustrates how the moon will appear on the console. Northern Hemisphere Icons Moon Phase Southern Hemisphere Icons...
- Page 32 WIRELESS SIGNAL RECEPTION The display console shows the signal strength for the outdoor wireless sensor: No signal Weak signal Good signal 7-in-1 wireless sensor array Hygro-thermo channel or other optional semsor • If the sensor signal is lost and isn’t recovered within 15 minutes, the signal icon will disappear.
- Page 33 OTHER SETTINGS TIME, DATE, UNIT, AND MORE Press and hold the SET button for two (2) seconds to enter the setting mode. Press the ^/MOD or v/NDX button to adjust the setting and press the SET button again to save and proceed with the next step of the setting.
- Page 34 During these settings, you can go back to normal mode by pressing and hold the SET button for two (2) seconds. UNIT SETTING Use the UNIT button to change the unit of the readings on the console display. 1. Press and hold the UNIT button for two (2) seconds to enter the unit setting mode. 2.
- Page 35 SETTING ALARM TIME AND ICE ALERT In normal time mode, press and hold the ALARM button for two (2) seconds to enter alarm/alert setting mode. Then, press the SET button again to save and proceed with the next step of the setting. Step Mode How to adjust...
- Page 36 ALARM OPERATION Use the UNIT button to change the unit of the readings on the console display. • Press and hold the UNIT button for two (2) seconds to enter the unit setting mode. • Press the UNIT button to proceed to the next setting step. •...
- Page 37 4. Select your device. 5. Go to your Wi-Fi list in your mobile device setting and select the console. 6. Go back to the app and check the “Operation completed” box. Then, tap “Confirm”. NOTE: Make sure your mobile device is within range of the console when connecting the two together.
- Page 38 8. Enter the name and password of your Wi-Fi network. Then, tap “Next”. 9. Wait a few minutes for your console to connect to your Wi-Fi network. NOTE: Be aware that you will need to put the console in AP mode and reconnect the console and your mobile device every time you wish to reenter app settings.
- Page 39 1. First, select the weather server you wish to connect to. 2. Register or log in your account of that server. 3. Enter the Station ID and key obtained from the weather server into the app. 4. Make sure “Upload” is enabled. 5.
- Page 40 CALIBRATION Go to “Calibration” to recalibrate certain sections of your console. FIRMWARE Go to “Firmware” to view the current firmware version and to see if there is a new firmware update available. NOTE: Tap the “Settings” icon next to your connected device when you want to enter the setup screen.
- Page 41 CREATE PWL ACCOUNT & SET UP WI-FI CONNECTION ® The console can upload/download weather data to ProWeatherLive (PWL) through a Wi-fi router, follow the steps below to set up your account and connection. CREATE YOUR PWL ACCOUNT 1. Visit the ProWeatherLive website at https://www.proweatherlive.net and click the “Create Your Account”.
- Page 42 3. In “Edit Devices” page, click the “+Add” on the top right corner to create a new device, it will generate the station ID and key instantly, jot down both and then click “FINISH” to create the station tab. 4. Click the “ Edit “ on the top right corner of the station tab. 5.
- Page 43 PROWEATHERLIVE (PWL) LIVE DATA Once your device is connected, login into your ProWeatherLive account and see your device’s live weather data on the dashboard. UPLOAD TO OTHER WEATHER SERVERS The ProWeatherLive weather server allows data from each weather station to be uploaded to two (2) other weather servers such as WeatherUnderground, WeatherCloud, PWSWeather, or AWEKAS.
-
Page 44: Care/Maintenance
UPDATING THE FIRMWARE This display console supports OTA (over the air) Function Firmware and will update whenever necessary through the WSLink app. The update function for both types of updates can be found at the bottom of the Advanced Tab on the wireless settings interface (see Advanced Settings via Web Interface). - Page 45 PAIRING THE SENSOR(S) MANUALLY Whenever you changed the batteries of the 7-in-1 weather sensor or other additional sensors, re-synchronization must be done manually. 1. Change all the batteries to new ones in the low battery sensor(s). 2. Press the SENSOR/WI-FI button on the console to enter sensor synchronization mode (as indicated by the flashing antenna).
-
Page 46: Troubleshooting
5. Install all the parts back when they are clean and fully dried. COMPATIBLE DEVICES The display console of the Logia 7-in-1 Wireless 24-Hour/10-Day Forecast Weather Station with Wi-fi®, Built-In Solar Panel, and 8” Full-Color LCD Display can be paired with other add- on sensors like the indoor hygro-thermo, soil moisture &... -
Page 47: Specifications
Data isn’t transferring to ProWeatherLive. In the console SETUP page, ensure your Station ID and Station Key are correct. 2. In the “Edit Devices” of the console on PWL, ensure the device’s Mac address is entered correctly. Rainfall data is not correct. Make sure the rain collector is clean for the tipping bucket to tip smoothly. - Page 48 Warranty length: 1 year WI-FI COMMUNICATION SPECIFICATIONS Wi-fi standard: 802.11 b/g/n Wi-fi operating frequency: 2.4 GHz Supported router security type: WPA/WPA2, WPA3, OPEN, WEP (WEP only supports Hexadecimal password) Websites: https://proweatherlive.net App name: WSLink Support platforms: Android and Apple RF frequency: 915 MHz (US version) RF transmission range: 492’...
- Page 49 INDOOR HUMIDITY DISPLAY & FUNCTION SPECIFICATIONS Humidity unit: Accuracy: 1% ~ 9% RH ± 8% RH @ 77 °F (25 °C) 10% ~ 90% RH ± 5% RH @ 77 °F (25 °C) 91% ~ 99% RH ± 8% RH @ 77 °F (25 °C) Resolution: Memory modes: Historical data of past 24 hours, MAX/MIN...
- Page 50 Wind chill display range: -85 °F ~ 64.4 °F (-65 °C ~ 18 °C) Resolution: 0.1 °F/0.1 °C Accuracy: 41.2 °F ~ 140 °F ± 0.7 °F (5.1 °C ~ 60 °C ± 0.4 °C) -3.8 °F ~ 41 °F ± 1.8 °F (-19.9 °C ~ 5 °C ± 1 °C) -40 °F ~ -4 °F ±...
-
Page 51: Warranty
Company’s property. Refunds can only be given if the original Product is returned. This Warranty does not apply to: (a) Any non-Logia 7-in-1 Wireless 24-Hour/10-Day Forecast Weather Station with Wi-fi®, Built-In Solar Panel, and 8” Full-Color LCD Display product, hardware or software, even if packaged or sold with the Product;... - Page 52 (i) If any Logia 7-in-1 Wireless 24-Hour/10-Day Forecast Weather Station with Wi-fi®, Built-In Solar Panel, and 8” Full-Color LCD Display serial number has been removed or defaced. This Warranty is valid only in the country where the consumer purchased the Product, and only applies to Products purchased and serviced in that country.
- Page 53 FCC STATEMENT This device complies with Part 15 of the FCC Rules. Operation is subject to the following two conditions: (1) This device may not cause harmful interference, and; (2) This device must accept any interference received, including interference that may cause undesired operation. NOTE: This equipment has been tested and found to comply with the limits for a Class B digital device, pursuant to part 15 of the FCC Rules.
- Page 54 LOGIA is a trademark of C&A IP Holdings LLC, in the U.S. Android is a trademark of Google LLC. Apple and App Store are trademarks of Apple Inc. in the U.S. and other countries. IOS is a trademark of Cisco in the U.S. and other countries and is used under license.
Need help?
Do you have a question about the LOWSC7110FWB8 and is the answer not in the manual?
Questions and answers