Table of Contents
Advertisement
Advertisement
Table of Contents

Related Manuals for Logia LOWSB510PB


Summary of Contents for Logia LOWSB510PB
- Page 1 5-IN-1 WIRELESS WEATHER STATION WITH PC DATA SYNC USER GUIDE LOWSB510PB...
-
Page 2: Table Of Contents
Thank you for purchasing the Logia 5-in-1 Wireless Weather Station with PC Data Sync. This ™ User Guide is intended to provide you with guidelines to ensure that operation of this product is safe and does not pose risk to the user. Any use that does not conform to the guidelines described in this User Guide may void the limited warranty. -
Page 3: Safety Precautions
10. Do not tamper with the display or the weather vane’s internal components. This invalidates your limited warranty. 11. Placing this product on certain types of wood may result in unintended damage to the finish, for which Logia will not be responsible. Consult your furniture manufacturer’s instructions for ™... -
Page 4: Product Features
PRODUCT FEATURES 1. Wireless 5-in-1 weather sensor measures wind speed, wind direction, rainfall, temperature, and humidity. 2. No calibration needed! The product is fully pre-calibrated and mostly assembled; all you need to do is install it and sync with the included display console. 3. -
Page 5: Package Contents
PACKAGE CONTENTS 1. Wireless Weather 5. Large Mounting Screws (4) 10. Rubber Pads for Mounting Clamp Sensor (1) 6. Large Hexagonal Nuts (4) 11. Micro USB Cable (1) 2. Mounting Pole (1) 7. Large Washers (4) Plastic Exterior 12. Display Console (1) 8. -
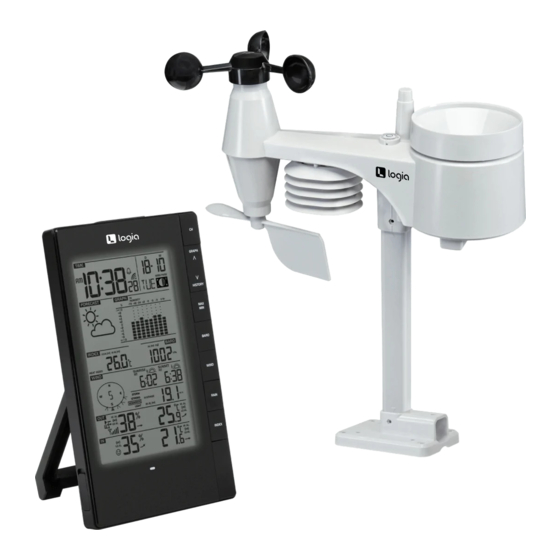
Page 6: Display Console Overview
DISPLAY CONSOLE OVERVIEW MAIN CONSOLE OVERVIEW 1. Snooze/Backlight button 8. BARO button 16. °C/°F button 2. LCD Display (see overview 9. WIND button 17. DATA button on page 7) 10. RAIN button 18. TIME SYNC button 3. Micro USB port 11. -
Page 7: Lcd Display Overview
LCD DISPLAY OVERVIEW 1. a) Time, b) date, and c) moon phase 2. Weather forecast icons 3. Weather indexes (heat index, wind chill, Beaufort level, dew point) 4. Wind direction and wind speed 5. Temperature and humidity (outdoor) 6. Temperature and humidity (indoor) 7. -
Page 8: Wireless Weather Sensor Overview
WIRELESS WEATHER SENSOR OVERVIEW MAIN DEVICE 1. Rain collector 8. Mounting base 2. Level 9. Mounting clamp 3. Antenna 10. Red LED indicator 4. Wind cups (anemometer) 11. RESET button 5. Mounting pole 12. Battery compartment 6. Sensor casing 13. Mounting clamp screws 7. - Page 9 RAIN GAUGE 1. Rain collector 2. Tipping bucket 3. Rain sensor 4. Drain holes TEMPERATURE AND HUMIDITY SENSOR 1. Sensor shield 2. Temperature and humidity sensor WIND SENSOR 1. Wind cups (anemometer) 2. Wind vane...
-
Page 10: Wireless Weather Sensor Setup
WIRELESS WEATHER SENSOR SETUP INSTALL BATTERIES 1. Unscrew the door to the battery compartment on the underside of the main sensor unit. 2. Insert three (3) new AA alkaline batteries, making sure the polarities match up with the markings inside the compartment. 3. - Page 11 STALLATION battery door compartment on tightly . ND INSTALLATION tery door at bottom of unit and insert the he battery door at bottom of unit and insert the ng to the +/- polarity indicated . ccording to the +/- polarity indicated . the water tight O-ring is properly aligned in y door compartment on tightly .
- Page 12 Please note that there are two different ways you can attach the pole to the base, depending on how you will be mounting it outdoors. If you will be fastening the sensor directly to a railing, use the option that positions the stand perpendicular to the sensor pole. If you will be fastening it to a pole, use the slot that positions the base parallel to the sensor pole.
-
Page 13: Display Console Setup
properly orient wind measurements . 1 .5 meter off vane . 2 . Choose an open area within 150 meters from the LCD console . the ground ing stand and 3 . Install the wireless 5-IN-1 sensor as level as possible to achieve accurate rain and ) to a post or measurements . - Page 14 4. Once the batteries are inserted, the LCD display should power on. NOTE: If nothing appears on the LCD display after you insert the batteries, use a pin or similar small object to press the RESET button at the rear. NOTE: The display console does not need to be plugged in, and is rated to last up to 2 years on battery power alone.
- Page 15 After insertion of batteries, the main console will automatically search and connect the wireless 5-in-1 sensor (antenna blinking) . Once the connection is successful, antenna mark and readings for outdoor temperature & humidity, wind speed, wind direction and rainfall will appear on the display .
-
Page 16: Clock Set Options Display
SETTING CLOCK MANUALLY 1. In normal mode, press and hold [ CLOCK SET ] key for 2 seconds to enter clock setting. 2. Press [ ] or [ ] key set hour. 3. Press [ CLOCK SET ] key again to enter the next setting. 4. -
Page 17: Other Display Console Settings
OTHER DISPLAY CONSOLE SETTINGS MOON PHASE The display console calculates the moon phase according to your time, date, and time zone. The table NOTE: below explains the corresponding phases and their icons for both Northern and Southern hemispheres. - In alarm mode, the “ ”... - Page 18 Waxing Crescent Moon First Quarter Moon Waxing Gibbous Moon Full Moon SETTING THE ALARM If you’d like to use your display console as an alarm clock, follow these instructions to set the alarm Waning Gibbous Moon time: Third Quarter Moon 1.
- Page 19 Waxing Gibbous Moon Full Moon Waning Gibbous Moon Third Quarter Moon TEMPERATURE/HUMIDITY & TRENDS Waning Crescent Moon Press the °C/°F button to switch between Celsius and Fahrenheit temperature measurements. The arrows show the trend in changes to the temperature/humidity levels. Arrow Icon NOTE: Temp/Humidity Trend...
- Page 20 Waxing Gibbous Moon Full Moon Waning Gibbous Moon Third Quarter Moon 3. If the signal for the outdoor channel has been interrupted and does not recover within 15 minutes, Waning Crescent Moon the signal icon will disappear. The temperature and humidity section (outdoor) will display “—” on the corresponding channel.
- Page 21 To select the wind display mode In normal mode, press [ WIND ] key to switch between AVERAGE and GUST wind speed. To set the wind speed unit and direction display format 1. In normal mode, press and hold [ WIND ] key for 2 seconds to enter into wind speed unit [ GRAPH / ] or [ HISTORY / V ] key to change the wind speed unit in this sequence: m/s →...
- Page 22 4 ~ 6 knot 4 ~ 6 knot vanes begin to move. vanes begin to move. 1 6 ~ 3 3 m/s 1 6 ~ 3 3 m/s 12 ~ 19 km/h 12 ~ 19 km/h Leaves and small twigs Leaves and small twigs 8 ~ 12 mph 8 ~ 12 mph...
-
Page 23: Weather Forecast
Strong gale over. Construction/temporary 25 ~ 30 mph Whistling heard in overhead wires. 41 ~ 47 knot Strong breeze signs and barricades blow over. Umbrella use becomes difficult. 22 ~ 27 knot 20.8 ~ 24.4 m/s Empty plastic bins tip over. 10 8 ~ 13 8 m/s 89 ~ 102 km/h Trees are broken off or... -
Page 24: Barometric Pressure
17 ~ 21 knot leaf begin to sway. 28.5 ~ 32.6 m/s 8 0 ~ 10 7 m/s ≥ 118 km/h Severe widespread damage to 39 ~ 49 km/h Large branches in motion. ≥ 74 mph vegetation and structures. Hurricane force 25 ~ 30 mph Whistling heard in overhead wires. -
Page 25: History Graph
Set the Rainfall Units 1. Press and hold the RAIN button for two (2) seconds to enter unit setting mode. 2. Press the GRAPH/ or HISTORY/ buttons to toggle the units of measure for rainfall between mm and in. 3. Press the RAIN button again to save and exit the setting mode. Select the Rainfall Display Mode Press the RAIN button to toggle between: 1. - Page 26 Pressure and mmHg Indoor °F or °C Past 72 hours Temperature Outdoor °F or °C Past 72 hours Temperature (according to the current channel) Indoor Past 72 hours Humidity Outdoor Past 72 hours Humidity (according to the current channel) Rainfall mm or in Past 7 days (daily)
-
Page 27: Max/Min Data Record
Rainfall mm or in Past 7 days (daily) MAX / MIN DATA RECORD MAX/MIN DATA RECORD The console can record the accumulated and daily MAX / MIN weather data with the The display console can record the accumulated and daily MAX/MIN weather data with a corresponding time stamp for you to easy review . -
Page 28: Weather Alert Settings
Dew point Hi Dew point Lo Heat index H Beaufort scal 2 . Under the setting and History Data for Past 24 Hours 3 . Press [ GR The display console automatically stores the weather data from the past 24 hours. change rap 1. -
Page 29: Pointing The Wireless Weather Sensor To South
Dew point High Alert 10°C Dew point High Alert 10°C -40°C ~ 60°C -40°C ~ 60°C Dew point Low Alert Weather index -10°C Dew point Low Alert Weather index -10°C Heat index High Alert 27°C ~ 49°C 35°C Heat index High Alert 27°C ~ 49°C 35°C Beaufort scale High Alert... -
Page 30: Data Log
y stores the weather data in its data logger (default every 30 minutes), DATA LOG e data through the PC software* (*Please consult your local distributor The display console automatically stores the weather data in its data logger every 30 minutes by nload) . -
Page 31: Pc Software
and readings for outdoor temperature & humidity, wind speed, wind direct appear on the display . Changing batteries and manual pairing of sensor Whenever you changed the batteries of the wireless 5-in-1 sensor, pairing manually . 1 . Change all the batteries to new ones in the sensor . NOTES: 2 . -
Page 32: Uninstalling The Weather Tool Software
While using the PC software, you can click on the “?” icon located in the upper-right corner for operating details, setup instructions, and program settings. Uninstalling the Weather Tool Software You can either go through your PC’s options to uninstall the program, or delete the WeatherTool.exe file from your desktop. -
Page 33: Specifications
2. Gently remove the rain collector. 3. Clean and remove any debris or insects. 4. Wait until the parts are fully dry, and then reinstall them, and return the rain collector to a locked position. CLEANING THE THERMO/HYGRO SENSOR 1. Unscrew the 2 screws at the bottom of the sensor casing. 2. - Page 34 - Internet connection Weather Underground upload requirements - Permit software to access internet (for firewall/anti-virus programs) Wireless Sensor Communication Specifications 1 Wireless 5-in-1 weather outdoor sensor and up to 7 optional Supported sensors wireless hygro-thermo outdoor sensors 868 MHz (EU or UK version), 915 MHz (US version), RF frequency 917 MHz (AU version) RF transmission range...
- Page 36 FCC STATEMENT This device complies with Part 15 of the FCC Rules. Operation is subject to the following two conditions: (1) This device may not cause harmful interference, and; (2) This device must accept any interference received, including interference that may cause undesired operation.
- Page 37 (“DMA”) number. No warranty service will be provided without a DMA number and return shipping costs to our facilities shall be assumed by you, the purchaser. Shipping costs of the replacement unit to you shall be assumed by us. If you experience any issues with your Logia ™...
- Page 38 LOGIA is a trademark of C&A IP Holdings, LLC, in the U.S. Windows is a trademark of Microsoft Corporation. Microsoft, Windows, Windows Server, Windows Vista, and Excel are trademarks of Microsoft Corporation in the U.S. and/or other countries. All other products, brand names, company names, and logos are trademarks of their respective owners, used merely to identify their respective products, and are not meant to connote any sponsorship, endorsement or approval.
Need help?
Do you have a question about the LOWSB510PB and is the answer not in the manual?
Questions and answers
Setting up rain collector empting time