
Related Manuals for Logia LOWSCB711SAB


Summary of Contents for Logia LOWSCB711SAB
- Page 1 ™ 7-IN-1 WIRELESS WEATHER STATION WITH WI-FI , BUILT- ® IN SOLAR PANEL, AND 5.7” FULL-COLOR LCD DISPLAY LOWSCB711SAB...
-
Page 2: Table Of Contents
Thank you for purchasing the 7-in-1 Wireless Weather Station with Wi-fi , Built-In Solar ® Panel, and 5.7" Full-Color LCD Display. This User Guide is intended to provide you with guidelines to ensure that operation of this product is safe and does not pose risk to the user. Any use that does not conform to the guidelines described in this User Guide may void the limited warranty. -
Page 3: Safety Precautions
SAFETY PRECAUTIONS WARNING! Please read and understand all safety precautions, operating instructions, and care/maintenance instructions before operating this appliance. Keep this manual for future reference. • This product is not a toy. Keep out of the reach of children. • This product is designed for use in the home only as an indication of weather conditions. This product is not to be used for medical purposes or public information. -
Page 4: Product Features
PRODUCT FEATURES • Wireless 7-in-1 weather sensor measures wind speed, wind direction, rainfall, UV index, light intensity, temperature, and humidity • No calibration needed! The product is fully pre-calibrated and mostly assembled; all you need to do is install and sync it with the included display console •... -
Page 5: Product Overview
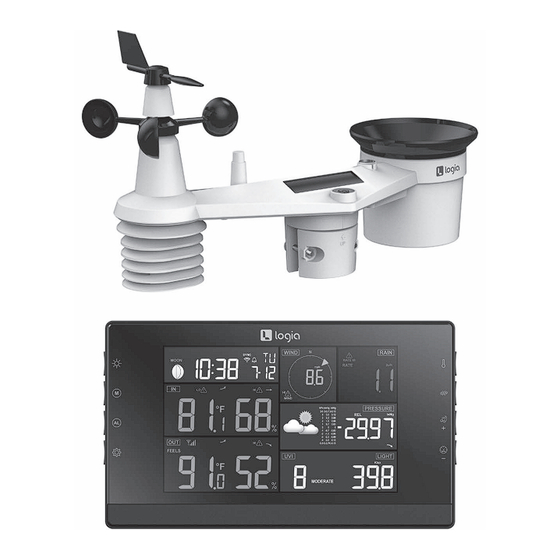
PRODUCT OVERVIEW WEATHER CONSOLE OVERVIEW 14 15 1. Backlight/Snooze button 7. +/Wind button 13. Contrast button 2. Memory button 8. -/Baro button 14. Reset button 3. Alarm button 9. Display screen 15. Power jack 4. Set button 10. Kickstand 16. Wall mounting hole 5. - Page 6 LCD DISPLAY OVERVIEW 1. Time & date, moon phase 2. Wind speed & direction 3. Rainfall & rain rate 4. Indoor temperature & humidity 5. Weather forecast & pressure 6. Outdoor temperature & humidity 7. UV and light intensity...
- Page 7 WIRELESS SENSOR OVERVIEW 1. Rain collector 9. Radiation shield and hygro- thermo sensor 2. Balance indicator 10. Red LED indicator 3. Solar panel 11. Reset button 4. UV/Light sensor 12. Battery door 5. Wind vane 13. Drain holes 6. Wind cups 14.
-
Page 8: Installation Instructions
INSTALLATION INSTRUCTIONS SETTING UP THE WIRELESS 7-IN-1 OUTDOOR SENSOR The wireless 7-in-1 outdoor sensor measures wind speed, wind direction, rainfall, UV, light intensity, temperature, and humidity for you. Installing the Wind Vane 1. Place and press the wind vane piece down onto the shaft. 2. - Page 9 Installing the Batteries 1. Unscrew the battery door at the bottom of the 7-in-1 outdoor sensor using a screwdriver (not included). 2. Insert three (3) AA batteries (not included) into the battery compartment. 3. Close and fasten the battery door back on the compartment. NOTE: The LED light will flash red every 12 seconds.
- Page 10 Pointing the wireless weather sensor toward the south will allow maximum sunlight on the solar panel, especially during the winter season in the Southern Hemisphere. SETTING UP THE DISPLAY CONSOLE Installing the Batteries 1. Remove the battery door on the back of the console. 2.
-
Page 11: Operating Instructions
Pairing the Console with the Wireless 7-in-1 Sensor 1. Once your display console powers on, it should automatically enter AP mode and search for the wireless weather sensor. If the console does not connect within the first 15 minutes, press the SENSOR/WIFI button to manually pair the sensor and console. - Page 12 BAROMETRIC PRESSURE The atmospheric pressure is the pressure at any location of the earth caused by the weight of the column of air above it. 1. Pressure drop alert indicator 2. Rate of change graph for the barometric pressure 3. Barometric pressure reading 4.
- Page 13 Outdoor Temperature Index Press the INDEX button to switch between Feels Like, Heat Index, Wind Chill, and Dew Point. Feels Like The Feels Like temperature index determines what temperature it actually feels like outside, taking into account factors like wind chill and the heat index. Heat Index The heat index is determined by the wireless weather sensor’s temperature and humidity readings when the temperature is between 79 °F (26 °C) and 120 °F (50 °C).
- Page 14 Indoor Temperature & Humidity This section can show reading and status of the sensor of the console. 1. Indoor temperature reading 2. Indoor temperature high/low alert indicator 3. Indoor temperature trend 4. Indoor humidity high/low alert indicator 5. Indoor humidity trend 6.
- Page 15 Beaufort Scale Index The Beaufort scale below is an international scale of wind velocities from 0 (Calm) to 12 (Hurricane force). Beaufort Scale Description Wind Speed Land Condition < 1 km/h < 1 mph Calm Calm. Smoke rises vertically. < 1 knots <...
- Page 16 39 ~ 49 km/h 25 ~ 30 mph Large branches in motion. Whistling heard in Strong breeze overhead wires. Umbrella use becomes difficult. 22 ~ 27 knots Empty plastic bins tip over. 10.8 ~ 13.8 m/s 50 ~ 61 km/h 31 ~ 38 mph Whole trees in motion.
- Page 17 RAIN This section shows the rainfall or rain rate information. 1. Rain rate high alert indicator 2. Period of rainfall and rain rate 3. Reading of rainfall or rain rate Select the Rainfall Display Mode Press the RAIN button to toggle between: •...
- Page 18 UV Index VS Sunburn Time Chart Exposure level Moderate High Very high Extreme UV index 12~16 Sunburn time 45 minutes 30 minutes 15 minutes 10 minutes Very high or Extreme UV level! Suggest Moderate or high UV level! Suggest to Recommended to wear sunglasses, broad brim hat and wear sunglasses, broad brim hat and...
- Page 19 MOON PHASE Hemisphere Moon Phase Southern Hemisphere The sun-lit area of the moon moves from right to left in the Northern Hemisphere, while in the Southern New Moon Hemisphere, it moves from left to Waxing right. This table illustrates how the Crescent moon will appear on the console.
- Page 20 TIME SYNCHRONIZE STATUS After the console has connected to the time server, it can get the UTC time. The “SYNC” icon will appear on the LCD with the time. NOTE: The time will automatically synchronize per hour. Users can also press the REFRESH button to get the internet time manually within one (1) minute. WI-FI CONNECTION STATUS The Wi-Fi icon on the console display indicates the console’s connection status with the Wi-Fi router.
- Page 21 Temperature unit Press the +/WIND or -/BARO button to select °C or °F. Baro pressure unit Press the +/WIND or -/BARO button to select hPa, mmHg, or inHg. Wind speed unit Press the +/WIND or -/BARO button to select m/s, knots, mph, or km/h. Rain unit Press the +/WIND or -/BARO button to select mm or in.
- Page 22 OUT humidity high alert Press the +/WIND or -/BARO button to adjust the outdoor humidity high alert value. Press the ALARM button to toggle the alarm on or off. OUT humidity low alert Press the +/WIND or -/BARO button to adjust the outdoor humidity low alert value. Press the ALARM button to toggle the alarm on or off.
- Page 23 Backlight Function The console backlight brightness can be adjusted by using the BACKLIGHT/SNOOZE button to toggle between Hi, Lo, or Off. LEARNING THE WSLINK APP Set Up the WSLink App 1. Download the WSLINK App to your mobile device from the Google Play or App Store ™...
- Page 24 7. Once you are in the app 8. Enter the name and password of your settings, tap “Wi-Fi”. Wi-Fi network. Then, tap “Next”. 9. Wait a few minutes for your console to connect to your Wi-Fi network. NOTE: Be aware that you will need to put the console in AP mode and reconnect the console and your mobile device every time you wish to reenter app settings.
- Page 25 Weather Server Go to “Weather Server” to select a weather server where you can view the weather data of your device from an online weather server. NOTE: You must create an account or log in to your existing account in order to view your weather data.
- Page 26 Calibration Go to “Calibration” to recalibrate your console. Firmware Go to “Firmware” to view the current firmware version and to see if there is a new firmware update available.
- Page 27 CREATE WU/WC ACCOUNT & SET UP WI-FI® CONNECTION The console can upload/download weather data to Weather Underground (WU) and/or Weathercloud (WC) through a Wi-fi router, follow the steps below to set up your account and connection. Create Your Weather Underground Account 1.
- Page 28 Use your smartphone, tablet, or computer to connect to the console via Wi-Fi by following these steps: ® 1. On PC, open your Wi-Fi network settings. On Android™ or iOS devices, go to the settings menu ® and then select Connections/WI-FI to open the network settings. 2.
-
Page 29: Care/Maintenance
CARE/MAINTENANCE BATTERY REPLACEMENT If the low battery indicator icon is displayed near the antenna icon of the sensor(s), this indicates that the batteries in your wireless weather sensor(s) are running low and should be replaced. Make sure to replace all batteries at the same time. FACTORY RESET •... -
Page 30: Troubleshooting
3. Carefully remove any dirt or insects on the sensor and ventilation fan (do not let the sensors inside get wet). 4. Clean the shield with water to remove any dirt or insects. 5. Install all the parts back when they are clean and fully dried. TROUBLESHOOTING Problem Solution... -
Page 31: Specifications
SPECIFICATIONS DISPLAY CONSOLE GENERAL SPECIFICATIONS Product type: Weather/environment sensor & console Dimensions (W x H x D): 7.5″ x 4.4″ x 0.8″ (190 x 113 x 20 mm) (without kickstand extended) Weight: 0.7 lbs. (295 g) (with battery) Power source: DC 5 V, 1 A adapter Backup battery: CR2032... - Page 32 BAROMETER SPECIFICATIONS Barometer unit: hPa, inHg, mmHg Measuring range: 540 ~ 1100 hPa Accuracy: (700 ~ 1100 hPa ± 5 hPa) / (540 ~ 696 hPa ± 8 hPa) (20.67 ~ 32.48 inHg ± 0.15 inHg) / (15.95 ~ 20.55 inHg ± 0.24 inHg) (525 ~ 825 mmHg ±...
- Page 33 OUTDOOR TEMPERATURE DISPLAY & FUNCTION SPECIFICATIONS Temperature unit: °C or °F Weather index mode: Feels like, wind chill, heat index, and dew point Feels like display range: -85 °F ~ 122 °F (-65 °C ~ 50 °C) Dew point display range: -4 °F ~ 176 °F (-20 °C ~ 80 °C) Heat index range: 78.8 °F ~ 122 °F (26 °C ~ 50 °C)
- Page 34 , Built-In Solar Panel, and 5.7″ Full-Color LCD Display ® product, hardware or software, even if packaged or sold with the Product; (b) Damage caused by use with non-Logia 7-in-1 Wireless Weather Station with Wi-fi , Built-In Solar Panel, and 5.7 ″ ®...
- Page 35 To maintain compliance with the FCC’s RF exposure guidelines, place the unit at least 20cm from nearby persons. If you experience any issues with your Logia 7-in-1 Wireless Weather Station, please contact us before returning your product to the place of purchase. We’re here to help! QUESTIONS OR PROBLEMS? CONTACT US! Email: info@supportcbp.com or call: 1-833-815-0568...
- Page 36 LOGIA is a trademark of C&A IP Holdings LLC in the US, Canada, China, and the EU. Android and Google Play are trademarks of Google LLC. Apple, IOS, and App Store are trademarks of Apple Inc. in the U.S. and other countries.
Need help?
Do you have a question about the LOWSCB711SAB and is the answer not in the manual?
Questions and answers