Table of Contents
Advertisement
Advertisement
Table of Contents

Related Manuals for Logia LOWSC710B


Summary of Contents for Logia LOWSC710B
- Page 1 ™ 7-IN-1 WIRELESS WEATHER STATION LOWSC710B...
-
Page 2: Table Of Contents
Thank you for purchasing the Logia 7-in-1 Wireless Weather Station. This User Guide is intended to provide you with guidelines to ensure that operation of this product is safe and does not pose risk to the user. Any use that does not conform to the guidelines described in this User Guide may void the limited warranty. -
Page 3: Safety Precautions
SAFETY PRECAUTIONS WARNING! Please read and understand all safety precautions, operating instructions, and care/maintenance instructions before operating this appliance. Keep this manual for future reference. • This product is not a toy. Keep out of the reach of children. • This product is designed for use in the home only as an indication of weather conditions. -
Page 4: Product Features
PRODUCT FEATURES • Wireless 7-in-1 weather sensor measures wind speed, wind direction, rainfall, UV index, light intensity, temperature, and humidity. • No calibration needed! The product is fully pre-calibrated and mostly assembled; all you need to do is install it and sync with the included display console. •... -
Page 5: Product Overview
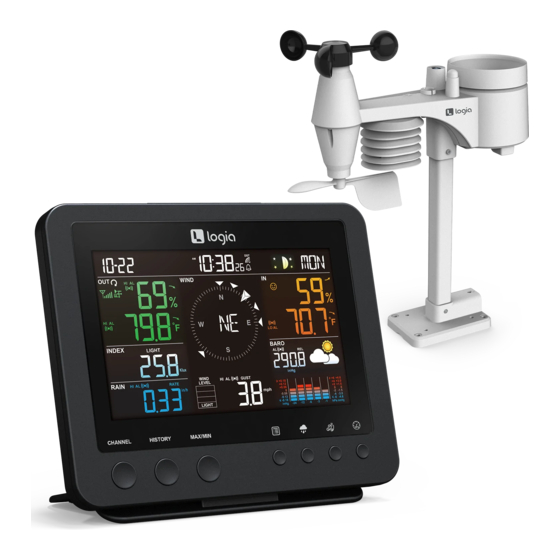
PRODUCT OVERVIEW WEATHER CONSOLE OVERVIEW SENSOR RESET DC5V 600mA CHANNEL HISTORY MAX/MIN 1. Detachable kickstand 9. BARO button 17. Power cord 2. SNOOZE button 10. LCD display 18. °C/°F button 3. CHANNEL button 11. CLOCK button 19. SENSOR button 4. HISTORY button 12. - Page 6 LCD DISPLAY OVERVIEW 1. Time & date, moon phase 2. Outdoor temperature & humidity 3. UV index & light intensity 4. Rainfall & rain rate 5. Indoor temperature & humidity 6. Barometer, weather forecast 7. Wind direction & speed...
- Page 7 OUTDOOR WEATHER SENSOR OVERVIEW 1. Antenna 9. Wind vane 2. Rain collector 10. Red LED indicator 3. UVI/light sensor 11. RESET button 4. Mounting pole 12. Battery compartment 5. Mounting base 13. Mounting clamp 6. Balance indicator 14. Rain sensor 7.
-
Page 8: Installation Instructions
INSTALLATION INSTRUCTIONS SETTING UP THE WIRELESS 7-IN-1 OUTDOOR SENSOR The wireless 7-in-1 outdoor sensor measures wind speed, wind direction, rainfall, UV, light intensity, temperature, and humidity for you. Installing the Batteries Unscrew the battery door at the bottom of the 7-in-1 outdoor sensor. - Page 9 Insert the bottom side of the pole into the mounting base (included). Make sure the square holes are aligned with each other. Insert the screw through the holes of the pole and base then tighten the hexagonal nut onto the other end of the screw. Use a screwdriver or wrench if needed.
- Page 10 SETTING UP THE DISPLAY CONSOLE Installing the Batteries Unscrew and remove the battery door on back of the console. Insert a CR2032 battery (included) into the compartment. Place the battery door back onto the compartment and screw it in place. NOTE: If nothing appears on the display after inserting the battery, then press the RESET button using a pin.
-
Page 11: Operating Instructions
OPERATING INSTRUCTIONS TIME & CALENDAR When the unit receives a RCC (radio-controlled clock) signal, a sync-time symbol will appear on the LCD, and the unit will synchronize daily. Flashing wave segments on the sync-time symbol means RCC signals are being received. Every day the unit will automatically search for the time signal at 2:00 a.m., 8:00 a.m., 2:00 p.m., and 8:00 p.m. - Page 12 Press the ALARM button again to confirm the alarm hour and move to adjusting the minutes. The minute digits should be flashing. Press the UP or DOWN button to adjust the alarm minute. Press and hold either button to move through the minutes quickly.
- Page 13 TEMPERATURE Outdoor Temp & Humidity Display Auto loop indicator Low battery indicator Signal strength indicator CH indicator and sensor indicator Temperature alert indicator Temperature reading Humidity alert indicator Humidity trend Humidity reading 10. Temperature trend Indoor Temp & Humidity Display Humidity alert indicator Comfort indication Temperature alert indicator...
- Page 14 NOTE: Comfort indicator levels may vary even when the temperature is the same due to variances in relative humidity levels. No comfort indicator will be displayed if the temperature falls below 32 °F (0 °C) or over 140 °F (60 °C). Viewing the Other Channels This console is capable of pairing with the wireless weather sensor and up to three (3) additional wireless hydro-thermo sensors.
- Page 15 The SNOWY weather forecast is not based on the atmospheric pressure but based on the current outdoor temperature reading from the wireless sensor. When the outdoor temperature is below ~ 26 °F (-3 °C), the SNOWY weather indicator will be shown on the LCD display. Select the Barometric Pressure Display Mode Press the BARO button to select between ABS and REL mode: •...
- Page 16 • RATE: current rainfall rate in the past hour • HOURLY: total rainfall in the past hour • DAILY: total rainfall since midnight • WEEKLY: total rainfall for the current week • MONTHLY: total rainfall since the beginning of the current month •...
- Page 17 Select the Wind Display Mode While in normal operating mode, press the WIND button to switch between the average wind speed measurement, gust wind speed measurement, and BFT measurement. • AVERAGE: The AVERAGE wind speed will display the average of all wind speed numbers recorded in the previous 12 seconds.
- Page 18 6 ~ 11 km/h 4 ~ 7 mph Wind felt on exposed skin. Leaves rustle. Light breeze Wind vanes begin to move. 4 ~ 6 knots 1.6 ~ 3.3 m/s 12 ~ 19 km/h 8 ~ 12 mph Leaves and small twigs constantly moving, Gentle breeze Light flags extended.
- Page 19 Weather Indexes When reading the Weather Index display, you can press the INDEX button to cycle through different weather indexes in the following order: UV Index > Light Intensity > Feels Like > Wind Chill > Heat Index > Dewpoint. UV Index Mode UV index shows the current UV index detected by the outdoor sensor.
- Page 20 Wind Chill Wind chill is determined by a combination of the wireless weather sensor’s temperature and wind speed data. Dew Point The dew point is the temperature below which the water vapor in the air is at a constant barometric pressure condenses into liquid at the same rate at which it evaporates.
- Page 21 Records are displayed in the following order when outdoor temperature/humidity is shown: Indoor MAX temperature > indoor MIN temperature > indoor MAX humidity > indoor MIN humidity > MAX pressure > MIN pressure > outdoor MAX temperature > outdoor MIN temperature > outdoor MAX humidity >...
- Page 22 Press the UP or DOWN button to select section: Indoor > Outdoor > CH1 > CH2 > CH3. Once a section is selected, press the ALERT button to select the alert type • When Indoor symbol appears, the selected sequence is: In Temperature HI >...
- Page 23 • Slide to the HI position for the brighter backlight. • Slide to the LO position for the dimmer backlight. • Slide to the OFF position turn off the backlight. WIRELESS SIGNAL RECEPTION The 7-in-1 weather sensor is capable of transmitting data wirelessly over an approximate operating range of 492′...
-
Page 24: Care/Maintenance
CARE/MAINTENANCE BATTERY REPLACEMENT If the low battery indicator icon is displayed in the outdoor temperature and humidity section or the corresponding CH section of the LCD console display, this indicates that the batteries in your wireless weather sensor(s) are running low and should be replaced. Make sure to replace all batteries at the same time. - Page 25 Clean and remove any debris or insects from the rain collector. Install the rain collector when it is clean and fully dried. CLEANING THE UV SENSOR AND CALIBRATION • For precision UV measurement, gently clean the UV sensor cover lens with a damp micro-fiber cloth. •...
-
Page 26: Compatible Devices
COMPATIBLE DEVICES The display console of the Logia 7-in-1 Wireless Weather Station can be paired with other add-on sensors like the indoor hygro-thermo sensor and soil moisture and temperature add-on sensor. Visit www.logiaweatherstations.com for the most updated list of compatible Logia add-on sensors. -
Page 27: Specifications
SPECIFICATIONS DISPLAY CONSOLE GENERAL SPECIFICATIONS Product type: Weather/environment sensor & console Dimensions (W x H x D): 6.6″ x 5.4″ x 0.9″ (168 x 136 x 24 mm) (without kickstand) Weight: 0.8 lbs. (356 g) (with batteries) Power source: DC 5 V, 600 mA adapter Backup battery: CR2032 Adult assembly required for console:... - Page 28 INDOOR TEMPERATURE DISPLAY & FUNCTION SPECIFICATIONS Temperature unit: °C or °F Range: 14 °F - 122 °F (-5 °C - 50 °C) Accuracy: < 32 °F or >104 °F ± 3.6 °F (< 0 °C or > 40 °C ± 2 °C) 32 °F ~104 °F ±...
- Page 29 OUTDOOR HUMIDITY DISPLAY & FUNCTION SPECIFICATIONS Range: 1% - 99% RH Accuracy: 1% ~ 20% RH ± 6.5% RH @ 77 °F (25 °C) 21% ~ 80% RH ± 3.5% RH @ 77 °F (25 °C) 81% ~ 99% RH ± 6.5% RH @ 77 °F (25 °C) Resolution: Memory modes: Historical data of past 24 hours, MAX/MIN...
- Page 30 Company’s property. Refunds can only be given if the original Product is returned. This Warranty does not apply to: (a) Any non-Logia 7-in-1 Wireless Weather Station product, hardware or software, even if packaged or sold with the Product; (b) Damage caused by use with non-Logia 7-in-1 Wireless Weather Station products;...
- Page 31 Warning: Changes or modifications to this unit not expressly approved by the party responsible for compliance could void the user’s authority to operate the equipment. If you experience any issues with your Logia 7-in-1 Wireless Weather Station, please contact us before returning your product to the place of purchase. We’re here to help! QUESTIONS OR PROBLEMS? CONTACT US! Email: info@supportcbp.com or call: 1-833-815-0568...
- Page 32 LOGIA is a trademark of C&A IP Holdings LLC in the US, Canada, China, and the EU. All other products, brand names, company names, and logos are trademarks of their respective owners, used merely to identify their respective products, and are not meant to connote any sponsorship, endorsement, or approval.
Need help?
Do you have a question about the LOWSC710B and is the answer not in the manual?
Questions and answers
How do I reset the date?
To reset the date on a Logia LOWSC710B, you need to manually set the time. First, deactivate the RCC reception by pressing and holding the RCC button for eight seconds. Then, press and hold the CLOCK button for two seconds until the 12/24-hour symbol flashes. Use the UP or DOWN button to adjust the settings. The options cycle through Time Zone > Hour > Minute > Second, so continue through the settings to adjust the date as needed.
This answer is automatically generated