
Subscribe to Our Youtube Channel
Related Manuals for Logia LOWSC717FWB19


Summary of Contents for Logia LOWSC717FWB19
- Page 1 ™ 7-IN-1 WIRELESS 8-DAY FORECAST WEATHER ® STATION WITH WI-FI EVERLASTING SOLAR CELL, & ULTRA-WIDE DISPLAY USER GUIDE LOWSC717FWB19...
-
Page 2: Table Of Contents
Thank you for purchasing the Logia 7-in-1 Wireless 8-Day Forecast Weather Station with Wi-Fi, ® Everlasting Solar Cell, and Ultra-Wide Display. This User Guide is intended to provide you with guidelines to ensure that operation of this product is safe and does not pose risk to the user. Any use that does not conform to the guidelines described in this User Guide may void the limited warranty. -
Page 3: Safety Precautions
SAFETY PRECAUTIONS WARNING! Please read and understand all safety precautions, operating instructions, and care/maintenance instructions before operating this appliance. Keep this manual for future reference. • This product is not a toy. Keep out of the reach of children. • This product is designed for use in the home only as indication of weather conditions. This product is not to be used for medical purposes or for public information. -
Page 4: Product Features
PRODUCT FEATURES 1. Wireless 7-in-1 weather sensor measures wind speed, wind direction, rainfall, UV index, light intensity, temperature, and humidity 2. No calibration needed! The product is fully pre-calibrated and mostly assembled; all you need to do is install it and sync with the included display console 3. -
Page 5: Package Contents
DISPLAY CONSOLE S Dimensions: (W x H Weight: 1.4 lbs. (632 LOGIA is a trademark of C&A IP Holdings LLC in the US, Canada, China and the EU. Android and Google Play is a trademarks of Google LLC. Power source: DC 5 Apple, IOS, and App Store are trademarks of Apple Inc. -
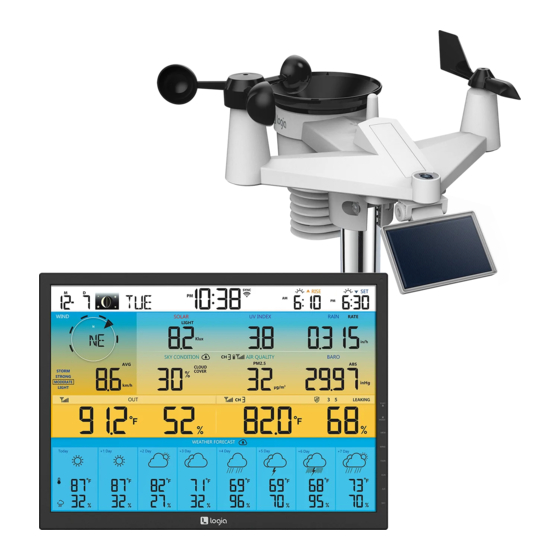
Page 6: Weather Console Overview
PRODUCT OVERVIEW WEATHER CONSOLE OVERVIEW Time & Data, Moon phase, Sunrise / sunset 6 . Sky condition & moon rise / moon set 7 . Air quality Wind direction & speed 8 . Barometer Solar Light intensity 9 . Indoor / CH temperature & humidity UV index 10 . -
Page 7: Console Lcd Display Overview
LCD DISPLAY OVERVIEW DISPLAY CONSOLE FUNCTIONS AND OPERATION SCREEN DISPLAY 1 . Time & Data, Moon phase, Sunrise / sunset 6 . Sky condition & moon rise / moon set 7 . Air quality 2 . Wind direction & speed 8 . -
Page 8: Wireless Sensor Overview
WIRELESS SENSOR OVERVIEW GETTING STARTED WIRELESS 7-IN-1 SENSOR G STARTED ESS 7-IN-1 SENSOR GETTING STARTED WIRELESS 7-IN-1 SENSOR 1. Antenna 7. Bubble level gradienter 2. Radiation shield & Thermo-hygro sensor 8. Rain collector 3. Mounting parts (fit for 35 ~40mm diameter pole) 9. -
Page 9: Installation Instructions
9. Wind vane 1. Antenna 5. RESET button 10. UV/light sensor 2. Radiation shield & 6. Transmission status LED hygro-thermo sensor 11. Solar Cell 7. Bubble level 3. Mounting base 8. Rain collector 12. Wind cups 4. Battery door INSTALLATION INSTRUCTIONS SETTING UP THE WIRELESS 7-IN-1 OUTDOOR SENSOR The wireless 7-in-1 outdoor sensor measures wind speed, wind direction, rainfall, UV, light intensity, temperature, and humidity. - Page 10 Lock grooves 1 Align NSTALL RAIN GAUGE FUNNEL he rain gauge funnel and rotate clockwise to lock the funnel to the sensor array INSTALLING THE BATTERIES Rain Collector Installation 1. Unscrew the battery door at the bottom of the 7-in-1 outdoor sensor using a screwdriver (not 2 Lock included).
- Page 11 4. Close and fasten the battery door back on the compartment. lose the battery door and tighten the screw Step 5: Close the battery door and tighten the screw emove the solar panel protection film. NOTE: The LED light will flash red every 12 seconds. se the battery door and tighten the screw ADJUSTING THE SOLAR CELL Step 6: Remove the solar panel protection film.
- Page 12 3. Adjust the vertical angle of the solar cell to get the most optimal usage out of the solar cell depending on your location. ep 2: Adjust the vertical angle of the solar panel (0°, °, 30°, 45°, 60°) according to the latitude of your ation.
- Page 13 INSTALLATION AND SETUP Your console can pair up with one wireless 7-in-1 outdoor sensor and up to 7 wireless indoor sensors. (1pc wireless indoor sensor included) MOUNTING THE SENSOR ON A POLE INSTALL WIRELESS 7-IN-1 SENSOR Stick the rubber pads on the inside of the mounting clamp and mounting base of the sensor. Your wireless 7-IN-1 sensor measures wind-speed, wind-direction, rainfall, UV, light intensity, Adjust the vertical angle of the solar panel (0°, temperature and humidity for you.
-
Page 14: Setting Up The Display Console
POINTING THE WIRELESS 7-IN-1 OUTDOOR SENSOR TO SOUTH (OPTIONAL) The outdoor wireless weather sensor is calibrated to be pointed north for maximum accuracy. However, for your convenience, if you are a user located in the Southern Hemisphere, you can use the sensor with the wind vane pointing south. -
Page 15: Pairing The Console With The Wireless 7-In-1 Sensor
Concrete wall 80 ~ 90% Aluminum siding 100% Metal wall 100% Remarks: RF signal reduction for reference POWERING UP THE CONSOLE SETUP THE CONSOLE Connect the power adapter to the integrated power cord of the console. Follow the procedure to setup the console connection with sensor(s) and WI-FI. Plug the power adapter into a power outlet to turn on the console. -
Page 16: Operating Instructions/Forecast
Sunny Partly cloudy Cloudy / Foggy Overcast Windy CHANNEL Press this button to switch between indoor and channels readings FORECAST Press to view the HI/LO temperature from today to next 3 days RAIN Press to switch between Rain Rate, rainfall OPERATING INSTRUCTIONS Light rain Heavy rain... -
Page 17: Outdoor Temperature, Humidity & Temperature
4.3.2 HIGH / LOW TEMPERATURE FORECAST FOR TODAY & NEXT 7 DAYS By default, the console shows the High (HI) and Low (LO) temperatures of current day and next 7 days . 4.3.2 HIGH / LOW TEMPERATURE FORECAST FOR TODAY & NEXT 7 DAYS By default, the console shows the High (HI) and Low (LO) temperatures of current day and next GH / LOW TEMPERATURE FORECAST FOR TODAY &... -
Page 18: Indoor/Channels Temperature & Humidity
Press [ / INDEX ] or [ / MODE ] key to adjust the day 4. Outdoor Humidity reading - If temperature / humidity is below the measurement range, the reading will show “Lo”. If temperature / humidity is above the measurement range, the reading will show “HI”. 5. -
Page 19: Multi-Channel And Scroll Mode For Optional Sensors
reading and status of the indoor, optional hygro-thermo sensor(s) and water for CH sensor th icon section icon atus section 1. Low battery indicator for CH sensor icon ection 2. Sensor signal strength icon 3. Channel number icon 4. Auto loop icon 5. -
Page 20: 4.3.8 Wind
Hygrometer sensor (optional, refer to section 3.2). Press the [ CH ] key to switch between D SCROLL MODE FOR OPTIONAL SENSORS indoor and Channels 1 to 7 . Thermo- D SCROLL MODE FOR OPTIONAL SENSORS For auto-scroll function, just press and hold the CHANNEL button for three (3) seconds and the icon efer to section Thermo-... - Page 21 Violent storm and structural Hygro-thermo You can add up to 7 additional Water Leak sensors (optional, refer 56 ~ 63 knot temperature damage likely. to section 3.2.1) sensor channel 28.5 ~ 32.6 m/s The channel number(s) of the corresponding water leak sensor(s) added to the console will be shown with the NO LEAKING icon.
-
Page 22: Beaufort Scale
BEAUFORT SCALE The Beaufort scale below is an international scale of wind velocities from 0 (calm) to 12 (Hurricane force). Beaufort Scale Description Wind Speed Land Condition < 1 km/h < 1 mph Calm Calm. Smoke rises vertically. < 1 knots <... -
Page 23: Barometric Pressure/ Rain/ Light Intensity, Uv Index & Sunburn Time
1 ~ 3 knot vanes are stationary. 103 ~ 117 km/h 0 3 ~ 1 5 m/s 64 ~ 73 mph Widespread vegetation and structural Violent storm 6 ~ 11 km/h damage likely . 56 ~ 63 knots Wind can be felt on exposed 28.5 ~ 32.6 m/s 4 ~ 7 mph Light breeze... -
Page 24: 4.3.12 Air Quality
- The sunburn time is based on normal skin type, it is just a reference of UV strength. In general, the darker one's skin is, the longer (or more radiation) it takes to affect the skin. - The light intensity function is for sunlight detection . 4.3.11.2 UV INDEX MODE UV Index Mode To show the current UV index detected by the outdoor sensor . -
Page 25: Max/Min
29 ~ 38 km/h Branches of a moderate 18 ~ 24 mph Fresh breeze size move. Small trees in 17 ~ 21 knot leaf begin to sway. 8 0 ~ 10 7 m/s SKY CONDITION 39 ~ 49 km/h Large branches in motion. 25 ~ 30 mph Whistling heard in overhead wires. -
Page 26: Moon Phase/ Sunrise/Sunset & Moon Rise/Moon Set Time
To View the MAX/MIN While in normal operating mode, press the MAX/MIN button to cycle through the MAX/MIN records. Records are displayed in the following order: Daily MAX records > daily MIN records > since MAX records > since MIN records Reset the Total MAX/MIN Records Press and hold the MAX/MIN button for two (2) seconds to reset the MAX/MIN records. -
Page 27: Wireless Signal Reception/ Time Synchronize Status/ Wi-Fi ® Connection Status
Press [ / INDEX ] or [ / MODE ] key to select "Month / Day" or M-D/D-M format Northern Southern determined by time "Day / Month" display format Moon Phase sole. The following Hemisphere Hemisphere Mode Setting procedure Press [ / INDEX ] or [ / MODE ] key to enable or disable Time Sync function. -
Page 28: Time, Date, And General Settings
Temperature unit Press [ / INDEX ] or [ / MODE ] key to select °C or °F Rain unit Press [ / INDEX ] or [ / MODE ] key to select mm or in Press [ / INDEX ] or [ / MODE ] key to select m/s, km/h, knots or Wind speed unit TIME, DATE, AND GENERAL SETTINGS Distance unit... -
Page 29: Create Pwl Account & Set Up Wi-Fi ® Connection
- By pressing and hold [ALARM / SNOOZE] key for 2 seconds to stop the alarm and will activate again in the next day - By pressing [ ALARM ] key to stop the alarm and the alarm will activate again in the next day. NDEX NOTE: which is determined by the wireless 7-IN-1 sensor's temperature &... - Page 30 2. Once your account is created, sign into it, and then click “Edit Devices” in the drop-down menu to 2. Log in the ProWeatherLive and then click the "Edit Devices" in the pull down menu. add a new device. 2. Log in the ProWeatherLive and then click the "Edit Devices" in the pull down menu. Step 1 2.
-
Page 31: Setting Up Wi-Fi ® Connection
condition will be based on the Latitudes and condition will be based on the Latitudes and The device Mac address can be found on the Longitudes entered, which are also used for Longitudes entered, which are also used for backside of the console or in the "SETUP" calculations of sunrise, sunset, moon rise E.g. -
Page 32: Setting Up Weather Server Connection
SETTING UP WEATHER SERVER CONNECTION SETUP THE WEATHER SERVER CONNECTION Enter the information into the following web interface “SETUP” page. Ensure all information is entered Enter the information into the following web interface "SETUP" page. Ensure all information is prior to pressing to connect the console to ProWeatherLive. - Page 33 ADVANCE SETTING IN WEB INTERFACE Press the “ADVANCED” button at the top of web interface to enter the advance setting page, this page allows you to ADVANCE SETTING IN WEB INTERFACE set and view the calibration data of the console, as well as update the firmware version on PC/Mac web browser. Press "ADVANCED"...
-
Page 34: Proweatherlive (Pwl) Live Data
CALIBRATION 1. You may enter or change the offset and gain values for different measurement parameters, while viewing the current offset and gain values next to the corresponding boxes. 2. Once you have completed your calibrations, press the APPLY button on the SETUP tab. 3. - Page 35 FIRMWARE UPDATE NOTE: Please press "Help" in the should you have any query on the PWL operation. This display console supports OTA (over the air) Function Firmware and WI-FI System Firmware updates via any web browser (not mobile browser) on a PC that is connected to Wi-Fi .
-
Page 36: Care And Maintenance
6 . The console will restart once the update is completed . 7 . The console will stay in AP mode for you to check the firmware version and all the current setting . Simply press and hold [ SENSOR / WI-FI ] key for 6 seconds to exit AP mode . IMPORTANT NOTE: - Please keep connecting the power during the firmware update process. -
Page 37: Compatible Devices
COMPATIBLE DEVICES The display console of the Logia 7-in-1 Wireless Weather Station with Wi-fi , Everlasting Solar Cell, ® and 7” Full-Color HD LCD Display can be paired with other add-on sensors like the indoor hygro-thermo and soil moisture & temperature, and lightning add-on sensor. -
Page 38: Specifications
SPECIFICATIONS DISPLAY CONSOLE General Specifications Product type Weather/environment sensor & console Dimensions (W x H x D) 16.5″ x 12.1″ x 1.2″ (419 x 308 x 30 mm) Weight 4.5 lbs. (2034 g) (with battery) Power source DC 5 V, 1.5 A adapter Backup battery CR2032 Operating temperature environment... - Page 39 492' (150 m) RF transmission range Time-related Function Specifications Time display HH:MM Hour format 12 hr. AM/PM or 24 hr. Date display DD/MM or MM/DD Time synchronize method Time received through PWL Weekday languages EN/DE/FR/ES/IT/NL/RU Barometer Display & Function Specifications Note: The following details are listed as they are displayed or operate on the console.
- Page 40 RF frequency 915 MHz Transmission interval Every 12 seconds UV, light intensity, wind speed, and wind direction data Every 24 seconds for temperature, humidity, and rain data Operating temperature range -40 °F ~140 °F (-40 °C ~ 60 °C) Operating humidity range 1 ~ 99% RH Location use for sensor Outdoor use...
-
Page 41: Limited Warranty To Original Consumer
Everlasting Solar Cell, and Ultra-Wide Display ® product, hardware or software, even if packaged or sold with the Product; (b) Damage caused by use with non-Logia 7-in-1 Wireless 8-Day Forecast Weather Station with Wi-fi, Everlasting Solar Cell, ® and Ultra-Wide Display products;... - Page 42 Warning: Changes or modifications to this unit not expressly approved by the party responsible for compliance could void the user’s authority to operate the equipment. If you experience any issues with your Logia 7-in-1 Wireless 8-Day Forecast Weather Station with Wi-fi, Everlasting Solar ®...
- Page 43 LOGIA is a trademark of C&A IP Holdings LLC in the US, Canada, China, and the EU. Android and Google Play are trademarks of Google LLC. Apple, IOS, and App Store are trademarks of Apple Inc. in the U.S. and other countries.
Need help?
Do you have a question about the LOWSC717FWB19 and is the answer not in the manual?
Questions and answers