
Subscribe to Our Youtube Channel
Related Manuals for Logia LOWSC510SWB


Summary of Contents for Logia LOWSC510SWB
- Page 1 ™ 5-IN-1 WIRELESS WEATHER STATION ® WITH WI-FI SOLAR PANEL USER GUIDE LOWSC510SWB...
-
Page 2: Table Of Contents
Thank you for purchasing the Logia 5-in-1 Wireless Weather Station with Wi-Fi ® and Solar ™ Panel. This User Guide is intended to provide you with guidelines to ensure that operation of this product is safe and does not pose risk to the user. Any use that does not conform to the guidelines described in this User Guide may void the limited warranty. -
Page 3: Safety Precautions
SAFETY PRECAUTIONS WARNING! Please read and understand all safety precautions, operating instructions, and care/maintenance instructions before operating this appliance. Keep this manual for future reference. • This product is not a toy. Keep out of the reach of children. • This product is not to be used for medical purposes or for public information. •... -
Page 4: Product Features
PRODUCT FEATURES 1. Wireless 5-in-1 weather sensor measures wind speed, wind direction, rainfall, temperature, and humidity. 2. No calibration needed! The product is fully pre-calibrated and mostly assembled; all you need to do is install it and sync with the included display console. 3. -
Page 5: Package Contents
Weight: 1.1 lb. (503 g) (with batteries) Power source: DC 5 V, 1A adapter LOGIA is a trademark of C&A IP Holdings, LLC in the US, Canada, China and the EU. Backup battery: CR2032, 3 V battery Android and Google Play is a trademarks of Google LLC. -
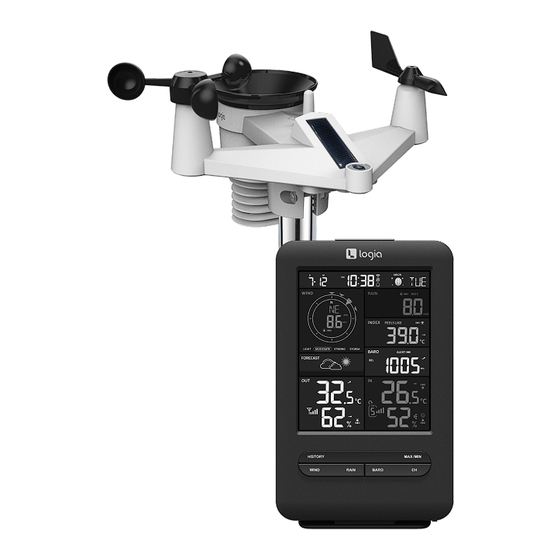
Page 6: Product Overview
NOTE: This instruction manual contains useful information on the proper use and care of this product Please read PRODUCT OVERVIEW NOTE: this manual through to fully understand and enjoy its features, and keep it handy for future use This instruction manual contains useful information on the proper use and care of this product Please read CONSOLE LCD DISPLAY OVERVIEW this manual through to fully understand and enjoy its features, and keep it handy for future use OVERVIEW... -
Page 7: Lcd Display Overview
1 [ ALARM/SNOOZE ] key 9 Table stand 2 LCD display 10 Wall mounting hold 3 [ HISTORY ] key 11 [ ALERT ] key 4 [ WIND ] key 12 [ ALARM ] key LCD DISPLAY OVERVIEW 5 [ RAIN ] key 13 [ CLOCK SET ] key 6 [ MAX / MIN ] key 14 [ HI / LO / AUTO ] k... -
Page 8: Wireless 5-In-1 Outdoor Sensor Overview
WIRELESS 5-IN-1 OUTDOOR SENSOR OVERVIEW WIRELESS 5-IN-1 SENSOR 1 Antenna 7 Bubble level gradienter 2 Radiation shield & Thermo-hygro sensor 8 Rain collector 3 Mounting parts (fit for 35 ~40mm diameter 9 Wind vane pole) 10 Solar panel 4 Battery door 11 Wind cups... -
Page 9: Installation Instructions
9. Wind direction vane 1. Antenna 5. RESET button 10. Solar panel 2. Radiation shield & 6. Transmission status LED hygro-thermo sensor 11. Wind speed cups 7. Bubble level gradienter 3. Mounting parts 8. Rain collector 4. Battery door INSTALLATION INSTRUCTIONS The display console can pair up with one (1) wireless 5-in-1 outdoor sensor and up to seven (7) wireless indoor sensors. -
Page 10: Setting Up The Wireless 5-In-1 Outdoor Sensor
SETTING UP THE WIRELESS 5-IN-1 OUTDOOR SENSOR The wireless 5-in-1 outdoor sensor measures wind speed, wind direction, rainfall, temperature, and INSTALLATION AND SETUP humidity. Your console can pair up with one wireless 7-in-1 outdoor sensor and up to 7 wireless indoor sensors. - Page 11 Secure the sensor onto a mounting post or pole (not included) using the mounting clamp (included). Add rubber pads onto mounting clamp before fastening the mounting clamp onto the sensor. INSTALL BATTERIES Screw location Unscrew the battery door at bottom of unit and insert the batteries Tighten the mounting clamp using included screws onto the bottom of the sensor once it is on a pole.
-
Page 12: Setting Up The Weather Console
SETTING UP THE WEATHER CONSOLE Your console can pair up with one (1) wireless 5-in-1 outdoor sensor and up to seven (7) wireless indoor sensors. (No indoor sensors included.) INSTALLING THE BACKUP BATTERIES Remove the battery door on the rear of the console. Insert a new button battery. - Page 13 1. Remove the battery door of the console. PAIRING THE WIRELESS 5-IN-1 SENSOR AND INDOOR SENSOR 2. Insert 3 new AAA batteries as per the polarity indicated, Once your display console powers on, it should automatically search for and connect to the wireless 3.
-
Page 14: Setting Up Wi-Fi Connection
to use Wunderground.com or Weathercloud.net, leave the check boxes unchecked. Press “SETUP” icon Language: English to SETUP page SETUP ADVANCED SETUP INSTRUCTIONS WiFi Router setup Press to search router Select the Wi-fi router (SSID) you will connect to Search Router: ROUTER_A ®... - Page 15 SETUP THE WEATHER SERVER CONNECTION Enter the following information into the below web interface "SETUP" page to connect the console to weather server, If you do not want to use Wunderground.com or Weathercloud.net, please empty the station ID & key to ignore the data upload. SETUP page SETTINGS Press "ADVANCED"...
- Page 16 NOTE: - When WI-FI setup is completed, your PC or mobile will resume your default WI-FI connection. - During AP mode, you can press and hold the [ SENSOR / WI-FI ] key for 6 seconds to stop TIME ZONE AP mode and the console will restore your previous setting.
- Page 17 Press "ADVANCED" key at the top of web interface to enter the advance setting page, this 1. Remove the battery door of the console. page allow you to set and view the calibration data of the console, as well as update the 2.
-
Page 18: Create And Sync Your Weather Server Account
Wi-Fi router. ® NOTE: Logia™ does not own Weather Underground or Weathercloud, and these instructions are liable to change without notice due to changes in either website. CREATE YOUR WEATHER UNDERGROUND ACCOUNT Make sure your display console is connected to your Wi-Fi network, as outlined in brief below. - Page 19 4. Follow their instruction to enter your station information, in the Step "Tell Us More About Your Device", (1) enter a Name for your weather station. (2) choose “Other” in “Device Hardware” section and fill in other the other information (3) select "I Accept" to accept Weather underground's privacy terms, (4) click “Next”...
- Page 20 3. Enter all the requested information into the Create New Device page. When presented with the Weather Link", Once you have completed, click Create . Model selection box, choose LOWSC510SWB Series under the Logia section. When presented with the Link Type selection box, choose Pro Weather Link. Once you have completed this section, click Create.
-
Page 21: Updating The Firmware
VIEW YOUR WEATHER DATA IN WEATHER UNDERGROUND To view your weather station data live via PC or mobile web browser, visit http://www.wunderground. com, and then enter the Station ID you were provided during account setup in the search box. Your weather data will show up on the next page. -
Page 22: Operating Instructions
Make sure your PC’s wireless connection is stable. Once the update process starts, do not try to do anything else on your PC or on the display console. During the firmware update process, the console will stop uploading data temporarily. It will reconnect to your router and resume uploading data once the update is complete. - Page 23 Northern Hemisphere Icons Moon Phase Southern Hemisphere Icons New Moon Waxing Crescent Moon First Quarter Moon Waxing Gibbous Moon Full Moon Waning Gibbous Moon Third Quarter Moon Waning Crescent Moon Arrow Icon Daylight Saving Time (DST) The display console will come with the DST function set to “AUTO” (for EU and US version). Using the Temp/Humidity Trend Rising Steady...
-
Page 24: Temperature
No signal Weak signal Good signal Activating/Deactivating the Alarm & Temperature Pre-Alarm The temperature pre-alarm will alert you 30 minutes prior to your alarm time whenever the outdoor temperature falls below 26.5 °F (-3 °C). In normal operating mode, press the ALARM button to display the set alarm time for five (5) seconds. Too cold Comfortable Too hot... - Page 25 the next day. - By pressing [ALARM / SNOOZE] key to enter snooze that the alarm will sound again after 5 minutes. - By pressing and hold [ALARM / SNOOZE] key for 2 seconds to stop the alarm and will activate again in the next day Viewing Outdoor Channels - By pressing [ ALARM ] key to stop the alarm and the alarm will activate again in the next day.
-
Page 26: Wind
3 . If the signal does not recover within 48 hours, the “Er” display will become permanent. You need to replace the batteries and then press [ SENSOR / WI-FI] key to pair up the sensor again . NOTE: Comfort indicator levels may vary even when the temperature is the same due to VIEW THE OUTDOOR CHANNEL (OPTIONAL FEATURE WITH ADD ON EXTRA variances in relative humidity levels. - Page 27 Beaufort Scale Description Wind Speed Land Condition < 1 km/h < 1 mph Calm Calm. Smoke rises vertically. < 1 knots < 0.3 m/s 1.1 ~ 5km/h 1 ~ 3 mph Smoke drift indicates wind direction. Light air 1 ~ 3 knots Leaves and wind vanes are stationary.
-
Page 28: Weather
28 ~ 33 knot against the wind. 13 9 ~ 17 1 m/s 62 ~ 74 km/h Some twigs broken from 39 ~ 46 mph trees. Cars veer on the Gale WEATHER 34 ~ 40 knot road. Progress on foot is Weather Indexes seriously impeded. -
Page 29: Pressure
91 °F to 105 °F (33 °C to 40 °C) Extreme Caution Possibility of dehydration Empty plastic bins tip over. 10 8 ~ 13 8 m/s 106 °F to 129 °F (41 °C to 54 °C) Danger Heat exhaustion likely 50 ~ 61 km/h ensor's temperature and wind speed data determines the Whole trees in motion. -
Page 30: Rain
LATIVE BAROMETRIC READING key to switch between ABSOLUTE / RELATIVE barometric RAIN Rainfall e rainfall and rain rate The Rainfall shows information regarding the rainfall and rain rate. or 2 seconds to enter unit setting mode. Set the Rainfall Units le the rainfall unit between mm and in. - Page 31 View the Accumulated MAX/MIN While in normal operating mode, press the MAX/MIN button to cycle through the daily MAX/MIN records. Records are displayed in the following order: Outdoor MAX temperature > outdoor MIN temperature > outdoor MAX humidity > outdoor MIN humidity >...
- Page 32 TO SET ALERT 1. Press [ ALERT ] to select and display the desired weather alert reading in the sequence 1 . Press [ HISTORY ] key to check the beginning of the current hour's weather data, e.g. the 1 . Press [ HISTORY ] key to check the beginning of the current hour's weather data, e.g. the 1.
-
Page 33: Care And Maintenance
Silence the Weather Alert Alarm Press the SNOOZE/LIGHT button on top of the display console to silence the alarm, or it will automatically turn off after two (2) minutes. NOTES: Once the alert is triggered, the alarm will sound for two (2) minutes and the associated alert icon and weather readings will flash. -
Page 34: Troubleshooting
Memory modes Historical Data of past 24 hours, daily Max Rainfall display mode Rate / Hourly / Daily / Weekly / Monthly / Total rainfall Weather Index Display & Function Specifications Note: The following details are listed as they are displayed or operate on the console Weather index mode Feels like, wind chill, heat index, and dew point 2. -
Page 35: Specifications
SPECIFICATIONS DISPLAY CONSOLE General Specifications Dimensions (W x H x D without stand) 4.6” x 7.6” x 0.8” (118 x 192.5 x 21 mm) Weight 265 g (with batteries) Main power DC 5V, 1A adapter (Manufacturer: HUAXU Electronics Factory, Model: HX075-0501000-AB, HX075-0501000-AG-001 or HX075-050100-AX) Backup battery CR2032 Operating temperature range... - Page 36 Typical at 77°F (25°C) Resolution 1 hPa / 0.01 inHg / 0.1 mmHg Weather forecast Sunny / Clear, Slightly Cloudy, Cloudy, Rainy, Rainy / Stormy, and Snowy Memory modes Historical data of past 24 hours, daily Max/Min Indoor / Outdoor Temperature Display & Function Specifications Note: The following details are listed as they are displayed or operate on the console.
- Page 37 Dew point display range -4 °F ~ 176 °F (-20 °C ~ 80 °C) Heat index display range 78.8 °F ~ 122 °F (26 °C ~ 50 °C) Wind chill display range -85 °F ~ 64.4 °F (-65 °C ~ 18 °C) (wind speed > 4.8 km/h) Memory modes Historical Data of past 24 hours, Daily Max/Min Wireless 5-in-1 Outdoor Sensor Specifications...
-
Page 38: Limited Warranty To Original Consumer
Solar Panel product, hardware or software, even ® if packaged or sold with the Product; (b) Damage caused by use with non-Logia™ 5-in-1 Wireless Weather Station with Wi-Fi ® and Solar Panel products; (c) Damage caused by accident, abuse, misuse, flood, fire, earthquake, or other external causes;... - Page 39 Warning: Changes or modifications to this unit not expressly approved by the party responsible for compliance could void the user’s authority to operate the equipment. If you experience any issues with your Logia 5-in-1 Wireless Weather Station with Wi-Fi ®...
- Page 40 LOGIA is a trademark of C&A IP Holdings, LLC, in the U.S. Android is a trademark of Google LLC. Apple and App Store are trademarks of Apple Inc. in the U.S. and other countries. IOS is a trademark of Cisco in the U.S. and other countries and is used under license.
Need help?
Do you have a question about the LOWSC510SWB and is the answer not in the manual?
Questions and answers