
Related Manuals for Logia LOWSC715FWB10


Summary of Contents for Logia LOWSC715FWB10
- Page 1 ™ 7-IN-1 WIRELESS 6-DAY FORECAST WEATHER ® STATION WITH WI-FI EVERLASTING SOLAR CELL & ULTRA-WIDE DISPLAY USER GUIDE LOWSC715FWB10...
-
Page 2: Table Of Contents
Thank you for purchasing the Logia 7-in-1 Wireless 6-Day Forecast Weather Station with Wi-Fi ® SAFETY PRECAUTIONS Everlasting Solar Cell, and Ultra-Wide Display. This User Guide is intended to provide you with guidelines to ensure that operation of this product is safe and does not pose risk to the user. Any use WARNING! Please read and understand all safety precautions, operating instructions, that does not conform to the guidelines described in this User Guide may void the limited warranty. -
Page 3: Product Features
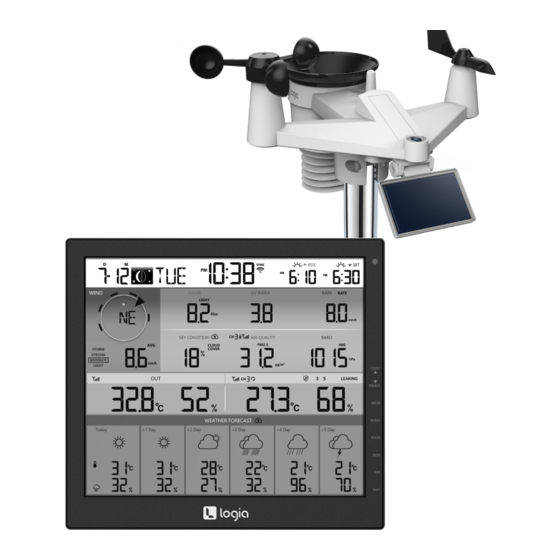
DISPLAY CONSOLE S Dimensions: (W x H - Console power adapter LOGIA is a trademark of C&A IP Holdings LLC in the US, Canada, China and the EU. Weight: 1.4 lbs. (632 - Console CR2032 battery Power source: DC 5 Android and Google Play is a trademarks of Google LLC. -
Page 4: Weather Console Overview
PRODUCT OVERVIEW 1. Time & Data, Moon phase, Sunrise / sunset 1. Time & Data, Moon phase, Sunrise / sunset 6. Sky condition 6. Sky condition WEATHER CONSOLE OVERVIEW CONSOLE LCD DISPLAY OVERVIEW & moon rise / moon set & moon rise / moon set 7. -
Page 5: Wireless Sensor Overview
9. Wind vane WIRELESS SENSOR OVERVIEW 1. Antenna 5. RESET button GETTING STARTED 10. UV/light sensor WIRELESS 7-IN-1 SENSOR 2. Radiation shield & 6. Transmission status LED hygro-thermo sensor 11. Solar Cell 7. Bubble level 3. Mounting base 8. Rain collector 12. - Page 6 Step 6: Remove the solar panel protection film. INSTALL RECHARGEABLE BATTERIES : Unscrew the battery door at bottom of unit and take cable socket. 4. Connect the cable of the rechargeable battery pack (included) to the cable located in the battery ADJUSTING THE SOLAR CELL compartment.
-
Page 7: Setting Up The Display Console
RECOMMENDATION FOR BEST WIRELESS COMMUNICATION Effective wireless communication is susceptible to noise interference in the environment, and POINTING THE WIRELESS 7-IN-1 OUTDOOR SENSOR TO SOUTH (OPTIONAL) The joint of the solar cell is labeled with different degrees (0, 15, 30 45, and 60). To place the solar cell in distance and barriers between the sensor transmitter and the display console. -
Page 8: Operating Instructions
/ INDEX point and wind chill reading 3.4.2 SETUP DISPLAY CONSOLE Decrease the value in setting 1. Once the console power up, all the segments of the LCD will be shown. To switch between predicted HI & LO temperature, or predicted 2. -
Page 9: Outdoor Temperature, Humidity & Temperature
WIND CHILL OUTDOOR TEMPERATURE, HUMIDITY & TEMPERATURE MPERATURE, HUMIDITY & TEMPERATURE INDEX Wind chill or windchill is the lowering of temperature due to the passing-flow of lower-temperature air. attery indicator Mode Setting procedure Wind chill is determined by a combination of the wireless weather sensor’s temperature and wind speed data. l indicator to show the signal Temperature unit Press [ / INDEX ] or [ / MODE ] key to select °C or °F... -
Page 10: Wind
section WIND INDOOR TEMPERATURE & HUMIDITY Wind Speed and Direction Overview The indoor reading is the default mode of this console. This mode shows comfort indication and temperature/ 4.3.8 WIND 4.3.8.1 WIND SPEED AND DIRECTION SECTION OVERVIEW VIEW humidity readings. Real time wind CH sensor Real time wind... -
Page 11: Barometric Pressure
0 3 ~ 1 5 m/s Severe widespread damage to vegetation ≥ 74 mph 6 ~ 11 km/h Hurricane force and structures. Debris and unsecured ≥ 64 knots Wind can be felt on exposed objects are hurled about. 4 ~ 7 mph ≥... -
Page 12: Air Quality
long-sleeved clothing. sleeved clothing, If you have to stay outdoors, BURN TIME TABLE make sure to seek shade. Moderate High Very high Extreme 12~16 d on normal skin type, it is just a reference of UV strength. In general, the darker UV Index Mode SKY CONDITION or more radiation) it takes to affect the skin. -
Page 13: Max/Min
106 °F – 129 °F (41 °C – 54 °C) Minute Danger Press [ / INDEX ] or [ Heat exhaustion highly likely / MODE ] key to adjust the minute protection 8 ~ 12 mph 31 ~ 38 mph long-sleeved clothing. -
Page 14: Create Pwl Account & Set Up Wi-Fi ® Connection
TIME, DATE, AND GENERAL SETTINGS DISPLAY BACKLIGHT Press and hold the SET button for two (2) seconds to enter the setting mode. Press DOWN/INDEX or UP/ The weather console backlight can be adjusted, using the HI/LO/AUTO slider to select the appropriate FORECAST button to adjust the setting and press SET button again to save and proceed with next step of brightness: the setting. -
Page 15: Setting Up Wi-Fi Connection
- Slide to the [ AUTO ] position for the auto adjust back light that according to environment light level. CREATE PWL ACCOUNT & SETUP WI-FI CONNECTION OF CONSOLE The console can upload /download weather data in ProWeatherLive (PWL) cloud server through 4. - Page 16 SETTING UP WEATHER SERVER CONNECTION ADVANCE SETTING IN WEB INTERFACE SETUP THE WEATHER SERVER CONNECTION Press the “ADVANCED” button at the top of web interface to enter the advance setting page, this page allows you to Enter the information into the following web interface “SETUP” page. Ensure all information is entered Enter the information into the following web interface "SETUP"...
-
Page 17: Proweatherlive (Pwl) Live Data
NOTE: CALIBRATION UPDATING THE FIRMWARE Please press "Help" in the should you have any query on the PWL operation. 1. You may enter or change the offset and gain values for different measurement parameters, while This display console supports OTA (over the air) Function Firmware and WI-FI System Firmware MAINTENANCE viewing the current offset and gain values next to the corresponding boxes. -
Page 18: Compatible Devices
Some condensation beneath the UV This will disappear when temperature rises up under the sun and will not The display console of the Logia 7-in-1 Wireless 6-Day Forecast Weather Station with Wi-fi sensor(s) is/are 2. Make sure the channel displayed match to the channel selection on sensor ®... -
Page 19: Specifications
Barometer Display & Function Specifications Note: The following details are listed as they are displayed or operate on the console. Barometer units hPa, inHg, and mmHg Measuring range 540 ~ 1100 hPa SPECIFICATIONS Accuracy (700 ~ 1100 hPa ± 5 hPa) / (540 ~ 696 hPa ± 8 hPa) (20.67 ~ 32.48 inHg ±... -
Page 20: Limited Warranty To Original Consumer
® , Everlasting Solar Cell, and Ultra-Wide Display product, hardware or software, even if packaged or sold with the Product; (b) Damage caused by use with non-Logia 7-in-1 Wireless 6-Day Forecast Weather Station with Wi-Fi ® , Everlasting Solar Cell, and Ultra-Wide Display products;... - Page 21 • Connect the equipment into an outlet on a circuit different from that to which the receiver is connected. LOGIA is a trademark of C&A IP Holdings LLC in the US, Canada, China, and the EU. • Consult the dealer or an experienced radio/TV technician for help.
Need help?
Do you have a question about the LOWSC715FWB10 and is the answer not in the manual?
Questions and answers