
Related Manuals for WaterLogic escowa Purus iQ3


Summary of Contents for WaterLogic escowa Purus iQ3
- Page 1 Purus iQ 3 Service - Manual For the Installation, Programming, Cleaning and Maintenance...
- Page 2 This operating handbook relates to the following equipment: Purus iQ3 Type: Serial number: This service manual is for the installation, pro- If you should loss or damage the manual, you gramming, cleaning and maintenance. It is a part must request a replacement from the manu- of the equipment and must always be available facturer or the local distributor.
-
Page 3: Table Of Contents
Chapter Page Chapter Page Service Record Machine Construction Overview Programming Dismantling To enter programming mode press program Button (PT) for 6 seconds Inside front cover View from rear Intended Use removal of covers Internal View Conditions view from top Operational basis Advantages of the IQ3 General equipment information Information on Accessories... -
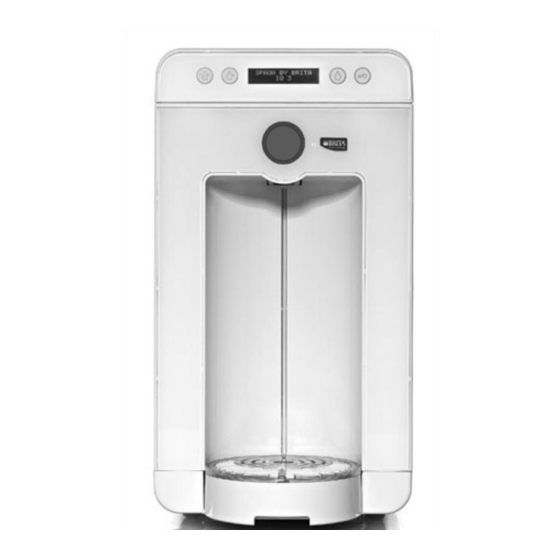
Page 4: Service Record
Service Record Service Equipment: IQ3 Water Filter: Inst. Date: Technician: Date Counter Work Carried Out Technician... - Page 5 1. Machine Construction Overview 1.1 Dismantling 1. Display and Buttons 2. Aerator with filter 3. Drip tray with capacity of 1.5 L Chilled Still Water Sparkling Water Ambient Water Keypad Lock...
-
Page 6: Inside
1. Machine Construction Overview 1.2 Inside front cover 1. Connection for external bottle 2. Aerator (change every 12 months) 3. BRITA filter 4. Disposable CO bottle (optional) -
Page 7: View From Rear
1.3 View from rear 1. External CO connection 2. Mains water inlet 3. Power supply connection 4. Programming button 5. Programming card slot 6. Machine identification plate 7. Evaporator... -
Page 8: Removal Of Covers
1. Machine construction overview 1.4 removal of covers 1. Undo top cover screws 2. Remove top cover first 3. Remove side covers... -
Page 9: Internal View
1.5 Internal View Left Side view Right Side view 1. High pressure pump 5. Ozone Generator 2. Compressor (Time out 4 h) 6. High pressure pump 3. Carbonator 7. Cooling fan 4. PCB Cover 8. Inlet valve... -
Page 10: View From Top
1. Machine construction overview 1.6 view from top 1. Thermostat 2. Relief valve (7.5 bar) 3. Level probes 4. Outlet valves 5. CO water 6. Chilled Still water 7. Ambient still water 8. Ozone injector... -
Page 11: General Equipment Information
2. General equipment information 2.1 Machine identification plate The machine identification plate contains impor- tant information. Please always indicate type of device and serial number for spare part orders. The machine identification plate shows the following detail: OEM: Manufactor Model/type of device: E - iQ3- E - 3 sparkling+ozono Model number:... -
Page 12: Safety Information
2. General equipment information 2.3 Safety Information 2.5 Accessories This equipment is manufactured with consi- Various accessories are available for the equip- deration to safety aspects. Regardless this ment. where accessories are in the form of kits equipment must only be serviced by authorised they will be supplied with instructions, which persons. -
Page 13: Installation Guide
3. Installation Guide 3.1 Notes for Installation • Read the manual carefully before using the iQ3. • The mains water supply must be potable (safe for drinking). • The iQ3 should always be connect to a mains electricity supply. • Do not touch for hygiene reasons the water dispense nozzle. -
Page 14: Installation
4. Installation 4.1 First installation 4.1.1 Preparation Attach the CO gas supply before flushing the filter. See details on the following page. 1. Connect the mains water supply to the iQ3. Do not turn the water supply on. Do not attach the mains cable. 2. -
Page 15: Co Installation
4.1.2 CO Installation Before installing the CO the BRITA C1000AC must first be Disposable or commercial CO fitted and flushed. See details on the following page. 1. The equipment is supplied with a 4 mm CO inlet hose. The hose is suitable for the disposable CO system. -
Page 16: Fitting The Water Filter
4. Installation 4.1 First Installation 4.1.3 Fitting the Water Filter 1. Fit the C1000AC cartridge with the bayonet fixing to the filter head. 2. Push the Cartridge upwards in correct position. Lock the cartridge with the blue lever. Open the mains water supply. Check the water connection for leaks. -
Page 17: Sanitation And Cleaning
5. Sanitation and cleaning. 5.1 Sanitation with Anolyte- sani - Brita Service cartridge. 5.1.1 Sanitation with the Service Cartridge. Sanitation should be carried out at installation and at 6 monthly intervals. 1. Turn off Water Supply. Press the button for ambient water for 10 sec, then press the button for Cool water for 10 sec. -
Page 18: Sanitation
5. Sanitation and cleaning 5.2 Sanitation 5.2.1 Sanitation with iQ - sani - clean - SHOT (using Anolyte) Alternative Cleaning option. 1. Fit the Anolyte kit (injector and bottle with 1 L concentrate) instructions are included with the kit. The kit is fitted externally between the water supply and intake valve of the equipment. -
Page 19: Disinfection Of Dispense Area
5.3 Disinfection of Dispense area The equipment is built in a hygienically germ- Disinfect after maintenance the dis- free production facility. To ensure that the hygie- pense area with disinfection spray ne remains as intended make sure that cleaning around to ensure perfect hygiene. instructions are adhered too. -
Page 20: Programming
6. Programming 6.1 To enter programming mode press program Button (PT) for 6 seconds. Program Button (PT) uttons used to change nd store values. T1 - T2 + Press PT to scroll through the options. Default setting Options Refrigerator Temp Refrigerator temperature +8.0 T1 to decrease T2 to increase Range... -
Page 21: Intended Use Conditions
7. Intended Use 7.1 Conditions • • Regular maintenance, such as replacement The machine is designed only for the dispen- se of filtered water and cooled of seals in use of CO - systems and visual in- filtered Water with CO spections should be carried out no later than •... -
Page 22: Information On Accessories
7. Intended Use 8.3 Sanitation 7.4 Information on Accessories Sanitise the equipment during the routine - Please note following information: 6 month service call. The device must only be • The CO cylinder must be installed upright. used with a water filter in operation. Read the Cylinders must be secured with an additional chapter about water filters, for more information safeguard against falling over. -
Page 23: Installation And Service Checklist
8.6 Installation and service checklist The following work must be carried out under the maintenance rule: Component? To be checked Water Supply Supply secure at mains stop valve. Secure at inlet valve Water filter New Water Filter fitted? Water filter fitted securely without leaks? Sanitation All 3 water outlets disinfected with Anolyte or Sanitab? Outlet dispense... -
Page 24: Technical Data
9. Technical Data Dimensions: 445 mm Height: Width: 240 mm Depth: 510 mm Dispense area height: 260 mm Dispense area width: 145 mm Weight approx: 18 Kg (Incl. packaging) Electrical power ratings: Supply Voltage: 230 Volt (+/- 10%) Power max.: 140 Watt Power consumption average in 24hr: 0.9 KWh... -
Page 25: Water And Co
10. Water and CO 10.3 CO connection 10.1 Water supply There are two options for supplying CO to the Our drinking water is subject to equipment: stringent controls. Tap water is • IQ3 CO disposable bottle system. the most highly monitored of all •... -
Page 26: Co Of Systems And Connection
10. Water and CO 10.3 CO connection Guide to setting the valve for desired Attention: pressure: Please always work with vertical standing CO bottles (don`t turn the bottle upside-down). Optimal CO pressure for the iQ3 is between If you have to change somethin, pleas always 3 bar and 5 bar. -
Page 27: Troubleshooting
11. Troubleshooting 11.1 Troubleshooting guide Problem Cause Solution Water is not dispensing. The water supply is turned off. Turn the water supply on. Inspect The water supply pipe is kinked / the water supply pipe. Inspect the trapped. The is now power to the mains power supply. -
Page 28: Schematics
12. Schematics 12.1 Water Circuit Attention: do not bow the water tubes! PUMP INLET SOLENOID VALVE CHECK PUMP INLET VALVE SOLENOID WATER CARBON VALVE FILTER WATER INLET CARBON FILTER OPTIONAL OZONE GENERATOR CARBONATOR INTERNA L LEVEL PROBE CHECK COLD TEMPERATED CA RTRIDGE 6 BAR VA LVE... -
Page 29: Safety Markings
Safety Markings • The CB Scheme is an IEC standard. Nemko 1. CE Marking on a product is a manufacturer‘s declaration is a European Norm (EN). You can also use that the product complies with the policy to the European standard as proof the essential requirements of of conformity and CE marking. - Page 30 Safety Markings • The EPDWA association was Water production plants for water intended founded to promote, develop for drinking purposes, municipalities, consor- and maintain the highest tia, etc. using the most advanced systems standards of hygiene, safety and ethics in the of clarification, flocculation, desalination, European Point - of - Use Drinking Water industry disinfection, etc..
- Page 31 EC Declaration of Conformity • EC DECLARATION OF CONFORMITY Safety of household and electrical applian- 2004/118/EC, 2006/95/EC. [Manufactor] S.r.l. ces - Part 2 - 24 : Particular requirements for Loc. Isola del Pero, 16 -17041 Altare (SV) - Italy refrigerating ap-pliances, ice -cream applian- de- clare under our responsability that the ces and ice -makers - EN 60335 - 2 - 24 : 2003 + product WATER DISPENSER Model SMILE,...
-
Page 32: Notes
Notes:... - Page 33 Notes:...
- Page 34 Notes:...
- Page 35 Notes:...
- Page 36 © copyright engl. version 2 09/12...
Need help?
Do you have a question about the escowa Purus iQ3 and is the answer not in the manual?
Questions and answers