Table of Contents
Advertisement
Quick Links
P5-16...R40-17
Model: C01 PLUS
Assembly and Operating Instructions
en
Roller shutter drive with integrated radio
transceiver
Important information for:
• Fitters / • Electricians / • Users
Please forward accordingly!
These instructions must be kept safe for future reference.
2010 301 184 0d 19/10/2023
Becker-Antriebe GmbH
Friedrich-Ebert-Straße 2-4
35764 Sinn/Germany
www.becker-antriebe.com
Advertisement
Table of Contents

Related Manuals for Becker C01 PLUS


Summary of Contents for Becker C01 PLUS
- Page 1 P5-16...R40-17 Model: C01 PLUS Assembly and Operating Instructions Roller shutter drive with integrated radio transceiver Important information for: • Fitters / • Electricians / • Users Please forward accordingly! These instructions must be kept safe for future reference. 2010 301 184 0d 19/10/2023 ...
-
Page 2: Table Of Contents
Table of contents General .................................... 3 Warranty ..................................... 4 Safety instructions ................................ 4 Instructions for the user.............................. 4 Instructions for installation and commissioning........................ 4 Intended use .................................. 6 Assembling and disassembling the plug-in connecting cable.................... 6 Assembly .................................... 7 Compatible Centronic transmitters ............................ 9 Commissioning with a CentronicPLUS transmitter ........................ -
Page 3: General
General These tubular drives are high-quality products with the following features: • Optimised for roller shutter operation • Individual, group and central radio control • No need to run wires to a switch or relay control device • Any combination of drive and transmitter possible •... -
Page 4: Warranty
Warranty Structural modifications and incorrect installation which are not in accordance with these and our other instructions can result in serious injuries, e.g., crushing of limbs. Therefore, structural modifications may only be carried out with our prior approval and strictly in accordance with our instructions, particularly the information contained in these Assembly and Operating Instructions. Any further processing of the products which does not comply with their intended use is not permitted. - Page 5 • Hazardous moving parts of the drive must be installed at a height of over 2.5 m above floor level or any other surface from which the drive can be accessed. • To ensure safe operation of the system after commissioning, the limit positions must be correctly set/ programmed in.
-
Page 6: Intended Use
Intended use The type of tubular drive described in these instructions is intended solely for the operation of roller shutters. This type of tubular drive supports not only curtain attachment by means of springs but also rigid shaft connectors. These are de- tected automatically. -
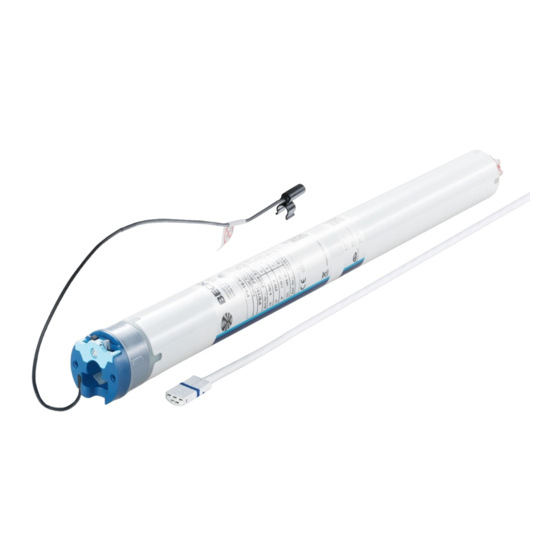
Page 7: Assembly
Disassembling the plug-in connecting cable for tubular drives Insert a suitable flathead screwdriver between the locating lug Ø35 and the snap-in pin, so that the snap-in pin releases the locat- ing lug from the plug. Now you can pull out the connecting cable along with the flat- head screwdriver. - Page 8 Assembling and disassembling the mounting pin Ø45 When pushed in, the mounting pin (2) locks automatically. To undo the mounting pin (2), push the tab washer (1) upwards and pull out the mounting pin (2). If you wish to use the "obstacle detection" function, you must use the "drive adapter for obstacle detection".
-
Page 9: Compatible Centronic Transmitters
All CentronicPlus receivers can be operated with the Centronic transmitters listed in the Centronic/CentronicPlus compatibility table at www.becker-antriebe.com/downloads As two fundamentally different radio technologies are linked in this case, the full performance of the CentronicPlus radio control system is not available in this combination. When using the Centronic transmitter with CentronicPlus receiver, the range perform- ance may be reduced under certain circumstances. -
Page 10: Commissioning With A Centronicplus Transmitter
Commissioning with a CentronicPLUS transmitter Explanation of symbols UP button STOP button DOWN button Programming button (on the transmitter) Function button (on the transmitter) LED ring on the transmitter Receiver confirms once or multiple times by “clicking” or “shifting” 1 = direction switch 2 = radio switch Operating modes Normal mode... -
Page 11: Establish Programming Mode
Connecting the tubular drive Connect the tubular drive to the power supply. 230V AC / 50 Hz 1 = blue 3 = black 2 = brown 4 = green / yellow Switch on the power. ► The tubular drive confirms. Establish programming mode This step is only necessary if one of the devices to be programmed is not yet part of the in- stallation. -
Page 12: Programming The Centronicplus Transmitter
Programming the CentronicPLUS transmitter With brand new products, devices from another installation or products that have been re- stored to factory settings, programming mode must be established beforehand (see Es- tablishing programming mode). Bring the transmitter as close as possible to the receiver to be programmed. Press the programming button for 3 seconds when it is ready to program. -
Page 13: Adding Additional Transmitters To The Installation
Adding additional transmitters to the installation If installation data already exists for the transmitter being programmed, the procedure will be terminated. Termination is indicated by the red flashing of the LED ring. In this case, the transmitter will need to be restored to factory settings (see corresponding transmitter in- structions). -
Page 14: Checking That The Running Direction Is Correct
Checking that the running direction is correct The direction of rotation can only be changed if no limit position has been set. There are several ways to change the direction of rotation: • Changing direction of rotation via the direction switch •... -
Page 15: Intelligent Installation Management
Intelligent installation management Completion of installation following automatic setting of limit positions The drive saves the limit position permanently once the upper limit position is reached 3 times in succession. Installation is then complete. If the limit position is set above a point, this is stored permanently. Limit position status indicator A brief stopping and restarting indicates that no limit position has been set in that direction of movement. - Page 16 Upper point to lower point There is no shading solution length adjustment with this limit position setting. Select the required receiver as described in the chapter Selection of the receiver for the setting mode [} 13]. Open to the desired upper limit position. Press the programming button and, within 3 seconds, also press the button and hold the two buttons down.
-
Page 17: Changing The Set Limit Positions
Upper point to lower stop Select the required receiver as described in the chapter Selection of the receiver for the setting mode [} 13]. Open to the desired upper limit position. Press the programming button and, within 3 seconds, also press the button and hold the two buttons down. -
Page 18: Deleting The Limit Positions
2) Extending the range of travel (the desired limit position is located outside the current range of travel) Attention When both or individual limit positions are deleted, all the other set functions (intermediate position I, intermediate position II, upper anti-freeze mechanism, obstacle detection, run times, fly screen protection function) are deleted as well. -
Page 19: Intermediate Positions I + Ii
Deleting both limit positions Select the required receiver as described in the chapter Selection of the receiver for the setting mode [} 13]. Open/close the shading solution to a point between the limit positions. Press the programming button and, within the next 3 seconds, press the STOP button at the same time and hold the two buttons down for 3 seconds. -
Page 20: Restoring The Wireless Memory Of The Tubular Drive To Factory Settings
Deleting the desired intermediate position Move the shading solution to the intermediate position that is to be deleted. Now press the STOP button and, within 3 seconds, also press the travel button as- signed to the intermediate position and hold the two buttons down. ▻... - Page 21 Briefly press the programming button to change to the setting mode. ▻ The receiver confirms. ▻ The LED ring of the transmitter slowly pulses light blue. ▻ The receiver now enters dead-man mode. ▻ The setting mode is now active. Then press the programming button and also the button, the STOP button and the button for approximately 3 seconds.
-
Page 22: Commissioning With A Centronic Transmitter
Commissioning with a Centronic transmitter Explanation of symbols UP button STOP button DOWN button Programming button (on the transmitter) Receiver confirms once or multiple times by "clicking" or "shifting" 1 = direction switch 2 = radio switch Attention The tubular drives are designed for short-time operation. An inbuilt thermal protection switch prevents overheating of the tubular drive. -
Page 23: Programming The Master Transmitter
Readying the tubular drive for programming with the radio switch Switch the radio switch to the inside position. If the radio switch is already in this posi- tion, switch it to the outside and back to the inside position. ► The tubular drive is ready to program for 3 minutes. Programming the master transmitter Press the programming button for 3 seconds when it is ready to programme. -
Page 24: Intelligent Installation Management
Changing direction of rotation via master transmitter Press the button. ▻ The shading solution runs in the desired direction. ► The running direction is OK. If the shading solution runs in the wrong direction, the running direction must be changed. Proceed as follows: First, press the programming button, then within 3 seconds also press the button for 3 seconds. -
Page 25: Changing The Set Limit Positions
Upper point to lower point There is no shading solution length adjustment with this limit position setting. Open to the desired upper limit position. Press the programming button and, within 3 seconds, also press the button and hold the two buttons down. ▻... -
Page 26: Deleting The Limit Positions
2) Extending the range of travel (the desired limit position is located outside the current range of travel) Attention When both or individual limit positions are deleted, all the other set functions (intermediate position I, intermediate position II, upper anti-freeze mechanism, obstacle detection, run times, fly screen protection function) are deleted as well. -
Page 27: Intermediate Positions I + Ii
Intermediate positions I + II The intermediate positions I + II are freely selectable positions for the shading solution between the two limit positions. Each travel button can be assigned one intermediate posi- tion. Both limit positions must be set before an intermediate position is set. Setting/modifying the desired intermediate position Open/close the shading solution to the desired intermediate position. -
Page 28: Deleting Transmitters
Deleting transmitters Deleting individual transmitters The programmed master transmitter cannot be deleted. It can only be overwritten (see Programming the master transmitter [} 23]). Press the programming button on the master transmitter for 3 seconds. ▻ The tubular drive acknowledges. Now press the programming button of the transmitter to be deleted for 3 seconds. ▻... -
Page 29: Additional Functions With Centronicplus / Centronic
Readying the tubular drive for programming with the radio switch Switch the radio switch to the inside position. If the radio switch is already in this posi- tion, switch it to the outside and back to the inside position. ▻ The tubular drive is ready to program for 3 minutes. Now press the programming button of the new master transmitter for 10 seconds. -
Page 30: Programming The Run Times
Programming the run times This function is available with all CentronicPlus EasyControl transmitters and with Centronic devices only equipped with "MemoControl" transmitters from the Becker range of control units. Both limit positions must be set before the Memo function is set. -
Page 31: Deleting The Run Times With A Centronic Transmitter
5 seconds. Activating / deactivating the run times with a Centronic transmitter This function is only available with MemoControl transmitters from the Becker Centronic range of control units. The Memo function is activated and deactivated via the slide switch. The last changeover to be performed is valid. -
Page 32: Local Operation With A Single Button
Local operation with a single button Only use a single button (normally open). Only connect one drive for each push-button. The length of cable between the tubular drive and the push-button must not exceed 20 m. The push-button must not be operated during the first five seconds after the mains voltage has been switched on. -
Page 33: Disposal
The packaging material must be disposed of properly. Maintenance These drives are maintenance-free. Technical data dia. 35 Tubular drive P5-16 P9-16 Model C01 PLUS Type C PROF1+ Rated torque [Nm] Output speed [rpm] Limit switch range 64 revolutions Supply voltage 230 V AC / 50 Hz... -
Page 34: Error Messages
Error messages The tubular drive is blocked. ► The transmitter confirms with 10 red flashes of the LED ring. The tubular drive is overheated. ► The transmitter confirms with 5 red / yellow flashes of the LED ring. The tubular drive is not responding. ►... -
Page 35: Sample Wiring Diagram
Problem Remedy The LED ring lights up red when the receiver for the setting Reduce distance from receiver. mode is selected. Check electr. connection of the receiver. Put the receiver into programming mode. Add the transmitter to the installation. The required setting cannot be changed. Make sure that the CentronicPlus transmitter is in setting mode. -
Page 36: Declaration Of Conformity
Declaration of conformity For UK-Markets: The Declaration of Conformity can be provided upon request from Becker Motors Ltd., or can be downloaded on www.beckermo- tors.co.uk. 36 - en...
Need help?
Do you have a question about the C01 PLUS and is the answer not in the manual?
Questions and answers