Advertisement
Quick Links
Advertisement

Related Manuals for ADJ ACCU-STAND LTS 50T AS


Summary of Contents for ADJ ACCU-STAND LTS 50T AS
- Page 1 LTS 50T AS User Manual...
- Page 2 ©2023 ADJ Products, LLC all rights reserved. Information, specifications, diagrams, images, and instructions herein are subject to change without notice. ADJ Products, LLC logo and identifying product names and numbers herein are trademarks of ADJ Products, LLC. Copyright protection claimed includes all forms and matters of copyrightable materials and information now allowed by statutory or judicial law or hereinafter granted.
-
Page 3: Table Of Contents
C O N T E N T S Gen Info Limited Warranty (USA Only) Safety Guidelines Overview Installation Instructions Trouble Shooting | Frequently Asked Questions Specifications | Optional Accessories Dimensional Drawings... -
Page 4: Gen Info
You may obtain an R.A. number by contacting customer support. CUSTOMER SUPPORT Contact ADJ Service for any product related service and support needs. Also visit forums.adj.com with questions, comments or suggestions. -
Page 5: Limited Warranty (Usa Only)
All shipping charges must be pre-paid. If the requested repairs or service (including parts replacement) are within the terms of this warranty, ADJ Products, LLC will pay return shipping charges only to a designated point within the United States. If the entire instrument is sent, it must be shipped in its original package. No accessories should be shipped with the product. -
Page 6: Safety Guidelines
S A F E T Y G U I D E L I N E S To guarantee a smooth operation, it is important to follow all instructions and guidelines in this manual. ADJ PRODUCTS LLC is not responsible for injury and/or damages resulting from the misuse of these devices due to the disregard of the information printed in this manual. -
Page 7: Overview
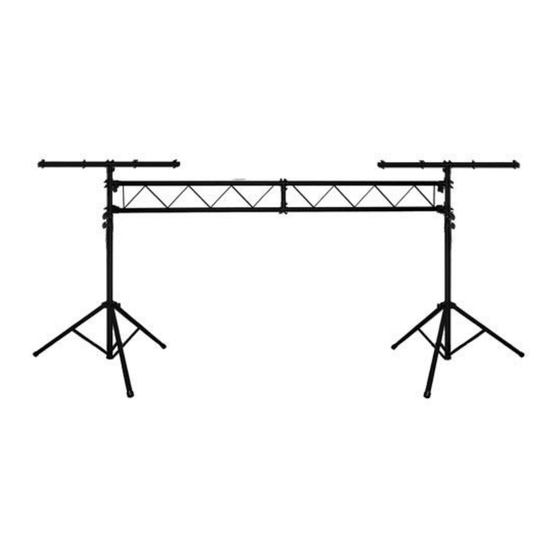
O V E R V I E W INCLUDED ITEMS (2) LTS Stand (6) Slide Mount T-Collar (1) Center “I-Beam” Support Rod (2) I-Beam Connector (4) Knob for Beam Connector (2) 5’ Truss I-Beam Section 1. Knob A 8. Inner Pipe 2. -
Page 8: Installation Instructions
I N S TA L L AT I O N I N S T R U C T I O N S FLAMMABLE MATERIAL WARNING Keep stand minimum 5.0 feet (1.5m) away from flammable materials and/or pyrotechnics. DO NOT INSTALL/HANG DEVICES ON STAND IF YOU ARE NOT QUALIFIED TO DO SO! AVOID INSTALLING OR MOUNTING THE STAND IN UNSTABLE LOCATIONS, SUCH AS AN UN- EVEN SURFACE OR MOVING TABLE. - Page 9 I N S TA L L AT I O N I N S T R U C T I O N S SETUP Loosen Knob D by turning it counter clockwise. Spread the legs by pulling up on the outer pipe until the stays extend horizontally.
- Page 10 I N S TA L L AT I O N I N S T R U C T I O N S Assembling the Truss I-Beam The stand comes with a Truss I-Beam for mounting optional lighting and other equipment. To use the Truss, insert 2 I-beam connectors into one end of the I-Beam Support.
- Page 11 I N S TA L L AT I O N I N S T R U C T I O N S Attaching the Truss I-Beam and T-Bar Slide two Slide Mount T-Collars onto the center post of each stand. Insert one end of the truss as- sembly into the Slide Mount T-Collars and place another Slide Mount T-Collar on the very top of each stand’s center post.
- Page 12 I N S TA L L AT I O N I N S T R U C T I O N S MOUNTING OPTIONAL LIGHTING AND OTHER ACCESSORIES Lighting and other optional accessories may be mounted to the T-Bar as well. For installation instruc- tions, please refer to the mounting instructions provided with the fixtures that are to be installed.
-
Page 13: Trouble Shooting | Frequently Asked Questions
What is the maximum height of the stand? The minimum extended height is 57.1” (1,450) while the maximum extended height of the stand is 118.1” (3,000 mm.) Are additional stands, clamps or accessories available? www.adj.com. Yes. A variety of stands and accessories are available at... -
Page 14: Specifications | Optional Accessories
S P E C I F I C AT I O N S • 100% portable trussing system • Easy set up and high stability • Features 2 Black steel tri-pods which extend up to 9 ft. • 2 added T-Bars on top to hang more lights. •... -
Page 15: Dimensional Drawings
D I M E N S I O N A L D R AW I N G S 73.3” 1,861.2 mm Ø 70” Ø 1,778.2 mm 39.4” 39.4” 1,200 mm 1,200 mm 128” 3,250 mm 118.1” 3,000 mm 188.1” 4,778.2 mm...
Need help?
Do you have a question about the ACCU-STAND LTS 50T AS and is the answer not in the manual?
Questions and answers