
Related Manuals for GTD GTD-LZ354P


Summary of Contents for GTD GTD-LZ354P
- Page 1 LED PAR LIGHT GTD-LZ354P User’s Manual Guangzhou GTD Culture & Technology Group Co.,Ltd. Tel: +86-20-61808296 Fax: +86-20-61812282 www.gtd-lighting.com http://...
- Page 2 ©2017 GTD all rights reserved. Information, specifications, diagrams, images, and instructions herein are subject to change without notice. GTD logo and identifying product names and numbers herein are trademarks of GTD. Copyright protection claimed includes all forms and matters of copyrightable materials and information now allowed by statutory or judicial law or hereinafter granted.
-
Page 3: Table Of Contents
Contents Safety instructions ..................................3 General guidelines ..................................4 Packing and shipping .................................. 5 Unpacking ....................................... 5 Packing after use..................................... 5 Accessories ....................................5 Product introduction .................................. 6 Installation ....................................7 Clamps installation ..................................7 Device installation ..................................7 Power / Control connection ............................... 7 Power connection ................................... -
Page 4: Safety Instructions
Before using the fixture, read the latest version of the product user manual, paying particular attention to the safety instructions. Please check www.gtd-lighting.com for the latest revision/update of the user manual. The manufacture of this fixture, are not responsible for damages, resulting from misuse of this fixture, due to the disregard of the information printed in this user manual. -
Page 5: General Guidelines
Broken or damaged cables can only be fixed or changed by certified technicians, certified local distributors or the manufacturer to ensure operational safety. Do not stick filters or other materials onto the lens. Do not modify the fixture or install other than GTD manufactured parts. -
Page 6: Packing And Shipping
Packing and shipping Unpacking Notes All products are quality controlled and checked for any faults before they are dispatched to customers. If the fixture is damaged during delivery, the customer must notify the shipper and manufacturer to file a damage insurance claim. Photographic evidence of the damage must be provided. -
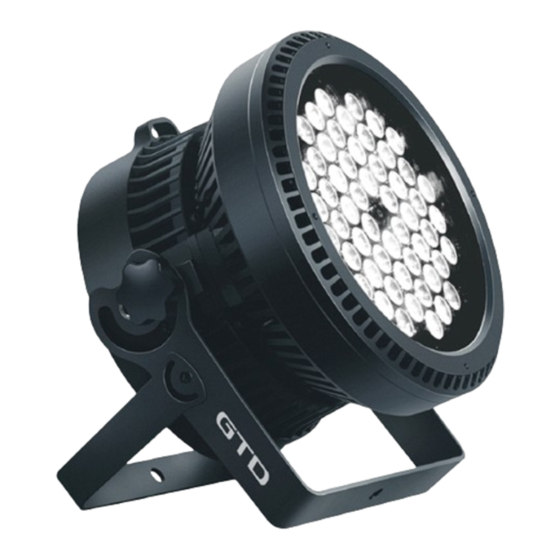
Page 7: Product Introduction
Product introduction LED lens Head cover Arm bracket Cast-aluminum back cover Manually-adjustable screw Safety cable mounting position Display screen DMX output Power output 10 DMX input 11 Power input 12 Mounting hole... -
Page 8: Installation
Installation Clamps installation The fixture can be placed on the stage or mounted on the truss facing any direction. The clamp gives a quick and easy lock on the truss. Warning Use one clamp when mounting the fixture. Fasten the screw properly and connect a safety cable to fixture. Device installation Make sure there is no damage on the clamps or safety cables before installation. -
Page 9: Control Connection
Control connection The fixture has 5-pin XLR connectors for DMX data input and output (3-pin optional) as shown below. Connection between the console and fixture, and between fixtures must be made with 2 core screened DMX signal cable. Maximum connecting distance of signal cable is 150 meters. -
Page 10: Control Panel
Control panel The control panel with buttons and digital display can access the function menu and configure the fixture easily. Press MENU to check or modify the functions of the fixture; Press UP or DOWN to view or select the function ... -
Page 11: Menu Structure
Menu structure LZ354P - Menu Structure Revision: A Valid from firmware version: 1.0 Level 1 Level 2 Level 3 Level 4 Info Addr AXXX A001 Setting the DMX address MSTR ALON Running build-in program as the master or the slave AUDI MSTR ALON Receiving soundsignal as the master or the slave... -
Page 12: Dmx Protocol
DMX protocol LZ354P - DMX Protocol Revision: A Valid from firmware version: 1.0 DMX mode Default Name DMX value DMX percentage Function Standard (16ch) Basic (10ch) Value 0.0% 12.2% Closed 12.5% 24.7% Open Synchronous strobe from slow to 25.1% 49.8% fast Strobe/Shutter 0(0%) - Page 13 DMX mode Default Name DMX value DMX percentage Function Standard (16ch) Basic (10ch) Value 0.0% 9.4% No function 9.8% 13.7% 3200K 14.1% 18.0% 3400K 18.4% 22.4% 3600K 22.7% 26.7% 3800K 27.1% 31.0% 4000K 31.4% 35.3% 4200K 35.7% 39.6% 4400K 40.0% 43.9% 4600K 44.3%...
-
Page 14: Technical Specification
Technical specification Optical Light source: LED 3W, quantity: 54pcs (12 red, 14 green, 14 blue, 14 white) Expected average lifetime: 50000 hours Beam angle (zoom): 9°-32°(50% peak angle), 16°-45°(10% peak angle) Photometric Total Output (Lumen): 2500 lumens narrow / 4800 lumens wide ... -
Page 15: Cleaning And Maintenance
It is required that the fixture should be kept clean and well maintained to ensure its reliability. Its lifespan mainly depends on the working environment and proper operation. Should you have any questions, please consult a technical engineer of GTD Lighting. Notes Damage resulted from dust, smoke, oil or improper use is not covered by warranty. -
Page 16: Troubleshooting
If the lens is cracked or otherwise damaged, replace it immediately. If the LED lamp becomes damaged or deformed in any way it must be replaced. If the light from the LED lamp appears dim, this normally indicates that it is reaching the end of its life span and ... -
Page 17: System Wiring Diagram
Water-proof female-line 24V+ DMX signal 24V- Signal 56V- SDI0106C Power Thermal 56V+ 24V+ 24V- Switching power supply GTD-LZ354P Spare parts list Item Notes LED aluminum substrate 5802010006A LJB0012A LED driver board 5802030003A LCR0002E Display board 5809210011A 354ZP-101F10& 354ZP-102E10& 354ZP-103G10 SDI0106C... - Page 18 Notes: P/N: 1502011017B Time: December 16 , 2017...
Need help?
Do you have a question about the GTD-LZ354P and is the answer not in the manual?
Questions and answers