Advertisement
Quick Links
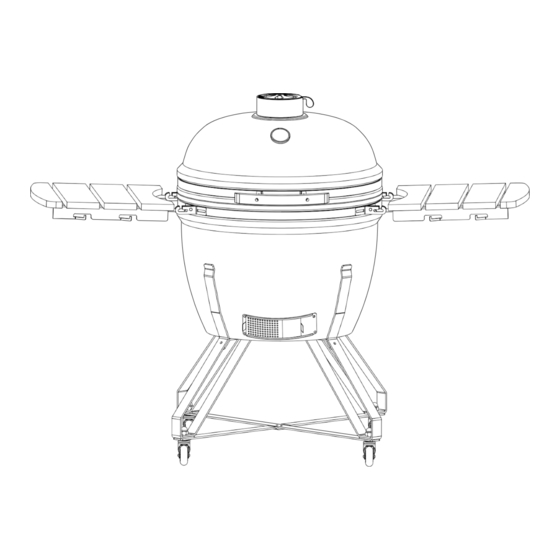
KOBE Kamado XXL
User Instructions - Please keep for future reference
KOBE Kamado XXL / 8923
EAN: 6418536019603
User Instructions - Please keep for future reference
IMPORTANT
Carefully remove any packaging before use but retain the safety instructions.
These instructions form part of the product.
Please take note of all the safety warnings listed in these instructions.
Please read these instructions in their entirety and retain them for future reference.
These instructions should be stored with the product.
This product is for domestic use ONLY and should not be used commercially or for contract purposes.
Advertisement

Subscribe to Our Youtube Channel
Related Manuals for Cal Flame Kamado XXL


Summary of Contents for Cal Flame Kamado XXL
- Page 1 KOBE Kamado XXL User Instructions - Please keep for future reference KOBE Kamado XXL / 8923 EAN: 6418536019603 User Instructions - Please keep for future reference IMPORTANT Carefully remove any packaging before use but retain the safety instructions. These instructions form part of the product.
-
Page 2: Warnings - Caution
Care and safe use guidelines ABOUT YOUR KAMADO Dating back 4000 years ago archaeologists have discovered large clay vessels thought to be early incarnations of the Kamado ceramic cooker. Since then it has evolved in many ways; removable lid, added draft door for better heat control and the switch from wood to charcoal as the primary fuel. -
Page 3: Maintenance
Care and safe use guidelines STORAGE • When not in use, and if stored outside, cover the Kamado once completely cooled with a suitable rain cover. • The chrome plated cooking grill is NOT dishwasher safe; use a mild detergent with warm water. •... -
Page 4: Cooking Temperature Guide
Care and safe use guidelines HIGH TEMPERATURE COOKING GUIDE • Light the lump charcoal according to the instructions on page 3. • Close the lid and fully open the top and bottom vents. • Monitor the Kamado until it has risen to the desired temperature. See page 4 for a temperature cooking guide. •... - Page 5 Parts list 1 (4x) A (4x) (1x) 9 (1x) 2 (1x) 16 (1x) B (4x) 13 (2x) 10 (1x) 3 (1x) C (4x) 4 (1x) (1x) D (2x) 11 (1x) 5 (1x) 15 (1x) E (1x) F (4x) 6 (4x) G (4x) 16 (2x) H (4x)
- Page 6 Assembly instructions 4 or 5 2 or 3 (Joining the two halves assembled in step l) Stand the section 1 upright and place the upper cross STEP 2 - braces (4&5) close to section 1. Inserting truss head screw C through the hole of section1 and section 4&5 and install K Keps nut and tighten securely.
- Page 7 Assembly instructions STEP 8 - When the grill is securely placed on the cart add the firebox (10), charcoal plate (9), and cooking grill (12) inside of the Kamado Grill as displayed in the assembly diagram. STEP 9 - Press down on the castor levers (8) to lock the castor wheels to ensure the Kamado cannot move when in use.
- Page 8 Assembly instructions STEP 10 - To attach the handle (14) to the lid of the Kamado Grill (11) start by attaching 2x handle brackets (13) using the 2x pre-attached bolts and dome headed nuts. Attach the handle (14) to the brackets (13) using 2x bolts (D) and nuts (L).
- Page 9 Assembly instructions STEP 12 - Attach the 2x table brackets (17) to the Kamado Grill (11) using the 4x pre-attached bolts and dome headed nuts per bracket. Please note the position shown in the above diagram. STEP 13 - Insert the 2x table hinge (16) into each of the table brackets (17 & 18). The Kamado Grill is now ready to use but please ensure that you have read the curing instructions thoroughly prior to use.
- Page 10 KOBE Kamado XXL Käyttöohjeet – säilytä myöhempää tarvetta varten KOBE Kamado XXL / 8923 EAN: 6418536019603 Tarvittavat työkalut (sisältyvät toimitukseen) Käyttöohjeet – säilytä myöhempää tarvetta varten TÄRKEÄÄ Irrota kaikki pakkaukset huolellisesti ennen käyttöä, mutta säilytä turvallisuusohjeet. Nämä ohjeet ovat osa tuotetta.
- Page 11 Hoitoa ja turvallista käyttöä koskevat ohjeet TIETOJA KAMADO-TUOTTEESTASI Muinaistutkijat ovat löytäneet 4 000 vuotta vanhoja isoja saviastioita, joita pidetään keraamisen Kamado-uunin edeltäjinä. Sittemmin kehitys on ollut monipuolista: tuotteessa on nykyisin irrotettava kansi, tehostettu veto parantaa lämmönhallintaa ja ensisijaiseksi polttoaineeksi on tullut puun sijaan hiili. Japanissa kutsuttiin mushikamadoksi pyöreää saviastiaa, jossa on irrotettava kupu ja jota käytetään riisin höyryttämiseen.
- Page 12 Hoitoa ja turvallista käyttöä koskevat ohjeet SÄILYTYS • Jos säilytät käyttämätöntä Kamadoa ulkona, peitä Kamado täysin jäähtyneenä sopivalla sadesuojalla. • Kromipintainen paistoritilä EI ole konepestävä, pese se miedolla pesuaineella ja lämpimällä vedellä. • Kun ryhdyt käyttämään Kamadoa, paina kumpaakin lukittuvaa pyörää, jotta grilli ei pääse liikkumaan käytön aikana. •...
- Page 13 Hoitoa ja turvallista käyttöä koskevat ohjeet PAISTO-OPAS KORKEILLE LÄMPÖTILOILLE • Sytytä irtopuuhiili sivulla 3 olevien ohjeiden mukaan. • Sulje kansi ja avaa ylhäällä ja pohjalla sijaitsevat ilma-aukot kokonaan. • Valvo Kamadoa, kunnes haluttu lämpötila on saavutettu. Katso lämpötilaa koskevat ohjeet sivulta 4. •...
- Page 14 Parts list Osaluettelo 1 (4x) A (4x) (1x) 9 (1x) 16 (1x) 2 (1x) B (4x) 13 (2x) 10 (1x) 3 (1x) C ( 4x) 4 (1x) (1x) D (2x) 11 (1x) 15 (1x) 5 (1x) E (1x) F (4x) 6 (4x) G (4x) 16 (2x)
- Page 15 Assembly instructions Asennusohjeet 4 or 5 2 or 3 (Joining the two halves assembled in step l) Stand the section 1 upright and place the upper cross – (Vaiheessa 1 asennettujen puoliskojen yhdistäminen) VAIHE 2 STEP 2 - braces (4&5) close to section 1. Inserting truss head screw C through the hole of section1 Nosta osio 1 pystyyn ja aseta ylemmät poikkituet (4 ja 5) lähelle osiota 1.
- Page 16 Assembly instructions Asennusohjeet – Kun grilli on vakaasti vaunun päällä, lisää arina (11), puuhiililevy (10), ylärengas (9) ja grilliritilä (13) VAIHE 8 STEP 8 - When the grill is securely placed on the cart add the firebox (10), charcoal plate (9), and cooking Kamado-grillin sisään kokoamiskaavion mukaisesti.
- Page 17 Assembly instructions Asennusohjeet STEP 10 - To attach the handle (14) to the lid of the Kamado Grill (11) start by attaching 2x handle brackets (13) – Kiinnitä kahva (15) Kamado-grillin (12) kanteen aloittamalla kahdesta kahvan kiinnikkeestä (14) VAIHE 10 using the 2x pre-attached bolts and dome headed nuts.
- Page 18 Assembly instructions Asennusohjeet – Kiinnitä kaksi pöydän kannatinta (18) Kamado-grilliin (12) neljällä esikiinnitetyllä pultilla ja VAIHE 12 kupumutterilla kumpaankin kannattimeen. Huomaa sijainti yllä olevassa kuvassa. STEP 12 - Attach the 2x table brackets (17) to the Kamado Grill (11) using the 4x pre-attached bolts and dome headed nuts per bracket.
- Page 19 KOBE Kamado XXL Bruksanvisning – spara den för framtida konsultation KOBE Kamado XXL / 8923 EAN: 6418536019603 Verktyg som behövs (ingår) VIKTIGT – Ta försiktigt bort eventuell förpackning före användning, men behåll säkerhetsanvisningarna. Dessa instruktioner utgör en del av produkten.
- Page 20 Skötsel och riktlinjer för säker användning OM DIN KAMADO Arkeologer har upptäckt lerkärl från 4 000 år tillbaka som tros vara tidiga versioner av Kamados keramiska spis. Sedan dess har den utvecklats på många sätt; avtagbara lock, tillagda förslag till luckor för bättre värmereglering och övergång från trä...
- Page 21 Skötsel och riktlinjer för säker användning FÖRVARING • När den inte används, och om den förvaras utomhus, täck över Kamado när den väl har svalnat helt med ett lämpligt regnskydd. • Den förkromade matlagningsgrillen tål INTE att maskindiskas. Använd ett milt rengöringsmedel med varmt vatten. •...
- Page 22 Skötsel och riktlinjer för säker användning GUIDE FÖR TILLAGNING PÅ HÖG TEMPERATUR • Tänd träkolet enligt instruktionerna på sidan 3. • Stäng locket och öppna helt de övre och nedre ventilerna. • Övervaka Kamado tills den har stigit till den önskade temperaturen. Se sidan 4 för en guide över tillagningstemperatur.
- Page 23 Parts list Lista över maskinens delar 1 (4x) A (4x) (1x) 9 (1x) 16 (1x) 2 (1x) B (4x) 13 (2x) 10 (1x) 3 (1x) C ( 4x) 4 (1x) (1x) D (2x) 11 (1x) 15 (1x) 5 (1x) E (1x) F (4x) 6 (4x) G (4x)
- Page 24 Assembly instructions Monteringsanvisningar 4 or 5 2 or 3 (Joining the two halves assembled in step l) Stand the section 1 upright and place the upper cross – (Sätt ihop de två halvorna som monterades i steg l) STEG 2 STEP 2 - braces (4&5) close to section 1.
- Page 25 Assembly instructions Monteringsanvisningar – När grillen är säkert placerad på vagnen, lägg eldstaden (11), träkolsplattan (10), övre ringen (9) STEG 8 STEP 8 - When the grill is securely placed on the cart add the firebox (10), charcoal plate (9), and cooking och tillagningsgrillen (12) inuti Kamado-grillen enligt monteringsschemat.
- Page 26 Assembly instructions Monteringsanvisningar STEP 10 - To attach the handle (14) to the lid of the Kamado Grill (11) start by attaching 2x handle brackets (13) – För att sätta fast handtaget (15) på Kamado-grillens lock (12), börja med att sätta fast 2 x STEG 10 using the 2x pre-attached bolts and dome headed nuts.
- Page 27 Assembly instructions Monteringsanvisningar – Sätt fast 2 x bordskonsoler (18) på Kamado-grillen (12) med hjälp av 4 x förmonterade bultar och ku STEG 12 muttrar per konsol. Observera placeringen som visas i bilden ovan. STEP 12 - Attach the 2x table brackets (17) to the Kamado Grill (11) using the 4x pre-attached bolts and dome headed nuts per bracket.
Need help?
Do you have a question about the Kamado XXL and is the answer not in the manual?
Questions and answers