Table of Contents
Advertisement
Quick Links
$5.
00
2004 OWNER'S MANUAL
GRILLS
ISLANDS
CARTS
CONVECTION 3000 GRILL
Duplication without written consent is strictly prohibited.
This Owner's Manual is for barbecues manufactured after May 19, 2004
Due to continuous improvement programs, all models, operation, and/or specifications are subject to change without prior notice.
LTR17006331
www.calspas.com
Advertisement
Table of Contents

Related Manuals for Cal Flame 3000


Summary of Contents for Cal Flame 3000
- Page 1 GRILLS ISLANDS CARTS CONVECTION 3000 GRILL Duplication without written consent is strictly prohibited. This Owner’s Manual is for barbecues manufactured after May 19, 2004 Due to continuous improvement programs, all models, operation, and/or specifications are subject to change without prior notice.
-
Page 2: Table Of Contents
Owner’s Manual Table of Contents Benefits of Owning a Cal Flame Barbecue ...2 Safety Precautions...3 Safety Instructions ...4 Contact Information ...6 Warranty Information ...6 Set-up and Delivery ...7 Grill Operation - Drop-In Grills...8 Grill Operation - Islands...13 Grill Operation - Carts ...22 Convection 3000 4-Burner Grill ...24... -
Page 3: Benefits Of Owning A Cal Flame Barbecue
Benefits Owner’s Manual BENEFITS OF OWNING A CAL FLAME BARBECUE Owning a barbecue allows you to have a wonderful outdoor place to cook a nutritious family meal. It offers a place for you to socialize with family and friends. A barbecue provides a great focal point in your backyard when having parties, family get-together or just to hang out with your kids. -
Page 4: Safety Precautions
Owner’s Manual SAFETY PRECAUTIONS 1. This gas barbeque must be installed and operated in accordance with the installation requierements of your local gas authority or the appropriate installation code in the area of installation. In the absence of local codes with either the National Fuel Gas code, ANSI Z223.1 / NFPA 54, or CAN/CGA-B149.1, Natural Gas and Propane Installation code. -
Page 5: Safety Instructions
SAFETY INSTRUCTIONS Please read before installing and operating your new Cal Flame grill. 1. Your new gas grill should be professionally installed by a licensed contractor. Refer to the instructions in this manual to ensure proper and safe installation and operation. -
Page 6: Precautions Regarding Children
14. Do not exceed 50 pounds of weight on the foldout work surfaces. 15. Do not block the vents located in the cabinet area of your Cal Flame Island and Stainless Steal Cart as gas may build up incase of leak and cause serious damage. -
Page 7: Contact Information
Locating Product Serial Number BBQ Islands Your new Cal Flame Island BBQ serial number is located on a metal plate inside the door below the grill on the door. You will need this number to properly register your BBQ and activate coverage. -
Page 8: Set-Up And Delivery
Location (Outdoor Use Only) When planning your Cal Flame Island or cart location, be sure to consider the shortest gas line run possible. Also, take into consideration the necessity of having a 100v power source. For use of your appliances (i.e. lights, rotisserie, refrigerator, receptacles, etc.). -
Page 9: Grill Operation - Drop-In Grills
Do not leave the grill unattended while cooking. Light (Illumination) Operation Your Cal Flame Grill is equipped with either 1-halogen light (CR-3000) or 2-halogen lights (CR-4000 & CR-5000). This feature is added for safety when cooking in non-illuminated areas. Also, for convenience when cooking in poorly illuminated areas or simply for an inviting display of deliciously grilled food. -
Page 10: On/Off Switch
Owner’s Manual On/Off Switch Operating the Grill Make sure all burner controls are off. Do not attempt to light the burners if the smell of gas is present. Check the connection with a soap and water solution after attaching the hose. For LP units, make sure there is gas in the tank and it is sitting upright. -
Page 11: Using Your Rotisserie
Lighting The Grill Burners 1. Open the hood. 2. Keep your face as far away from the burners as possible. 3. Rapidly rotate the burner knob counter clockwise past light position (You will hear a loud click) to high. 4. Listen for the "Whoosh" sound. If the burner does not light on the first try, repeat immediately. 5. - Page 12 Owner’s Manual Rotis Spit Handle Rotis Spit Bracket Lighting The Infrared or Rotisserie Burner 1. Open the hood. 2. Push and hold the rotisserie burner knob in for about 5 seconds to allow gas into the the infrared burner, then rotate knob rapidly counter clockwise past the light position (You will hear a loud click).
-
Page 13: Cal Flame Familiarization
Drop-In Grills Cal Flame Familiarization The following controls are for the Cal Flame Drop-In Grills, Stainless Steel Carts, Chef Series, Master Chef Series & Gourmet Series Islands. Please familiarize yourself with these controls prior to operation of your Cal Flame BBQ. -
Page 14: Grill Operation - Islands
Do not leave the grill unattended while cooking. Light (Illumination) Operation Your Cal Flame Grill is equipped with either 1-halogen light (CR-3000) or 2-halogen lights (CR-4000 & CR-5000). This feature is added for safety when cooking in non-illuminated areas. Also, for convenience when cooking in poorly illuminated areas or simply for an inviting display of deliciously grilled food. - Page 15 Islands 1. Make sure the drip tray is in place. 2. Light the grill burners using the instructions below. 3. Turn the control knob to HI and preheat the grill for 15 minutes. The top cover is to be closed during the appliance preheat period.
- Page 16 Owner’s Manual 2. To use the rotisserie, first mount the motor on the left side of the grill. Place securely onto support bracket. 3. The rod of the rotisserie system is assembled into the motor by placing the pointed end into the motor and resting the threaded end on the support at the side of the grill.
- Page 17 Islands 48" 27" 30" 27" 60" 31" 38" Owner’s Manual 36" 39" 38" 39" 36" 47" Owner’s Manual Figure 6. C-100 Figure 7. C-100B Figure 8. C-200 Page 16...
- Page 18 Owner’s Manual Islands 72" 7'-0" 32" 44" 41" Figure 10. C-250 Figure 9. C-225 18" 66" 96" 38" 48" 35" 38" 44" 40" 97" 24" Figure 11. C-250B Figure 12. C-300L Page 17 Owner’s Manual...
- Page 19 Islands Owner’s Manual 18" 96" 96" 78" 18" 66" 96" 46" 38" 32" 44" 35" 38" 40" 44" 40" Figure 13. C-300R Figure 14. C-400L 83" 62" 18" 96" 86" 51" 66" 78" 38" 44" 33" 40" 38" 18" 44" 40"...
- Page 20 Owner’s Manual 66" 51" 38" 18" 51" 66" 18" 105" 71" 38" Page 19 83" 62" 44" 40" 116" 94" 44" 40" 43" 34" 33" 44" 40" Figure 17. MC-600 Figure 18. MC-700 38" Figure 19. G-1000 Islands Owner’s Manual...
- Page 21 Islands 33" 34" 44" 40" 38" 112" 197" Owner’s Manual 124" 89" 42" 126" 113" Owner’s Manual Figure 20. G-2000 Figure 21. G-2500 Figure 22. G-2500-F Page 20...
- Page 22 Owner’s Manual 18" 38" 36" Page 21 81" 26" 163" 44" Figure 23. G-3000 40" Figure 24. G-3000 Sports Bar Figure 25. G-3500F Owner’s Manual Islands...
-
Page 23: Grill Operation - Carts
Do not leave the grill unattended while cooking. Light (Illumination) Operation Your Cal Flame Grill is equipped with either 1-halogen light (CR-3000) or 2-halogen lights (CR-4000 & CR-5000). This feature is added for safety when cooking in non-illuminated areas. Also, for convenience when cooking in poorly illuminated areas or simply for an inviting display of deliciously grilled food. - Page 24 4. Place the food on the grill and cook to desired completion. Adjust heat setting, if necessary. The control knob may be set to any position between HI and LOW. 5. Allow the grill to cool and clean the drip tray after each use. Cal Flame Figure 26. 3-Burner Cart Page 23...
-
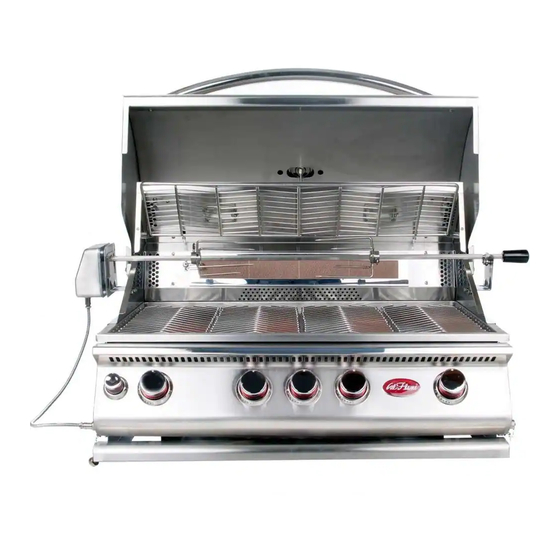
Page 25: Convection 3000 4-Burner Grill
Do not leave the grill unattended while cooking. Light (Illumination) Operation Your Cal Flame Grill is equipped with either 1-halogen light (CR-3000) or 2-halogen lights (CR-4000 & CR-5000). This feature is added for safety when cooking in non-illuminated areas. Also, for convenience when cooking in poorly illuminated areas or simply for an inviting display of deliciously grilled food. - Page 26 FRONT VIEW OF GRILL Motor mounted on back of grill Hot air gets sucked in by fan, then gets redistributed through the outer vents TOP VIEW OF GRILL Figure 29. Convection 3000 Grill Intake/ Recirculation Fan Cover Plate Owner’s Manual Owner’s Manual...
- Page 27 (Intake Design Shown) Owner’s Manual Opening (Intake) Front View Opening (Intake) Hot Air Redistribution Channels Rear View Figure 30. Intake and Exhaust Designs Convection 3000 Grill Exhaust Intake Hot Air Fan Intake/Recirculation Side View (Exhaust/Intake Shown) Opening (Intake) Hot Air...
-
Page 28: Cooking With The Convection 3000 Grill
Use a meat thermometer and take the guesswork out of cooking meat and seafood. The fan must be turned on in order for the Convection 3000 Grill to cook the items that are listed below. After desired cooking temperature is reached, remove meat from heat source and let it stand IMPORTANT: 10 to 15 minutes before carving. -
Page 29: Grill Installation
Location (Outdoor Use Only) When planning your Cal Flame Island or cart location, be sure to consider the shortest gas line run possible. Also, take into consideration the necessity of having a 110 volts power source. For use of your appliances (i.e. - Page 30 Owner’s Manual Cabinet Cut-Out Dimensions for Gas Grill and Accessories (24 1/2") 3 Burner 4 Burner 5 Burner 24 1/2" 32" Cut Out Dimensions Gas Inlet Can Be Located Anywhere Within 5" of Shaded Area. 3 Burner 4 Burner 5 Burner 23 1/2"...
-
Page 31: Installation Of New Side Burner
Installation of Nw Side Burner INSTALLATION OF NEW SIDE BURNER 1. Install side burner into an area of 17-1/2 inches long, 11 inches wide and 3 inches deep. 2. Assemble a 3/8 pipe nipple to the 3/8 pipe tee using teflon tape or pipe sealant. Use only sealant that is approved for use on LP gas. -
Page 32: Installation Of New Access Doors
Owner’s Manual INSTALLATION OF NEW ACCESS DOORS Installing Access Doors 1. Provide cut out and door jamb with inside dimensions as follows: 16 1/4" X 19 “ for single door 28 1/4” x 19 3/8” for double door 2. Secure the steel frame with 16 screws of type #10 x fl” truss head phillips S/S. 3. -
Page 33: Sports Bar Canopy
While the G3000 Island / Sports Bar Canopy is intended for outdoor use, some precautions must be taken when using and caring for your new Cal Flame equipment. When the equipment is not being used, or especially in times of inclement weather, it is the owners responsibility to remove and store the electronic equipment that is listed in this manual. - Page 34 Owner’s Manual NOTE: The following sections show how each wiring connection is to be made. These connections will be identical for the top and bottom of the canopy support post. Make sure that after the connections are made, the cables are tucked gently into each end of the canopy support posts.
-
Page 35: Canopy Assembly
Sports Bar Canopy Canopy Assembly The following instructions will allow you to assembly the canopy section of the G3000 Island/ Sports Canopy. NOTE: The following sections show how each wiring connection is to be made. These connections will be identical for the top and bottom of the canopy support post. Make sure that after the connections are made, the cables are tucked gently into each end of the canopy support posts. - Page 36 Owner’s Manual Figure D Mounting the G3000 Island/ Sports Bar Canopy CAUTION: THE FOLLOWING STEP IS A 2-PERSON PROCEDURE. THE CANOPY, AT THIS STAGE, IS EXTREMELY HEAVY. IT IS RECOMMENDED THAT THE OWNER USE A HELPER. 1. Carefully rotate the canopy upright and place it as close as possible to the canopy mounting holes. 2.
-
Page 37: Awning Installation
Sports Bar Canopy Awning Installation With the canopy installation nearly complete, the awning must be installed and wired. It should be noted that all screws that are used for the installation of the awning are self-tapping sheet metal screws. No drilling should be necessary. -
Page 38: Lp Gas Requirements
Either LP or NG will be marked on the operating tab, indicating the proper operating fuel. Attempting to convert Cal Flame grills from one fuel to another may result in serious injury and void the warranty coverage. - Page 39 Owner’s Manual LP Gas Requirements LP Gas Manifold Pressure For plumbed-in LP installation, use a convertible regulator and set it for LP gas. LP Gas Supply Pressure Maximum line pressure for propane is 11 inches Water Column (2.74 Kpa) but not greater than 5 psi (34.5 Kpa). LP Gas Pressure Regulator The unit must be used with the gas pressure regulator and hose assembly supplied with the grill.The regulator will control and maintain a uniform gas pressure in the manifold.
-
Page 40: Natural Gas (Ng) Requirements
Your Cal Flame Grill for use with Natural Gas comes equipped with its own regulator which MUST NOT be removed. If, this regulator needs to be replaced use only the type specified by Cal Flame for this appliance. -
Page 41: Leak Testing Procedure
Owner’s Manual LEAK TESTING PROCEDURE Leak Testing Perform a leak test at least once each year whether the gas supply cylinder has been disconnected or not. In addition, anytime the gas cylinder is connected to the regulator or any part of the gas system is disconnected or replaced, conduct a leak test. -
Page 42: Cleaning And Maintenance Procedures
Stainless steel is often taken for granted and assumed to be indestructible. However, care must be taken to ensure long life in your Stainless Steel Cal Flame Grills and Carts. To maintain the original appearance of your Cal Flame grill and/or cart, a regular routine must be followed. -
Page 43: Covering Your Stainless Steel Cart
Covering Your Stainless Steel Cart When not in use and after cooling, cover your Cal Flame Stainless Steel cart with our full length, zippered side canvas cover. The cover will help protect your cart from detrimental effects of weather & environmental pollutants (please see your local Cal Flame dealer for details). -
Page 44: Troubleshooting Procedures
Replace cotter pins. Replace cooking components and grease collectors. If an obstruction is suspected in the control valve, please contact your local Cal Flame dealer for assistance. Page 43 Figure 41. - Page 45 While the grill is still hot, you must wait for a minimum of five minutes before commencing re-ignition (this allows accumulated gas fumes to clear). If all checks/ corrections have been made and gas grill fails to operate properly, contact your local Cal Flame dealer. Problem:...
-
Page 46: Appendix
WATERFALL OPERATION (Optional) The following models come with the waterfall option: MC-700, G-2000, G-2500, G-2500F and G-3000. To turn the waterfall on, the unit must be plugged in. To turn the waterfall off, the unit must be unplugged. -
Page 47: Cal Flame Entertainment System
• Always close the CD protection door. Remember, water damage is not covered by the warranty. Entertainment Systems Cal Flame units equipped with the TV / DVD systems use this Splash stereo to broadcast the TV or DVD audio signals. Set Up: 1. - Page 48 Cal Flame Entertainment System 15” TV Monitor Operation: Turning On the TV Monitor: Once the TV has been opened (either by manual or automatic operation) you will be able to operate the TV with the silver TV remote control. Front Panel Features (Figure 43) 1.
- Page 49 Use this button to end the choice on the menu. 11. PICTURE SELECT Button Each time this button is pressed the on-screen picture adjustment display cycles through “adjustment screens” as follows: BRIGHTNESS CONTRAST Owner’s Manual COLOR TINT SHARPNESS Cal Flame Entertainment System Page 48...
- Page 50 Cal Flame Entertainment System Eject/ DVD TV/DVD Auto Program Skip/Search Erase/Add Channel Up Menu Enter Return Channel Down Vol - Program SubTitle Stop Pause/Replay NEXT PREV Page 49 Figure 44. Remote Control Owner’s Manual TV/CATV Power Channel Pad PRC/Sel Mute...
- Page 51 Closed captioning lets you display the audio portion of a program as text on the TV screen. This is useful to the hearing impaired or anyone who wants to watch a program without a sound. Owner’s Manual Cal Flame Entertainment System Page 50...
- Page 52 Cal Flame Entertainment System There are two types of closed captioning available: C1 (Caption 1)and C2 (Caption 2). C1 displays the full translation of the primary language in your area. C2 may be used as a source for secondary languages, simplified English, or other translations transmitted in your area.
-
Page 53: Cal Flame Entertainment System Operation
These instructions are to describe basic functions. Please see the DVD manufacturers operating instructions for other features and functions. These instructions are delivered with the Cal Flame owners manual in a clear plastic bag inside the stainless steel cabinet Operation 1. - Page 54 Owner’s Manual Operating the DVD System In TV Mode: The DVD system is used to feed the audio signal from the TV Tuner to the stereo. You will need to switch the audio and Video modes with DVD remote to properly receive picture and sound. NOTE: The Stereo must be tuned to 88.7FM to receive audio signals from either the DVD or TV Tuner.
-
Page 55: Parts List
Owner’s Manual PARTS LIST Contact your local Cal Flame Dealer to place your parts and accessories order. Or fax this completed form to (909) 947- 5087 with Credit Card Information: Visa Expiration Date______________ Card Number __ __ __ __ Home Address:_____________________________________City______________________State_____Zip_________... - Page 56 Drip Tray Handle w/out Tray 3 Burner 4 Burner 5 Burner Drip Tray w/out Handle 3 Burner 4 Burner 5 Burner COVERS FOR CAL FLAME DROP-INS 3 Burner 4 Burner 5 Burner COVERS FOR CAL FLAME CARTS 3 Burner 4 Burner 5 Burner...
- Page 57 Owner’s Manuals DESCRIPTION Chef Series (Cont.) C300 (Left w/Backsplash) C300 (Right w/Backsplash) C400 (Left w/Backsplash) C400 (Right w/Backsplash) Gourmet Series G1000 G2000 G2500 G2500 w/ Fireplace G3000 G3500 G3500 w/ Fireplace Master Chef Series MC500 MC600 MC700 Owner’s Manual PART NUMBER QUANTITY BBQ835C3-LB BBQ835C3-RB...
-
Page 58: Limited Warranty
Extent of Warranty This 2004 Cal Flame Warranty is only valid on the Cal Flame Barbecue Line delivered in the continental United States and Canada, and extends through the selling dealer to the original purchaser at the original site of installation. This warranty becomes valid at time of purchase and ends either by specified time-frame listed above, owner transfer, or relocation. -
Page 59: Cal Flame Program Charts
Page 58 Owner’s Manual... - Page 60 Owner’s Manual Page 59...
-
Page 61: Notes
Notes Owner’s Manual NOTES Page 60 Owner’s Manual...
Need help?
Do you have a question about the 3000 and is the answer not in the manual?
Questions and answers