
Subscribe to Our Youtube Channel
Related Manuals for Yale YSGA02-W


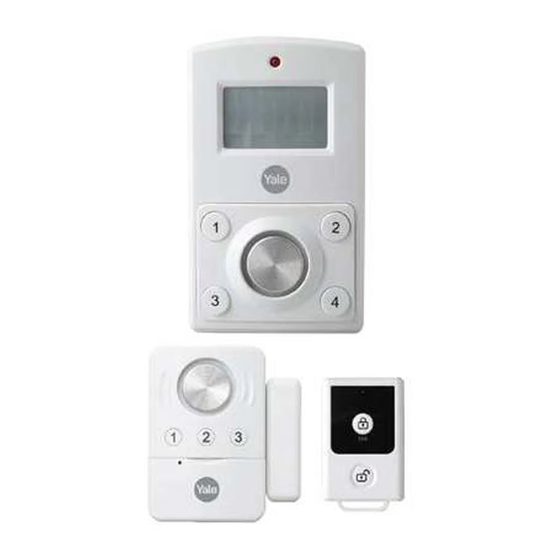
Summary of Contents for Yale YSGA02-W
- Page 1 Mini Wireless Alarm Kit YSGA02-W Instruction Manual DE: Bedienungsanleitung FR: Manuel d'instructions ES: Manual de instrucciones IT: Manuale di istruzioni Part of ASSA ABLOY...
- Page 2 Battery Installation Main alarm PIR Motion Sensor Keypad Siren Battery Compartment Screw Fixing Learn Button Battery Cover Door contact Contact Sensor & Magnet Siren 1, 2, 3 buttons TIP: “Learn” button The door contact can be fitted CR2 Battery horizontally or vertically. To insert batteries, open the battery cover.
- Page 3 Setting the 3 Digit PIN code PLEASE NOTE: If a delay of more than 5 seconds occurs between any of the below steps, the unit will return to standby mode. Change alarm 3 digit pin code Set personal 3 digit pin code To change the Alarm PIN code, please You can then proceed with entering enter the default PIN upon initial use:...
- Page 4 Factory reset Open the battery cover. Take out the battery. Press and hold “Learn” button and After three beep sounds, the alarm will return do not release, whilst re-installing to the default setting and the password will the battery. restore to default ‘1,2,3’. Password defaults to ‘1,2,3’.
- Page 5 Pair with remote control Take the remote control and Ensure alarm is UNARMED, open the open the battery cover. battery cover. Press the “Learn” button on the Press the “Learn” button and the red remote control. light will flash. If the red lights keep flashing, the battery The red light will flash, and the remote is lowand requires replacing.
- Page 6 Pairing the main alarm with the Door Contact To pair the door contact please ensure the Remove the front cover of the door contact. alarm is disarmed and then remove the cover of the main alarm unit. With the battery covers removed from the main alarm and the door contact, please press and hold the learn button on the main alarm unit, whilst pressing the learn button on the door contact.
- Page 7 Unlinking a paired device Open the battery cover. Take out the After three beep sounds, the Contact will battery, press ‘3’ and do not release return to the default setting and the password whilst installing the battery. will restore to default ‘1,2,3’. Installing the door contact Remove the backing tape from the door Use the 3M tape to fix the door contact...
- Page 8 Operation Settings: Setting the PIN To change the Door Contact PIN code, Enter the default code a second time and please enter the default PIN, ‘1,2,3’, the red light will flash. You can then proceed upon initial use. with entering your unique 3 digit PIN code. ‘Press 1,2,3.’...
- Page 9 Alarm sound ON and OFF settings: Turn ON the alarm sound When the alarm is unarmed, enter your Press 4 and then press 21. PIN followed by the ‘4’ key. ‘E.g 1, 2, 3, 4’ ‘4, 21’ The red light will flash three times. Once the main alarm is armed, if it is triggered it will automatically notify other paired devices connected to it.
- Page 10 Alarm sound ON and OFF settings: Turn OFF the alarm sound When the alarm is unarmed, enter your Press 4 and then press 22. PIN followed by the ‘4’ key. ‘4, 22’ ‘E.g 1, 2, 3, 4’ The red light will flash three times. Once the device is armed, if this is triggered, the device will automatically notify other paired devices around and WILL NOT sound...
- Page 11 Enable and disable vibration sensor function To enable the door contact vibration The red light will flash 3 times to indicate the sensor: When the door contact is vibration function is ON. If the vibration sensor unarmed enter your unique PIN (if not is triggered, the device will now sound and changed then enter the default) then notify other paired devices.
- Page 12 Installing the unit if required Take out the wall brackets in the package. Install the product on a wall or other suitable position at a maximum of 1.5 meters height. Select the area you would like to cover by positioning the alarm in the appropriate direction.
- Page 13 Operating instructions: Arming the main alarm Press the ‘4’ key on the main alarm The alarm will turn on after 30 seconds. to arm. PLEASE NOTE: You have 30 seconds to vacate the monitored area. Operating instructions: Disarming the main alarm You will have 5 seconds upon If the main alarm is not disarmed within 5 detection to enter your 3 digit PIN...
-
Page 14: Operation
Wireless range Please note: If using as part of the Mini Wireless Alarm Kit, the range of these parts is a minimum of 1 metre, up to a maximum of 70 metres. Operation To pair the remote control to the main Mini Wireless Alarm, open the battery cover and press the “Learn” button. - Page 15 Remote control, arming the alarm Remote control, arming the alarm Press the locked padlock icon on the After hearing a beep sound, you have 30 remote control to arm the main alarm. seconds to leave the alarm area. Remote control, disarming the alarm If the main alarm is not You will have 5 disarmed the siren will...
- Page 16 Precautions Please only use the correct batteries (as provided). Remove batteries before Immediately seek medical Do not swallow Do not dispose in fire storage of device advice if swallowed Do not mix used and Do not disassemble Do not recharge Do not mix different new batteries types of brands...
- Page 17 UK: ASSA ABLOY Ltd., School Street, Willenhall, West Midlands, England, WV13 3PW THE YALE BRAND, with its unparalleled global reach and range of products, reassures more people in more countries than any other consumer locking solution. THE ASSA ABLOY GROUP is the world’s leading manufacturer and supplier of locking solutions, dedicated to satisfying end-user needs to security, safety and convenience.
Need help?
Do you have a question about the YSGA02-W and is the answer not in the manual?
Questions and answers