Table of Contents
Advertisement
Quick Links
Advertisement
Table of Contents

Related Manuals for Stairville Replay Show


Summary of Contents for Stairville Replay Show
- Page 1 Replay Show DMX Manager...
- Page 2 Thomann GmbH Hans-Thomann-Straße 1 96138 Burgebrach Germany Telephone: +49 (0) 9546 9223-0 Internet: www.thomann.de 26.09.2023, ID: 474470 (V3)
-
Page 3: Table Of Contents
Installation and starting up........................ 11 Connections and controls........................14 Operating..............................18 6.1 Starting the device........................... 18 6.2 Setting the operating modes....................... 18 6.3 Software update..........................25 Technical specifications........................27 Plug and connection assignments....................29 Protecting the environment......................30 Replay Show DMX Manager... - Page 4 Replay Show DMX Manager...
-
Page 5: General Information
NOTICE! This combination of symbol and signal word indicates a pos‐ sible dangerous situation that can result in material and environmental damage if it is not avoided. Replay Show DMX Manager... - Page 6 General information Warning signs Type of danger Warning – high-voltage. Warning – danger zone. Replay Show DMX Manager...
-
Page 7: Safety Instructions
Within the device there are areas where high voltages may be present. Never remove any covers. There are no user-serviceable parts inside. Do not use the device when covers, safety equipment or optical components are missing or damaged. Replay Show DMX Manager... - Page 8 (FI). As a precaution, disconnect the power supply from the power grid when storms are approaching or it the device will not be used for a longer period. Replay Show DMX Manager...
- Page 9 Using fuses of a different type than compatible with the device may cause a fire and seriously damage the device. Only use fuses of the same type. Observe the labelling on the device casing and the information in the "Technical data” chapter. Replay Show DMX Manager...
-
Page 10: Features
2in1 DMX merge (HTP / LTP / Override / Backup) 1in2 DMX splitter (adjustable via buttons and display) Power supply via Power Twist or USB port Includes SD card (16 GB) for storing the shows Robust metal housing Replay Show DMX Manager... -
Page 11: Installation And Starting Up
This equipment uses a frequency range that is free of charge and registration within the European Union. For more information, please visit: http://www.thomann.de. Make sure that no metal objects are located between transmitter and receiver. Avoid interference by other radio and in-ear systems. Replay Show DMX Manager... - Page 12 DMX controller or other DMX device. Make sure that the output of the last DMX device in the chain is terminated by a resistor (110 Ω, ¼ W). Note that the ports on the front and back can not be used in parallel. Replay Show DMX Manager...
- Page 13 While both the device and the DMX manager are in operation, the DMX indicators [DMX IN 1]/ [DMX IN 2] show that a DMX signal is being received on the input. Rack mounting The device is designed for mounting in a standard 19-inch rack; it occupies one rack unit (RU). Replay Show DMX Manager...
-
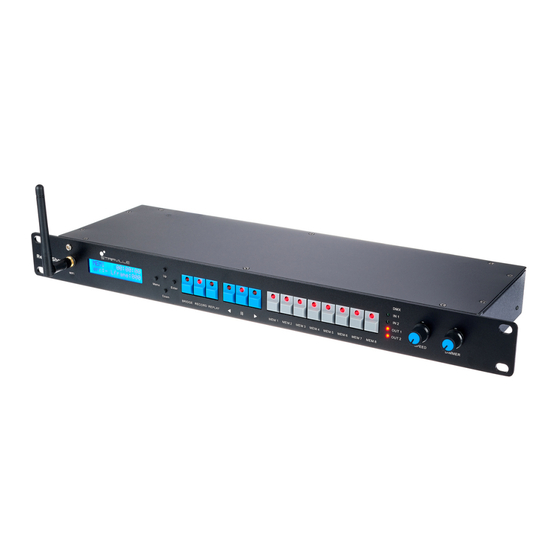
Page 14: Connections And Controls
Connections and controls Connections and controls Front panel Replay Show & ö Replay Show DMX Manager... - Page 15 [DMX OUT 1] / [DMX OUT 2] | Status display. The indicator LED for the DMX output lights up red as soon as a signal is sent. 8 [SPEED] | Rotary control for adjusting the speed 9 [DIMMER] | Rotary control for adjusting the brightness Replay Show DMX Manager...
- Page 16 Connections and controls Rear panel Replay Show DMX Manager...
- Page 17 14 [SD CARD] | SD card slot for the supplied memory card 15 [ON] / [OFF] | Main switch. Turns the device on and off. 16 Fuse holder 17 Lockable input socket (Power Twist) for powering the device Replay Show DMX Manager...
-
Page 18: Operating
6.2.1 Operating mode Bridge In BRIDGE mode, the device operates as a signal converter. In this mode, you can switch the device to splitter or merge mode. Menu level 1 Menu level 2 ‘Bridge Mode01’ ‘IN1/2>OUT1/2’ ‘DMXin>DMXout’ ‘IN1>OUT1&2’ Replay Show DMX Manager... - Page 19 Signal input: DMX inputs, signal output: LAN socket ‘Bridge Mode03’ ‘LAN>DMXout’ Signal input: LAN socket, signal output: DMX outputs ‘Bridge Mode04’ ‘WiFi>DMXout’ Signal input: WLAN, signal output: DMX out‐ puts ‘Bridge Mode05’ ‘WiFi>LAN’ Signal input: WLANasD, signal output: LAN socket Replay Show DMX Manager...
- Page 20 In SPLITTER mode, the device has three different ways to divide incoming signals. Press [BRIDGE] to enter the “BRIDGE” operating mode. The LED lights. Press [UP] or [DOWN] until the display shows ‘Bridge Mode01’ and confirm with [ENTER]. Replay Show DMX Manager...
- Page 21 Press [UP] or [DOWN] until the display shows ‘HTP’ and confirm with [ENTER]. ð The HTP mode is activated. If two DMX signals are present at the inputs of the device, then the signal with the higher value overwrites the other signal. Replay Show DMX Manager...
- Page 22 Press [UP] or [DOWN] until the display shows ‘Bridge Mode06’ and confirm with [ENTER]. Press [UP] or [DOWN] until the display shows ‘override’ and confirm with [ENTER]. Press [UP] or [DOWN] to increase or reduce the DMX value for ‘DMX1’ and confirm with ‘ENTER’ . Replay Show DMX Manager...
- Page 23 In RECORD mode, the data of a light show can be recorded via Ethernet (LAN), WLAN or the two DMX inputs. There are 8 memory slots, each with up to 20 hours of recording capacity. The data are stored on the SD card included in the delivery. Replay Show DMX Manager...
- Page 24 In the REPLAY mode, you can play the recordings individually or in an endless loop directly on the device or via your Android or iOS device. Press [REPLAY] to enter REPLAY mode. The LED lights. ð The unit automatically returns to the last selected playback mode. Replay Show DMX Manager...
-
Page 25: Software Update
Download the software update at www.thomann.de and save it in the main directory of the SD card. Insert the SD card into the SD card slot [SD CARD]. Press [MENU] repeatedly until the display shows ‘System setup [new software]’ . Replay Show DMX Manager... - Page 26 Operating Confirm with [ENTER]. ð The software update will now be uploaded to the DMX manager. Replay Show DMX Manager...
-
Page 27: Technical Specifications
Frequency range 2.4 GHz Max. transmission power 16 mW Range in clear field of vision 30 m - 50 m Supply voltage 100 - 240V 50/60 Hz via Power Twist 5V via USB 2.0, type B Replay Show DMX Manager... - Page 28 482 mm × 44 mm × 135 mm Weight 2.1 kg Ambient conditions Temperature range 0 °C…40 °C Relative humidity 20%…80% (non-condensing) Further information External storage option Type Ethernet-Interface Internal memory Type of distribution 1in2 Max. DMX channels 1024 Number of universes (outputs) Replay Show DMX Manager...
-
Page 29: Plug And Connection Assignments
The unit offers a 3-pin XLR socket for DMX output and a 3-pin XLR plug for DMX input. Please refer to the drawing and table below for the pin assignment of a suitable XLR plug. Configuration Ground, shielding Signal inverted (DMX–, ‘cold signal’) Signal (DMX+, ‘hot signal’) Replay Show DMX Manager... -
Page 30: Protecting The Environment
Dispose of this device through an approved waste disposal firm or through your local waste facility. When discarding the device, comply with the rules and regulations that apply in your country. If in doubt, consult your local waste disposal facility. Replay Show DMX Manager... - Page 32 Musikhaus Thomann · Hans-Thomann-Straße 1 · 96138 Burgebrach · Germany · www.thomann.de...
Need help?
Do you have a question about the Replay Show and is the answer not in the manual?
Questions and answers