Advertisement
Package Contents and Technical Specifications
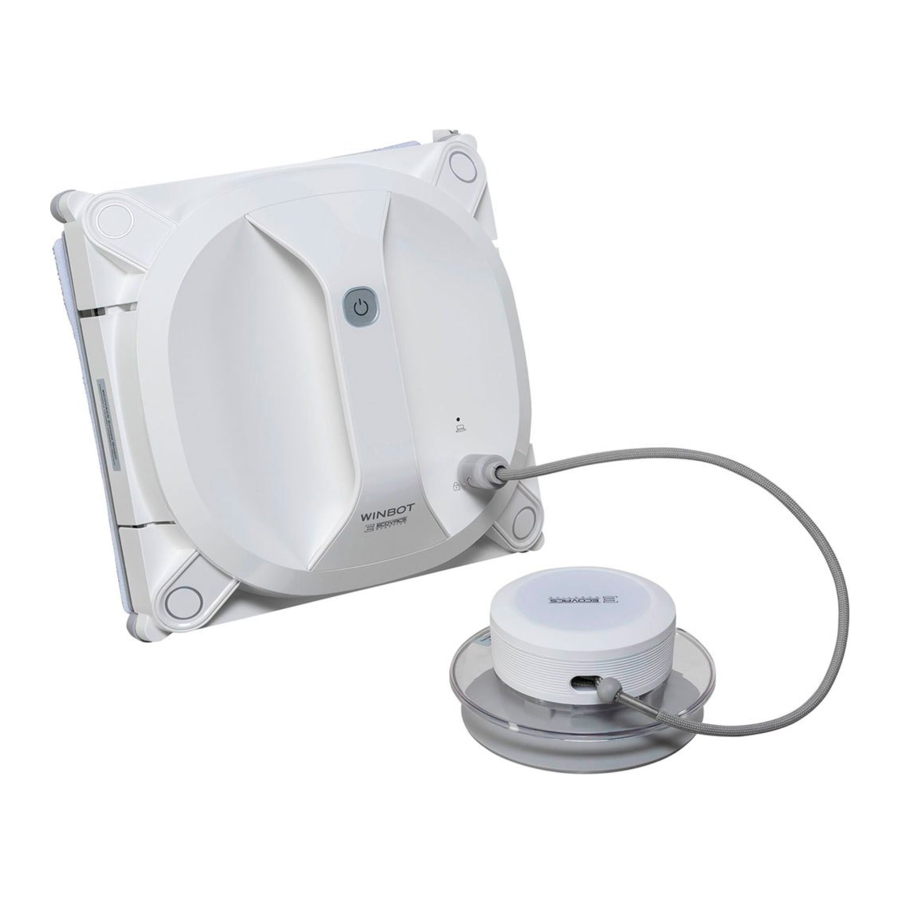
Package Contents

Note: Figures and illustrations are for reference only and may differ from actual product appearance.
Product design and specifications are subject to change without notice.
Specifications
| Model | WA30 | ||
| Working voltage | 22.2V DC | Rated power | 60W |
| Remote Control | |||
| Rated output voltage | 3V DC | ||
| Power Adapter | OH-1048A2701700U1-U | ||
| Input | 100-240V AC, 50/60Hz, 1.5A | Output | 27V DC, 1.7A |
Product Diagram
WINBOT

Note: Technical and design specifications may be changed in the course

Safety Pod

Note: Safety Pod comes with batteries pre-installed.
Remote Control

| Button | How to Use |
| Direction Control Buttons | Press to control the directions in which WINBOT travels. |
| START/PAUSE Button | Press to start/pause WINBOT. |
| Deep Cleaning Mode Button | Used to clean windows in both N- and Z- patterns, providing a better cleaning performance. If WINBOT is in AUTO Cleaning Mode, please pause it before using this function. |
| RESET Button |
|
| Remote Control Pairing Button | Used to pair Remote Control with WINBOT (pairing has been set up by default). |
Operating WINBOT
Notes Before Cleaning
Please refer to the glass manufacturer's care and cleaning instructions before using WINBOT on glass with an uneven surface, such as frosted, textured, patterned, or coated glass. ECOVACS cannot be held liable or responsible for damage due to improper use on these surfaces.

Do not use WINBOT on a framed window with a frame narrower than 5 mm(0.2'').

If WINBOT's Status Indicator Light flashes RED, please charge WINBOT.

WINBOT can clean framed or frameless glass larger than 50 cm x 50 cm (19.7'' x 19.7'').

If the Safety Pod's Battery Indicator Light flashes RED, the battery power is low, and the Safety Pod cannot work. Please change the battery.

If the window is covered with dirt, clean a small area of the glass before placing Safety Pod and WINBOT there.

WINBOT can clean glass installed at an angle, but may not operate normally. In this case, a person should remain in the vicinity to assist should there be a problem.

WINBOT can clean glass installed horizontally, but only when using the Direction Control Buttons on the Remote Control. Keep the Safety Pod firmly attached to the glass.

Do not use WINBOT upside down.
Using WINBOT
- Assemble Power Adapter

- Power ON WINBOT

- Charge WINBOT

Note: Keep objects away from WINBOT's Fan to avoid blockage.
Note: When WINBOT is charging, the WINBOT Status Indicator Light flashes BLUE. When WINBOT is fully charged, the WINBOT Status Indicator Light glows a continuous BLUE and then goes out. - Attach the Cleaning Pad (Pre-installed)

Note: Make sure the white side of the Cleaning Pad attaches to the fastener.
The Cleaning Pad is not completely square, make sure it does not cover the Squeegees or Edge Detection Sensors. - Spray Cleaning Solution
It is recommended to use WINBOT with WINBOT Cleaning Solution from ECOVACS. Using tap water or other cleaners could have an adverse effect on cleaning performance. Using other cleaning solutions could potentially void the warranty.
Note: Do not over-spray Cleaning Solution as doing so may cause the driving treads to slip.
Note: After spraying, BE SURE to wipe the bottom of WINBOT with a dry cloth.
![]()
When using WINBOT to clean windows, the Safety Pod must be used to guarantee the safe operation of WINBOT.
- Prepare the Safety Pod


Note: Turn the jack plug clockwise towards![]() until it locks.
until it locks.
- Start Cleaning
- Make sure to use the Finishing Cloth to clean the Safety Pod bottom. Use a dry cloth to clean an area on the glass where the Safety Pod is to be attached.

- Press the Safety Pod firmly on the glass until the Safety Pod Status Indicator Light glows a continuous GREEN.

INSTRUCTIONS PERTAINING TO A RISK OF INJURY TO PERSONS - If the window is equal to or less than 1 m wide, place the Safety Pod at the top corner of the window or a nearby window. Make sure the Safety Pod is attached at least 1.6 m(5.2') above ground.

Note: The Fan does not start until Safety Pod is firmly pressed on the glass. Keep the fan away from hair or any debris. The length of the Safety Pod cable is 2.5 m(8.2').
![]()
Whether WINBOT is being used to clean the inside or the outside of a window, ALWAYS press the Safety Pod FIRMLY on the INSIDE of the window. - If the window is wider than 1 m(3.3'), place the Safety Pod in the middle of the window. Make sure it is 1.6 m(5.2') above the ground.

- WINBOT has successfully attached to the window when the WINBOT Status Indicator Light glows a continuous BLUE and beeps.

Note: Please ensure there is a 15 cm(5.9") clearance between the glass and any obstacles in the room like curtains or furniture. - AUTO Cleaning Mode

Note: WINBOT automatically chooses the suitable cleaning path in an N- or Z-pattern Cleaning Mode depending on the shape of the window.
This is the most commonly used mode and is most suitable for regular cleaning.
Deep Cleaning Mode
This mode can be used for a better cleaning performance as WINBOT cleans in both N- and Z- patterns.

- Make sure to use the Finishing Cloth to clean the Safety Pod bottom. Use a dry cloth to clean an area on the glass where the Safety Pod is to be attached.
- Pause WINBOT

Note: The Direction Control Buttons on the Remote Control cannot be used until WINBOT is paused. - Stop (Finish Cleaning)
When WINBOT completes its cleaning cycle, it returns to the place where it started and plays a tune.
Note: Use a dry cloth to wipe away any marks the robot has left behind on the glass. If you want to stop the WINBOT during cleaning, first press the START/PAUSE Button once to pause WINBOT, and then hold WINBOT FIRMLY while pressing and holding this button for more than 5 seconds to remove WINBOT.
![]()


Note: If WINBOT has a problem and the WINBOT Status Indicator Light glows a continuous RED, it can be reset by pressing the RESET Button on the Remote Control. See Troubleshooting for details.


Maintenance
Before performing cleaning and maintenance on WINBOT, POWER OFF WINBOT and disconnect it from the Power Adapter.
Cleaning Pad

Note:
Wash with mild detergent.
Do NOT use a wet Cleaning Pad on WINBOT or it may slip on the window.
Washing the Cleaning Pad regularly can extend its service life.
If the Cleaning Pad becomes worn or no longer fits exactly within the fastener area, replace it with a new one to achieve optimal cleaning performance.
Fan, Side Rollers, Edge Detection Sensors and Squeegees
Fan

Edge Detection Sensors

Side Rollers

Squeegees

Driving Treads

- Inspect the Driving Treads by using the Direction Control Buttons on the Remote Control. Stop the Driving Treads if you see dirt on them.


Safety Pod
Clean Safety Pod

Change batteries in Safety Pod (if necessary)


Note: Remove the Safety Pod's battery if the robot will not be used for a long time. In case of battery leakage, please remove the battery and dispose of it in accordance with local laws and regulations.


Regular Maintenance
To keep WINBOT running at peak performance, perform the maintenance and replacement in accordance with the following frequencies.
| Robot Part | Maintenance Frequency | Replacement Frequency |
| Cleaning Pad | After each use | Every 40 washings |
| Fan | After each use | / |
| Side Rollers | ||
| Edge Detection Sensors | ||
| Squeegees | ||
| Driving Treads |
Note: ECOVACS manufactures various replacement parts and assemblies. Please contact Customer Service for more information on replacement parts.
Status Indicator Light and Sounds
WINBOT emits beeps when encountering problems. When you hear the beeps, please check the Status Indicator Light list below to find the solutions.
| Indicator | Status | Description | |
| WINBOT | WINBOT Status Indicator Light | Flashing BLUE |
|
| Continuous BLUE |
| ||
| Flashing RED | The robot's battery is low. Charge WINBOT as described in Using WINBOT. | ||
| Continuous RED | Please refer to Troubleshooting for details. | ||
| Safety Pod Status Indicator Light | Flashing GREEN | The Safety Pod is not prepared to be pressed onto the glass:
| |
| Continuous GREEN | The Safety Pod is working normally. WINBOT can start working. | ||
| Flashing RED | The Safety Pod's battery is low. Replace the battery as described in Safety Pod. | ||
| Continuous RED | Please refer to Troubleshooting, for details. | ||
| Safety Pod | Battery Indicator Light | Flashing RED | The Safety Pod's battery is low. Please replace the battery as described in Safety Pod. |
| Continuous GREEN | The Safety Pod's battery is sufficient. |
Troubleshooting
| No. | Malfunction | Possible Causes | Solutions |
| 1 | Safety Pod Status Indicator Light glows a continuous RED | The Safety Pod is not paired with WINBOT (WINBOT arrives from the factory paired with its Safety Pod. If the Safety Pod becomes unpaired or is replaced, it can be re-paired). | Within the first 5 seconds of powering ON WINBOT, press and hold the START/PAUSE Button on WINBOT and the Pairing Button on the Safety Pod at the same time. Pairing is complete when the Safety Pod Status Indicator Light blinks RED and GREEN and beeps. |
| Safety Pod is losing its suction. |
| ||
| Safety Pod is in Sleep Mode. | Power OFF the Safety Pod then power it ON again. | ||
| Safety Pod Jack is not connected with the Safety Pod Port on WINBOT. | Insert the Safety Pod Jack into the port as described in Using WINBOT. | ||
| 2 | WINBOT Status Indicator Light glows a continuous RED | WINBOT has moved over a problem area and is losing suction. | Press the RESET Button on the Remote Control and use the Direction Control Buttons to move WINBOT away (at least 10 cm/4") from the problem area. Then you can either press the START/PAUSE Button to resume cleaning in AUTO Cleaning Mode or use the Direction Control Buttons to manually clean the area. |
| Edge Detection Sensor are dirty. | Wipe the Edge Detection Sensors clean as described in Fan, Side Rollers, Edge Detection Sensors and Squeegees. If the problem persists, please contact Customer Service. | ||
| 3 | The robot's fan doesn't work after the Safety Pod has been connected with WINBOT and attached to the window. | Safety Pod malfunction | Check the Safety Pod Status Indicator Light on the WINBOT, and refer to Status Indicator Light and Sounds for details. |
| WINBOT is in sleeping mode | Press the START/PAUSE Button on WINBOT to wake it up. | ||
| 4 | Remote Control cannot control WINBOT. | When WINBOT is cleaning, only the START/ PAUSE Button works on the Remote Control. | Pause WINBOT by pressing the START/PAUSE Button on the robot or Remote Control. Other buttons on the Remote Control will function while WINBOT is paused. |
| The Remote Control is not paired with WINBOT (WINBOT arrives from the factory paired with its Remote Control. If the Remote Control becomes un-paired or is replaced, it can be re-paired). | Within the first 5 seconds of powering ON WINBOT, press and hold START/PAUSE Button on WINBOT and Pairing button on the Remote Control at the same time. Pairing is complete when START/PAUSE Button blinks RED and BLUE and beeps. | ||
| WINBOT Status Indicator Light glows a continuous RED. | Press and hold the RESET Button on the Remote Control to initialize WINBOT, then the Remote Control will function. | ||
| The batteries are not inserted in the Remote Control or need to be replaced. | Insert or replace the batteries in the Remote Control. | ||
| 5 | WINBOT Status Indicator Light flashes BLUE after the robot is placed on the glass. | The Cleaning Pad is attached incorrectly and is covering the Fan or the Edge Detection Sensors. | Remove the Cleaning Pad and re-attach it, making sure it is placed exactly within its fastener area and does not cover the Fan or the Edge Detection Sensors. |
| Edge Detection Sensor malfunction. |
| ||
| Fan malfunction. |
| ||
| Glass is too dirty for WINBOT to adhere properly. | Clean a small area of the glass before using and placing WINBOT there, or clean the window by hand first and use WINBOT for regular cleaning after that. * WINBOT is intended to be used for maintenance cleaning on common windows. The product is not designed to replace heavy-duty cleaners or for cleaning windows with heavy dust for the first time. | ||
| 6 | WINBOT moves in an irregular pattern during cleaning. | There is too much dirt and debris on the window. |
|
| 7 | WINBOT is stuck, and cannot move, be controlled by the Remote Control, or be reset by pressing RESET Button. | Insufficient suction or Edge Detection Sensor signal abnormity. | Press the RESET Button on the Remote Control once and then press and hold it until the WINBOT Status Indicator Light glows a continuous BLUE and the Safety Pod Status Indicator Light glows a continuous GREEN to switch WINBOT to Manual Override Mode. In Manual Override Mode, the Direction Control Buttons on the Remote Control are activated. Use the Direction Control Buttons to move WINBOT to a position away from edges and where you can safely reach it. Remove WINBOT from the window and power OFF. Power ON again to restart. *When using the Manual Override Mode, do not leave WINBOT attached to the glass unattended. If the problem persists, please contact Customer Service. |
| 8 | WINBOT does not charge after the Power Adapter has been correctly plugged in. | WINBOT's Power Switch is not set to ON. | Move the robot's bottom Power Switch to the ON position and make sure the WINBOT Status Indicator Light flashes BLUE. |

Documents / ResourcesDownload manual
Here you can download full pdf version of manual, it may contain additional safety instructions, warranty information, FCC rules, etc.
Advertisement


Need help?
Do you have a question about the WINBOT X and is the answer not in the manual?
Questions and answers