Table of Contents
Advertisement
Quick Links
Woodpeckers
®
PRECISION WOODWORKING TOOLS
Side Winder
INSTALLATION INSTRUCTIONS
Models: SW350
Made in U.S.A. by Woodpeckers Inc.
Protected by one or more of the following U.S.
Patents; 6,505,659; 7,559,347; 7,481,253;
7,108,463 and other patents pending.
SAFETY
Always unplug your router motor before making any
adjustments to the router lift. Refer to your routers' owners
manual for specific safe operating instructions.
BEFORE YOU BEGIN
The Woodpeckers
Side Winder can be installed in most
®
router tables with a standard 9¼ x 11¾ opening and a side
panel mounting surface no more than 19" away as in the
side of a cabinet or router table stand. In most cases three
holes will need to be drilled for mounting the side plate.
These instructions assume you're installing the Side Winder
on a Woodpeckers
Router Table Stand.
®
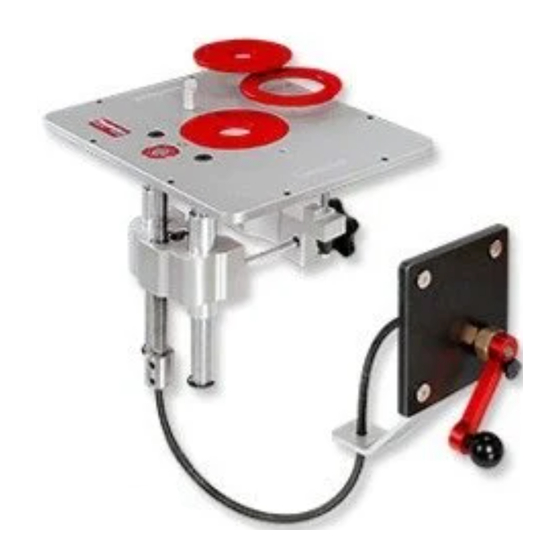
Woodpeckers
®
Router Table Stand, Router Table and Side Winder.
Made in the U.S.A. by Woodpeckers Inc., North Royalton, Ohio · Copyright 2010© Woodpeckers Inc.
Router Lift.
COMPATIBLE ROUTER MOTORS
The Woodpeckers
Side Winder 350 Router Lift fits the
®
Porter-Cable 690/890, Bosch 1617/1618 and Craftsman
models 17542, 17540, 28190 router motors as well as any
router motors 3.5" in diameter.
The wrench
handle must
be pointing
right in order
to fully insert
or remove it.
Lift Wrench
Figure 1.
USING THE LIFT WRENCH
You'll need to know how to use the Lift Wrench to install
your router motor.
STEP 1. To change the carriage height (the carriage is the
part beneath the table that holds the motor), orient the
wrench with the handle pointing right. (Figure 1.)
Insert the wrench until it's COMPLETELY BOTTOMED OUT.
Once it's all the way in, try and rotate it. If it doesn't turn, it
isn't in. Do not force the wrench. Take it out, push it back
down and try again.
STEP 2. Once it turns easily, simply rotate it ¼ turn in ei-
ther direction to lock the handle to the carriage. Now you
can raise or lower your router as needed using the wrench.
(Figure 2.)
To install your router motor you need to raise the carriage
all the way up and lock it in place by once again orienting
the handle to the right. Now remove the lift wrench.
Once fully
inserted, rotate
the wrench ¼
turn in either
direction and
completely raise
the carriage.
Carriage
Figure 2.
8/10 Page 1
Advertisement
Table of Contents

Related Manuals for Woodpeckers SW350


Summary of Contents for Woodpeckers SW350
- Page 1 Now remove the lift wrench. Woodpeckers ® Router Table Stand, Router Table and Side Winder. Made in the U.S.A. by Woodpeckers Inc., North Royalton, Ohio · Copyright 2010© Woodpeckers Inc. 8/10 Page 1...
- Page 2 Support the motor so it just begins to go through the open- ⁄ " wrench to lightly snug the ing in the plate. (Figure 5b). bolt into the plate. (cont’d.) Made in the U.S.A. by Woodpeckers Inc., North Royalton, Ohio · Copyright 2010© Woodpeckers Inc. 8/10 Page 2...
- Page 3 12). one of the connector bolts and hex nuts. (Figure 9). Bracket. Figure 12. Made in the U.S.A. by Woodpeckers Inc., North Royalton, Ohio · Copyright 2010© Woodpeckers Inc. 8/10 Page 3...
- Page 4 It’s typically used when doing heavy routing. and not disassembled. Made in the U.S.A. by Woodpeckers Inc., North Royalton, Ohio · Copyright 2010© Woodpeckers Inc. 8/10 Page 4...
- Page 5 (Image may not match your Side Winder but the process is the same. Made in the U.S.A. by Woodpeckers Inc., North Royalton, Ohio · Copyright 2010© Woodpeckers Inc. 8/10 Page 5...
- Page 6 w w w. i n c r a . c o m Side Winder Side Crank Installation on INCRA ® Router Table Stands Note: This addendum replaces Fig/Step 10 & Fig/Step 11 of the Woodpecker provided mounting instructions. Please follow all assembly instructions of the original manual up to Fig/Step 10 before using this addendum. If your INCRA router table stand is already assembled you will first need to remove the table top and remove the front top stretcher.
- Page 7 w w w. i n c r a . c o m Side Winder Side Crank Installation on ® INCRA Table Saw Systems Note: This addendum replaces Fig/Step 10 & Fig/Step 11 of the Woodpecker provided mounting instructions. Please follow all assembly instructions of the original manual up to Fig/Step 10 before using this addendum.
Need help?
Do you have a question about the SW350 and is the answer not in the manual?
Questions and answers