Table of Contents
Advertisement
Quick Links
AN11646
PN7120 NFC Controller SBC Kit Quick Start Guide
Rev. 1.3 — 20 May 2016
319713
Document information
Info
Content
Keywords
OM5577, PN7120, Raspberry Pi, BeagleBone, NFC, P2P, Card
Emulation, Linux, Android, Win10 IoT
Abstract
This document gives a description on how to get started with the PN7120
NFC Controller SBC Kit.
Application note
COMPANY PUBLIC
Advertisement
Table of Contents

Related Manuals for NXP Semiconductors PN7120


Summary of Contents for NXP Semiconductors PN7120
- Page 1 Application note 319713 COMPANY PUBLIC Document information Info Content Keywords OM5577, PN7120, Raspberry Pi, BeagleBone, NFC, P2P, Card Emulation, Linux, Android, Win10 IoT Abstract This document gives a description on how to get started with the PN7120 NFC Controller SBC Kit.
- Page 2 AN11646 NXP Semiconductors PN7120 NFC Controller SBC Kit Quick Start Guide Revision history Date Description 20160520 Adding details about Beaglebone startup 20151009 - Information about Win10 IoT demo added - Section 6.3 Licenses updated 20150701 - Correction of a syntax error in a referenced link...
-
Page 3: Fig 1. Pn7120 Nfc Controller Sbc Kit Content
PN7120 NFC Controller SBC Kit Quick Start Guide 1. Introduction This document gives a description on how to get started with the PN7120 NFC-Controller SBC Kit. This document provides a step by step guide to the installation procedure of the hardware and the software. -
Page 4: Linux Driver Support
1.3 Android driver support PN7120 NFC Controller is supported from the official Android Open Source Project (refer to [7] for more details) with the addition of dedicated patches available through PN7120 Product Web Page [5] (refer to AN11690). The BeagleBone Black demo image is based on this concept. -
Page 5: Fig 2. Om5577/Pn7120S Raspberry Pi Configuration
• Computer (running Windows, Linux or Mac OS X) for SD/MicroSD card installation • Raspberry Pi demo image file, downloaded from the OM5577/PN7120S demo kit webpage [6] 2.2 Hardware setup First of all assemble the PN7120 NFC Controller Board with the Raspberry Pi Interface Board. Fig 2. OM5577/PN7120S Raspberry Pi configuration Then stacked together the boards with the Raspberry Pi according to below guidelines. -
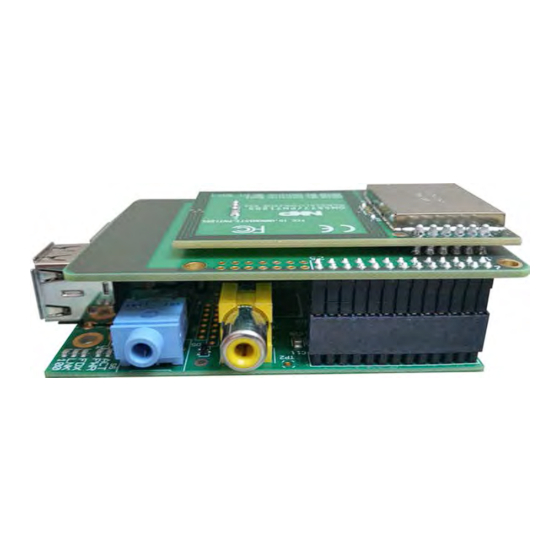
Page 6: Fig 3. Om5577/Pn7120S And Raspberry Pi B Model Stacked Together
AN11646 NXP Semiconductors PN7120 NFC Controller SBC Kit Quick Start Guide 2.2.1 Raspberry Pi A/B (old models) On the old models, the Raspberry Pi Interface Board connector fit perfectly the Raspberry Pi one. Assemble the boards as shown in figure below, removing first the 4 white plastic spacers: Fig 3. -
Page 7: Fig 5. Raspbian Gui
AN11646 NXP Semiconductors PN7120 NFC Controller SBC Kit Quick Start Guide - On Linux: www.nxp.com/redirect/raspberrypi.org/documentation/installation/installing- images/linux.md www.nxp.com/redirect/learn.adafruit.com/beaglebone-black- - On MAC OS X: installing-operating-systems/mac-os-x.md 2.4 Starting NFC demo 2.4.1 Linux image Insert the SD or MicroSD card in the Raspberry Pi. Connect HDMI Display, mouse and keyboard. -
Page 8: Fig 6. Proximity_Basictest Application
AN11646 NXP Semiconductors PN7120 NFC Controller SBC Kit Quick Start Guide 2.4.2 Win10 IoT image Insert the SD or MicroSD card in the Raspberry Pi 2, connect HDMI Display, and then power-up the Raspberry Pi by plugging the USB power cable. -
Page 9: Fig 7. Om5577/Pn7120S Beaglebone Configuration
• Computer (running Windows, Linux or Mac OS X) for MicroSD card installation • BeagleBone image file, downloaded from the OM5577/PN7120S demo kit webpage [6] 3.2 Hardware setup First of all assemble the PN7120 NFC Controller Board with the BeagleBone Interface Board. Fig 7. -
Page 10: Fig 8. Om5577/Pn7120S And Beaglebone Black Stacked Together
AN11646 NXP Semiconductors PN7120 NFC Controller SBC Kit Quick Start Guide Fig 8. OM5577/PN7120S and BeagleBone Black stacked together 3.3 Software setup Prepare a MicroSD card, with the downloaded BeagleBone demo image (http://www.nxp.com/documents/software/OM5577_BBB_Linux.html http://www.nxp.com/documents/software/OM5577_BBB_Kitkat.html), following the installation guidelines. First extract the “.img” file from the archive, then flash it on the microSD card according to below guidelines. -
Page 11: Fig 10. Identifying Device Number Under Linux
AN11646 NXP Semiconductors PN7120 NFC Controller SBC Kit Quick Start Guide 3.3.2 On Linux Insert the MicroSD card into your computer and determine the device node assigned to it (ignore the device number; e.g. /dev/sdb, not sdb1): $ sudo dmesg | tail -20 $ sudo dmesg | tail -20 [95300.848154] usb 2-1: new high-speed USB device number 33 using ehci-pci... -
Page 12: Fig 11. Bone-Debian Gui
AN11646 NXP Semiconductors PN7120 NFC Controller SBC Kit Quick Start Guide 3.4.1 Linux image The Raspberry Pi boots and displays the bone-debian GUI: Fig 11. bone-debian GUI Open a terminal and browse to the Linux libnfc-nci stack directory (refer to chapter 1.2 for more details about the Linux NFC software stack). -
Page 13: Fig 13. Android "Setting/Wireless&Network" Menu
AN11646 NXP Semiconductors PN7120 NFC Controller SBC Kit Quick Start Guide You can enable/disable the NFC function via “Settings/Wireless & Network/More…” Fig 13. Android “Setting/Wireless&Network” menu Using provided NXP TagInfo and NXP TagWriter applications you can get information from discovered tag and write content. -
Page 14: Fig 15. Android Taginfo Application
AN11646 NXP Semiconductors PN7120 NFC Controller SBC Kit Quick Start Guide Fig 15. Android TagInfo application Fig 16. Android TagWriter application AN11646 All information provided in this document is subject to legal disclaimers. © NXP Semiconductors N.V. 2016. All rights reserved. -
Page 15: Fig 17. Linux Demo Application Commands
4.1 Application details The demo application is part of the Linux libnfc-nci stack delivery. More details can be find in document AN11697 available on PN7120 Product Web Page [5]. 4.2 Using the application The application must be started with parameters: $ ./nfcDemoApp <OPTIONS>... -
Page 16: Fig 18. Linux Demo Application Polling Mode
AN11646 NXP Semiconductors PN7120 NFC Controller SBC Kit Quick Start Guide Fig 18. Linux demo application polling mode 4.2.2 Tag writing mode This mode allows writing data to an NFC tag. It is reached using “write” parameter: $ ./nfcDemoApp write <OPTIONS>... -
Page 17: Fig 20. Linux Demo Application Device Push Mode
AN11646 NXP Semiconductors PN7120 NFC Controller SBC Kit Quick Start Guide 4.2.3 Device push mode This mode allows pushing data to a remote NFC device (e.g. an NFC phone). It is reached using “push” parameter: $ ./nfcDemoApp push <OPTIONS> Fig 20. Linux demo application device push mode You can get more information about the message format using “-h”... -
Page 18: References
AN11646 NXP Semiconductors PN7120 NFC Controller SBC Kit Quick Start Guide 5. References The Raspberry Pi is a credit card sized computer. The initial idea behind it was to develop a small and cheap computer to be used by kids all over the world to learn programming. -
Page 19: Legal Information
Purchase of NXP ICs with NFC technology risk. Purchase of an NXP Semiconductors IC that complies with one of the Near Applications — Applications that are described herein for any of these Field Communication (NFC) standards ISO/IEC 18092 and ISO/IEC 21481 products are for illustrative purposes only. -
Page 20: Table Of Contents
AN11646 NXP Semiconductors PN7120 NFC Controller SBC Kit Quick Start Guide 7. List of figures Fig 1. PN7120 NFC Controller SBC Kit content ..3 Fig 2. OM5577/PN7120S Raspberry Pi configuration . 5 Fig 3. OM5577/PN7120S and Raspberry Pi B model stacked together .......... -
Page 21: Contents
AN11646 NXP Semiconductors PN7120 NFC Controller SBC Kit Quick Start Guide 8. Contents Introduction ............3 OM5577/PN7120S demo kit....... 3 Linux driver support ..........4 Android driver support ........4 Windows IoT driver support........ 4 Quick Startup on Raspberry Pi ......5 Required items ...........
Need help?
Do you have a question about the PN7120 and is the answer not in the manual?
Questions and answers