Table of Contents
Advertisement
Quick Links
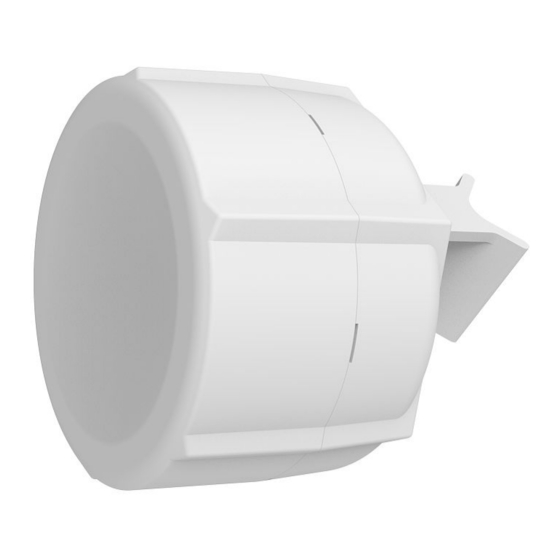
SXT kit-series
SXT kit series models:
SXT 4G kit
SXT LTE6 kit
SXT LTE kit-US
SXT LTE kit
The SXT kit comes as a complete set and includes a built-in modem, connected to a built-in antenna. It has two 10/100 Ethernet connectors that support
MDI-X auto-detection. There are two micro SIM card slots available, to switch between cell providers.
First use
The default configuration is CPE RouterMode:
*LTE interface connected to providers network (WAN port);
*WAN port is protected by a firewall and enabled DHCP client.
LAN Configuration:
IP Address 192.168.88.1/24 is set on the bridge (LAN port)
DHCP Server enabled;
DNS: enabled.
WAN (gateway) Configuration:
gateway: lte1;
ip4 firewall: enabled;
NAT: enabled.
1.
Open the bottom lid.
2.
Insert the SIM cards into the micro-SIM slots (SIM A slot is a default).
If using another slot, the configuration can be changed in RouterOS with CLI command:
/system routerboard modem set sim-slot=down
After changing SIM slots, LTE modem will be restarted. It can take some time (depending on modem and board around 30 seconds) to fully
initialize it, so make sure you test your modem.
https://wiki.mikrotik.com/wiki/Dual_SIM_Application
3.
Connect the device to the power source (see "
4.
Once the device is powered on and PC connected to the device, open
5.
User name: a
dmin
and there is no password by default you will be logged in automatically to the Quick Set screen.
SXT kit-series#Powering
").
https://192.168.88.1
in your web browser or Winbox to start the
Advertisement
Table of Contents

Related Manuals for MikroTik SXT 4G kit


Summary of Contents for MikroTik SXT 4G kit
- Page 1 SXT kit-series SXT kit series models: SXT 4G kit SXT LTE6 kit SXT LTE kit-US SXT LTE kit The SXT kit comes as a complete set and includes a built-in modem, connected to a built-in antenna. It has two 10/100 Ethernet connectors that support MDI-X auto-detection.
- Page 2 We recommend clicking the "Check for updates" button on the right side and updating your RouterOS software to the latest version to ensure the best performance and stability. Must have an internet connection and a valid SIM card. To manually update the device, please go to our web page and download the latest (MIPSBE) software packages to your PC. Open Web browser or Winbox and upload packages to the Files menu and reboot the device.
- Page 3 The installation infrastructure (towers and masts), as well as the router itself, must be properly grounded. The device includes a grounding wire attachment screw behind the case door. Attach your grounding wire to the grounding screw, then attach the other end of the grounding wire to the grounded mast.
- Page 4 Accessories Package includes the following accessories that come with the device: ADAPT1_EU/US Switching Power Supply 24 V, 0.8 A, 19.2 W, 85.3%, VI, cable:150 cm Hor CMC; CLAMP1_Hose Clapmp SUS304 (Philips type; clamping diameter range 35-70 mm); POE1_POE Injector with shielded connector; BRAC1_SXT5D mounting;...
- Page 5 BG С настоящото Mikrotīkls SIA декларира, че този тип радиосъоръжение RouterBOARD е в съответствие с Директива 2014/53/ЕС. Цялостният текст на ЕС декларацията за съответствие може да се намери на следния интернет адрес: https://mikrotik.com/products CS Tímto Mikrotīkls SIA prohlašuje, že typ rádiového zařízení RouterBOARD je v souladu se směrnicí 2014/53/EU. Úplné znění EU prohlášení o shodě...
- Page 6 HU Mikrotīkls SIA igazolja, hogy a RouterBOARD típusú rádióberendezés megfelel a 2014/53/EU irányelvnek. Az EU-megfelelőségi nyilatkozat teljes szövege elérhető a következő internetes címen: https://mikrotik.com/products IT Il fabbricante, Mikrotīkls SIA , dichiara che il tipo di apparecchiatura radio RouterBOARD è conforme alla direttiva 2014/53/UE. Il testo completo della dichiarazione di conformità...
- Page 7 * It is the customer's responsibility to follow local country regulations, including operation within legal frequency channels, output power, cabling requirements, and Dynamic Frequency Selection (DFS) requirements. All Mikrotik radio devices must be professionally installed! According to Commission Decision 2000/299/EC (6 April 2000), the product falls under the scope of Class 2.Note. The information contained here is subject to change.
- Page 8 informācija {+}https://mt.lv/help-lv+ MT. Manwal tal-istruzzjoni : Qabbad l-adapter tal-qawwa biex iddawwar it-tagħmir. Iftaħ 192.168.88.1 fil-web browser tiegħek, biex jiġi kkonfigurat. Aktar informazzjoni fuq {+}https://mt.lv/help-mt+ NL. Handleiding : Sluit voedingsadapter aan op het apparaat in te schakelen. Open 192.168.88.1 in een webbrowser om het product te configureren. Meer informatie in {+}https://mt.lv/help-nl+ PL.
Need help?
Do you have a question about the SXT 4G kit and is the answer not in the manual?
Questions and answers