Table of Contents
Advertisement
Quick Links
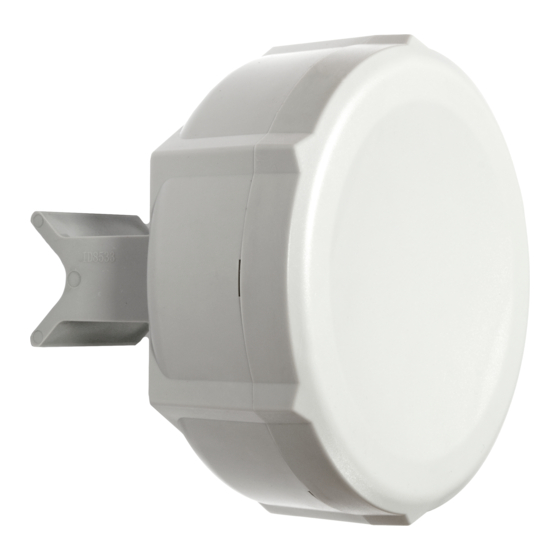
SXT 2
SXT is an outdoor wireless router that can be used as a CPE in a PtM setup, or for point-to-point links. Please ensure the device is correctly mounted, with
the cable pointing straight down.
Assembly and mounting
With the clip pointed forward, slide the mounting bracket into the rail on the bottom of the case, until the clip clicks into place. The SXT comes bundled with
a hose clamp, guide the clamp through the opening in the bracket and around the pole where it will be mounted. Tighten the hose clamp screw when
alignment is complete. Two screw holes are provided as additional security against accidental bracket movement.
The SXT device has a sliding door, behind which the Ethernet port and the reset jumpers are located. This door can be also secured shut with a screw in
the provided screw hole.
Connecting
Open the ethernet door to connect an ethernet cable to the ethernet port, connect the other end of the ethernet cable to the included PoE injector.
Plug the PoE injector into your network switch or computer.
Plug the included power supply into the PoE injector to start up the device.
Set LAN computer IP configuration to
The default IP address of the unit is 192.168.88.1, open this address in your web browser to start the configuration. The username is admin and
there is no password.
Please select your country in the screen that loads, to ensure your device meets local regulations. Set a wireless password, a management
password, and upgrade the device to the latest software with the "check for updates" button.
The device is preconfigured as a wireless client (CPE), and all you need to do is select the AP to connect to and set a device password. You can do this in
the quickSET tab that is loaded by default. In case an IP connection is not available, Winbox can be used to connect to the MAC address of the device.
In case you wish to boot the device from the network, for example, to use MikroTik Netinstall, hold the RESET button of the device when starting it, until
the LED light turns off, then the device will start to look for Netinstall servers.
We recommend clicking the "Check for updates" button and updating your RouterOS software to the latest version to ensure the best performance and
stability. More information about using RouterOS and connecting to this device
in our documentation:
*+https://mt.lv/help+*
Powering
The device only accepts 8-32 V power from Passive PoE injectors (one power supply and PoE injector are included).
Extension Slots and Ports
One Ethernet (10/100 Mbit or Gigabit, depends on model), supporting automatic cross/straight cable correction (Auto MDI/X), so you can use
either straight or cross-over cables for connecting to other network devices.
One Integrated Wireless with a built-in directional antenna, max gain 16 dBi.
Mounting
SXT designed to be mounted on the pole, the package includes a mounting bracket and steel clamp.
1.
With the clip pointed forward, slide the mounting bracket into the rail on the bottom of the case, until the clip clicks into place.
2.
Guide the clamp through the opening in the bracket.
automatic
(DHCP).
Advertisement
Table of Contents

Related Manuals for MikroTik SXT 2


Summary of Contents for MikroTik SXT 2
- Page 1 In case an IP connection is not available, Winbox can be used to connect to the MAC address of the device. In case you wish to boot the device from the network, for example, to use MikroTik Netinstall, hold the RESET button of the device when starting it, until the LED light turns off, then the device will start to look for Netinstall servers.
- Page 2 Attach the unit to a pole, with the Ethernet port pointing downward. Use a PH2 screwdriver to tighten the rings when the alignment is complete. Fix the Ethernet cable to the pole using zip ties, less than one meter from the unit, to avoid the cable being pulled out of the port. Check mounting angle and positioning.
- Page 3 BG С настоящото Mikrotīkls SIA декларира, че този тип радиосъоръжение RouterBOARD е в съответствие с Директива 2014/53/ЕС. Цялостният текст на ЕС декларацията за съответствие може да се намери на следния интернет адрес: https://mikrotik.com/products CS Tímto Mikrotīkls SIA prohlašuje, že typ rádiového zařízení RouterBOARD je v souladu se směrnicí 2014/53/EU. Úplné znění EU prohlášení o shodě...
- Page 4 EL Με την παρούσα ο/η Mikrotīkls SIA , δηλώνει ότι ο ραδιοεξοπλισμός RouterBOARD πληροί την οδηγία 2014/53/ΕΕ. Το πλήρες κείμενο της δήλωσης συμμόρφωσης ΕΕ διατίθεται στην ακόλουθη ιστοσελίδα στο διαδίκτυο: https://mikrotik.com/products EN Hereby, Mikrotīkls SIA declares that the radio equipment type RouterBOARD is in compliance with Directive 2014/53/EU. The full text of the EU declaration of conformity is available at the following internet address: https://mikrotik.com/products...
- Page 5 TX tramite le normative ETSI. Per informazioni più dettagliate consultare la Dichiarazione di conformità sopra / Este dispositivo MikroTik cumple con los límites máximos de potencia TX a través de las normas ETSI. Para obtener información más detallada, consulte la Declaración de conformidad anterior / Это...
Need help?
Do you have a question about the SXT 2 and is the answer not in the manual?
Questions and answers