Table of Contents
Advertisement
Quick Links
Advertisement
Table of Contents

Related Manuals for FineTek ECP1


Summary of Contents for FineTek ECP1
- Page 1 ECP1 Pressure Guage Operation Manual FinkTek Co., Ltd. No.16, Tzuchiang St., Tucheng Industrial Park, New Taipei City 23678 Tel: 886-2-22696789 Fax: 886-2-22686682 Website: http://www.fine-tek.com E-mail:info@fine-tek.com 08-ECP1-B1-EK,03/27/2023...
-
Page 2: Table Of Contents
Contents 1. Reading Labels ....................... 1 2. Product Warranty ......................2 2.1 New Product Warranty ....................2 2.2 Repair Warranty ......................2 2.3 Service Network ......................3 3. Product Inspection ......................4 3.1 Check Content ......................4 3.2 Safety Inspection ....................... 4 4. -
Page 3: Reading Labels
1. Reading Labels Thanks for purchasing FineTek’s Product. This operation manual describes the product features, working principles, operation and maintenance methods. It makes the user fully understand how to use the product correctly, so as to prevent dangerous situations such as device damage or operator injury. -
Page 4: Product Warranty
2. Product Warranty 2.1 New Product Warranty ➢ We don’t charge for the inspection, part/s and repair for the product of the company that has a defect within 12 months from the delivery date and meets the warranty terms. ➢ If the product defect is not due to human error during its transportation, user ➢... -
Page 5: Service Network
Aplus FineTek 355 S. Lemon Ave, Suite D, 1 909 598 2488 1 909 598 3188 (Sensor Inc.) Walnut, CA 91789 FineTek Pte Ltd. 37 Kaki Bukit Place, Level 4 +65 6452 6340 +65 6734 1878 (Singapore Branch) Singapore 416215 Bei den Kämpen 26... -
Page 6: Product Inspection
3. Product Inspection 3.1 Check Content ➢ Sensor x 1 ➢ Fixating buckle x 1; countersunk screw x 2; nut x 2 ➢ Cable x 1 ➢ Operation manual x 1 3.2 Safety Inspection ➢ Please check whether the external package is deformed or damaged. Please remember to take a picture for evidence for compensation later. -
Page 7: Product Features
4. Product Features 4.1 Product Features ➢ Dual-color LED and red-text alarm displays ➢ Analog 4–20 mA output that allows continuous detection of pressure values ➢ Anti-corrosion structural design that is suitable for minimally corrosive solution ➢ Quick release mount to facilitate calibration and replacement ➢... -
Page 8: Product Specifications
5. Product Specifications 5.1 Product Applications Power supply DC 12~36V Power consumption <50mA (@24V unloaded) −10 to 60°C Operating temperature Working medium Liquid/Slight corrosive liquid/air ±1.5% F.S. Accuracy ±0.1%F.S./ °C (25°C as the baseline) Temperature coefficient NPN/PNP output Maximum pressure tolerance of 30 V/100 mA and breakover current residual voltage of <... -
Page 9: Appearance And Dimension
5.3 Appearance and Dimension 5.4 Hole Dimension Cross-sectional view Cross-sectional view On the installation disc, it is required to make diagonal holes with a diameter of 3.2 mm according to the cross-sectional view B-B above; use the countersunk screws to hold the disk onto the equipment. In addition, it is required to make holes with a diameter greater than 51.2 and smaller than 54 mm according to the forgoing drawing to allow buckling and fixation once the display pressure meter is inserted into the installation disc. -
Page 10: Ordering Information
5.5 Ordering Information... -
Page 11: Wiring Instructions
5.6 Wiring Instructions Quick joint used for the ECP and the cable for connecting the six conductors of the cable (1) Brown: 4–20 mA (2) Green: Control box cover (3) Blue: OUT1 (4) Black: GND (5) Red: 24V (6) Orange: OUT2 Information on OUT1/OUT2 connection: ➢... -
Page 12: Installation Instructions
6. Installation Instructions 6.1 Environmental Safety ➢ Storage temperature: -40°C ~85°C (-40°F~185°F) ➢ Operating temperature: -10°C~60°C (-14°F~140°F) ➢ Supply power: 12 VDC ~ 36 VDC ➢ Output load current: Max, 50 mA 6.2 Install ECP pressure meter ECP snap disc Instrument panel Once holes are made on the instrument panel according to Section 5, use the countersunk screws and nuts (follow the red arrows), and secure the snap disc onto the instrument panel... -
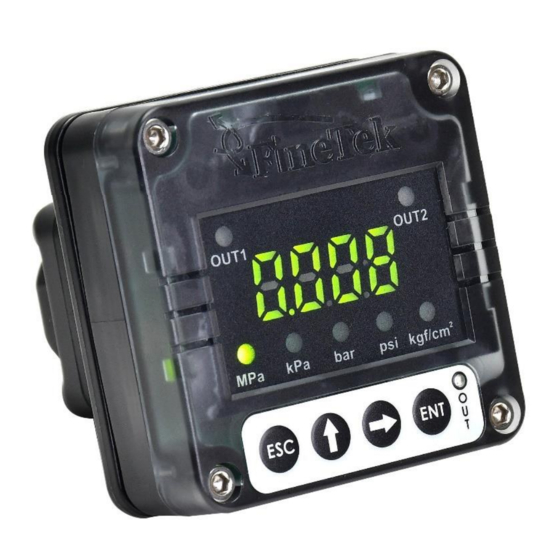
Page 13: Operating Instructions
7. Operating Instructions 7.1 Button Functions Quick key: ➢ Press and hold for 3 seconds to initialize pressure ➢ Press and hold for 3 seconds to shift (LOCK/UNLK) ➢ Press to quickly shift the unit ➢ Press to enter the menu in an unlocked state General operation: Press Access the next-level menu/enter for confirmation... -
Page 14: Description
7.2 Description ➔ 切換選項 00.00 OUT1 Mode Shift options NC/NO ENT確認 to confirm (Default: NC) ➔ Type ➔ 切換選項 Shift options Shift options PNP/NPN to confirm ENT確認 to confirm (Default: NPN) ➔ UP 調整數值; to adjust the value; HiPt 2.00 ➔... -
Page 15: Information On Commands
7.4 Information on Commands Level 1 menu: OUT1 (output settings for the first group) OUT2 (output settings for the second group) Level 2 menu: (Level 3 options in red, without entering Mode >NC alternating display) ➔ OUT1 Mode: OUT1 connection mode options; one can choose normally closed (NC) and normally open (NO) modes Type: OUT1 connection type options;... -
Page 16: Examples
7.5 Examples The default value of OUT1 LoPt is 1kgf/cm and that of HiPt is 2 kgf/cm Once the measured pressure is greater than HiPt 2 kgf/cm , the On/Off joint OUT1 starts to act and the font color turns red. Once the measured pressure is below LoPt 1 kgf/cm , the On/Off joint OUT1 starts to initialize and the font color turns green. -
Page 17: Transportation And Storage
8. Transportation And Storage 8.1 Transportation requirements To prevent the ECP Pressure Guage from damage during the transportation, please keep the packaging condition as how it was when it was shipped from the factory before arriving at the installation site. The storage conditions should meet the following: ➢...
Need help?
Do you have a question about the ECP1 and is the answer not in the manual?
Questions and answers