
Related Manuals for ZyXEL Communications Q1000z


Summary of Contents for ZyXEL Communications Q1000z
- Page 1 Q1000z 802.11n VDSL2 4 GE Port USB Router over POTS Firmware v1.00 Edition 1, 5/2010 DEFAULT LOGIN DETAILS IP Address: http://192.168.0.1 Copyright 2010 ZyXEL Communications Corporation www.zyxel.com...
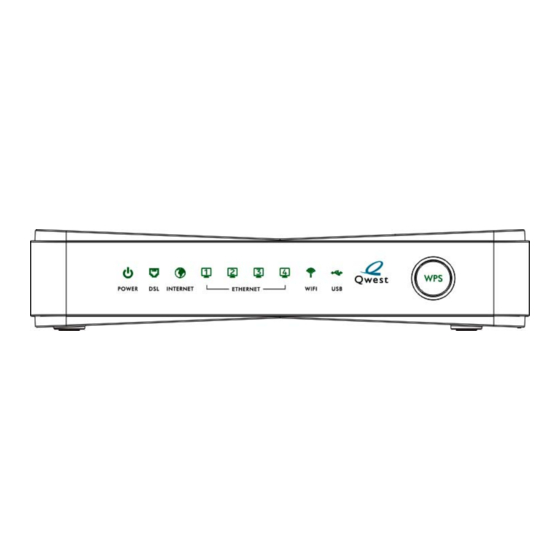
- Page 2 Device Panels LEDs (Lights) POWER LINE (DSL) ETHERNET RESET PHONE...
-
Page 3: Before You Begin
WPS button. Additionally, you can connect your telephone to the Q1000Z and make/receive PSTN calls. Before You Begin Make sure you have the following things before you set up your Q1000Z. • Internet access - account information provided by your ISP, such as user name, password, and so on. -
Page 4: Hardware Connections
3. ETHERNET: Use an Ethernet cable to connect a computer to this port for initial configuration and/or Internet access. 4. Use the power adaptor provided with your Q1000Z to connect an appropriate power source to this socket. As of writing, the USB port is reserved for future use. - Page 5 Checking the LEDs (Lights) Look at the LEDs (lights) on the top panel of the Q1000Z. • The POWER light blinks during start-up and is green once the Q1000Z is ready. • The DSL light is green if a physical DSL connection exists and blinks when transmitting data.
-
Page 6: Initial Configuration
Testing Internet Connection After you have connected the hardware and turned on the Q1000Z, open a web browser on your computer and go to any web site (for example, www.zyxel.com) to test your Internet connection. If you are prompted for a user name and password, enter the account information as given by your Internet service provider (ISP). - Page 7 ISP and click Apply. 3. If your ISP didn’t provide you a username and password, click the Advanced IP Configuration button. Configure your Q1000Z for Internet access according to instructions provided by your ISP. Make sure you enter the correct information.
-
Page 8: Wall Mounting
Set Up a WPS Connection Press the WPS button on the Q1000Z’s front panel for more than 5 seconds to turn the WPS function on. Follow these steps to add a WPS-enabled device to the wireless network using the WPS button. - Page 9 5. Make sure the screws are snugly fastened to the wall. They need to hold the weight of the Q1000Z with the connection cables. 6. Align the holes on the back of the Q1000Z with the screws on the wall. Hang the Q1000Z on the screws.
- Page 10 ACTA. On bottom of this equipment is a label that contains, among other information, a product identifier of QWEST Q1000Z. If requested, this number must be provided to the telephone company. 2. If this equipment DL causes harm to the telephone network, the telephone company will notify you in advance that temporary discontinuance of service may be required.
- Page 11 6. Connection to party line service is subject to state tariffs. Contact the state public utility commission, public service commission or corporation commission for information. 7. If the telephone company requests information on what equipment is connected to their lines, inform them of: a.
- Page 12 Service can be facilitated through our office at: ZyXEL Communications Corporation 6, Innovation Rd II, Science-Based Industrial Park, Hsin-Chu, Taiwan, R.O.C. +886- 3-578-3942 This device complies with part 15 of the FCC Rules. Operation is subject to the following two conditions: (1) This device may not cause harmful interference, and (2) this device must accept any interference received, including interference that may cause undesired operation.
- Page 13 • Connect the equipment into an outlet on a circuit different from that to which the receiver is connected. • Consult the dealer or an experienced radio/TV technician for help. RF exposure warning This equipment must be installed and operated in accordance with provided instructions and the antenna(s) used for this transmitter must be installed to provide a separation distance of at least 20 cm from all persons and must not be co-located or operating in conjunction with any...
Need help?
Do you have a question about the Q1000z and is the answer not in the manual?
Questions and answers