
Subscribe to Our Youtube Channel
Related Manuals for Midea MC122-2


Summary of Contents for Midea MC122-2
- Page 1 水龍頭式濾水器 使用說明書 MC122-2 備註:本說明書的所有內容均已仔細檢查。如有印刷錯誤或誤解,可向本公司咨詢。 註:產品若有技術改進,將會編進新版說明書中,恕不另行通知。 產品外觀、顏色如有改動,以實物為準。...
-
Page 2: Table Of Contents
感謝選用美的產品!為確保客戶清楚安全使用方式及了解本產品的功能和特性,請於使用 本產品前詳細閱讀本使用說明書。 目錄 目錄 重要安全說明 產品規格 產品介紹 安裝方法 使用方法 清潔與維護 故障診斷 商標、版權和法律聲明... -
Page 3: 重要安全說明
預防措施 為免因不安全或不當使用本產品而造成不可預見的風險或人身傷害,請在使用本產品前細心閱讀 本使用手冊。另請在收貨時,仔細檢查包裝及產品,確保一切完好並操作無異常。若有任何損壞, 請於購買產品七天內聯絡本公司售後服務團隊或零售商/經銷商。 警告:為確保使用者人身安全,絕不允許擅自對本產品進行任何改裝,如發現用於其他用途而造成 危險,本公司有權不作維修保護。(有關保養條款細則可參閱保修卡或Midea HK官網。)... - Page 4 警告 安裝注意事項 使用濾水器前,請仔細閱讀本說明書,並妥善保管,以備日後參考。 為了避免對身體造成傷害,請使用原裝大廈自來水; ● 初次使用時,請先流放淨水60秒; ● 每天使用前,請讓淨化水至少流動10秒後再使用(排出積水); ● 當濾水器兩天以上不使用時,請在使用前讓淨水至少流動60秒(以保持出水口處的清潔); ● “已盛好的淨水”請儘快使用,因為淨水中沒有餘氯,細菌容易繁殖,請將其放入有蓋的清潔 ● 容器中,並保存在雪櫃中。 請勿觸摸“淨水”出水口,以免滋生細菌; ● 若自來水濁度較大(如水箱清洗過或自來水長期不使用等),請先讓自來水流動一段時間,再 ● 使用“淨水”,以縮短濾芯壽命; 本產品為家用濾水器,請勿用於烹飪或飲用以外的用途; ● 切勿將專用水龍頭與其他機器(如煤氣熱水器)連接,以免損壞其他機器; ● 請勿將本機安裝在火焰或高溫附近; ● 當淨水流量變少時,請更換濾芯,濾芯應定期更換; ● 調節原水、淨水按鈕時緩慢按動,以免損壞主機零件; ● 在水壓高的地方使用時,請把水量調小後再使用。 出水流量大,淨水能力有可能會受到影響, ● 並且水壓過高,會引起破損以及漏水現象。 本產品的常規水壓為0.1-0.4MPa ; 為避免損壞容器,請勿冷凍本產品; ● 使用“淨水”時,不要使用超過38度的熱水。 如果熱水不小心經過濾水器,有時水中可能會有 ● 暫時的氣味;...
- Page 5 使用注意事項 部份水龍頭(例如:噴頭抽拉式水龍頭、矩形或橢圓形出水口的水龍頭、感應式水龍頭、直徑 ● 大於15-24mm或喉口深度小於15mm的水龍頭)不適合安裝;濾水器附帶的6個轉接器和1個 萬能接頭可以輕鬆地安裝在絕大多數帶螺紋的水龍頭上; 濾芯的更換週期可能因用水量、水質、水壓等原因而有所不同; ● 請不要安裝在混合水龍頭上; 請不要將濾水器裝在有陽光直射的地方,否則可能造成變形和變色; 無法將硬水轉化為軟水,不能去除水中溶解的鹽分(海水)、金屬離子等; ● 定期清洗和更換濾芯。 ●...
-
Page 6: 產品規格
產品規格 產品型號 MC122-2 淨水流量 2公升/每分鐘 額定總淨水量 1200公升 適用水源 自來水 白色主體,玫瑰金 外觀顏色 0.1-0.4MPa 水壓... -
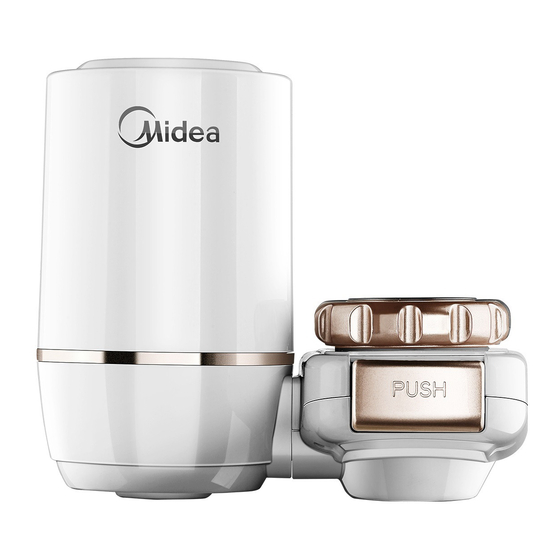
Page 7: 產品介紹
產品介紹 配件列表 安裝螺母 螺紋轉接器 濾芯筒護蓋 矽膠墊圈 不銹鋼濾網 淨水機主機 淨水原水切換顯示 濾芯底座 按鍵切換開關... - Page 8 零件列表 碳纖維濾芯 x1 萬能接頭 x1 轉接器 x6 保用証 x1 省力鑰匙 x1 使用說明書 x1 保用証 使用說明書 生料帶 x1...
-
Page 9: 安裝方法
安裝方法 在濾水器安裝之前,確保轉備好所需要的水龍頭安裝轉接器。 安裝A型轉接器,適合直徑為19.5毫米、21.5毫米或23.5毫米螺紋水龍頭。 1.從主機上拆下安裝螺母。 2.取下水龍頭起泡器,選取合適的轉接器。 3.將安裝螺母朝上,將外螺紋轉接器安裝 4.擰緊安裝螺母,固定主機。完成。 到水龍頭上。 安裝B型轉接器,適合直徑為20.5毫米、21毫米或22.5毫米螺紋水龍頭。 1.從主機上拆下安裝螺母。 2.取下水龍頭起泡器,選取合適的 轉接器。 3.將安裝螺母朝上,將內螺紋轉接器 4.擰緊安裝螺母,固定主機。完成。 安裝到水龍頭上。... - Page 10 安裝方法 安裝萬能接頭,適合直徑為15-24mm的水龍頭。 1.取下水龍頭起泡器,選取合適的 2.將安裝螺母朝上,將內螺紋轉接器 轉接器。 安裝在萬能接頭上。 3.將萬能接頭裝入水龍頭,用螺絲刀 4.擰緊安裝螺母,固定主機。完成。 扭緊緊錮圈。 安裝濾水器濾芯 1.打開濾芯筒護蓋,剝掉濾芯覆膜, 2.將濾芯筒接口與主機接口對準。 將濾芯重裝回濾芯筒 3.將濾芯筒插到主機介面中,然後將 4.完成。 濾芯向上旋轉90度固定。...
-
Page 11: 使用方法 1
使用方法 安裝好水龍頭後,打開自來水,將濾水器的按鍵開關切換到淨水檔,過濾後的淨水從淨水出水口 排出; 將濾水器按鍵開關切換至原水檔,則未經過濾的自來水從原水口排出。 淨水 原水... - Page 12 清潔與維護 濾芯更換 1. 將濾芯向後旋轉90度,取出濾芯。 2. 打開濾芯筒護蓋,取出舊濾筒,剝掉新濾芯 覆膜,將新濾芯裝回濾芯筒。 3. 將濾芯筒插入主機接口中,將濾芯向 4.完成。 上旋轉90度固定。 濾芯簡介 過濾功效 建議壽命 數量 濾芯名稱 碳纖維濾芯 6-12個月 高效過濾水中雜質、異色、異味和餘氯 1枝...
- Page 13 故障診斷 異常狀況 可能原因 排除方法 是否正確安裝在水龍頭上? 重新安裝 ● 主機頭漏水 水龍頭前端是否老化? 修理水龍頭 ● 密封圈是否老化? 更換密封圈 ● 水管端口漏水 水管端口是否連接牢固? 重新正確連接 ● 重新正確連接 濾芯軟管是否連接牢固? ● 主機主體漏水 淨水機主體上是否有積水? 用乾毛巾擦拭 ● 主機頭鎖緊軟管的螺母是否緊固? 重新正確連接 ● 主機頭漏水 主機頭密封膠墊圈是否損壞? 更換密封圈 ● 過濾網是否有污垢? 原水出水量小且 ● 請用熱水消毒過的乾淨的牙刷等 不均勻 清洗 原水出水口是否乾淨? ● 請將供水軟管復原...
- Page 14 商標、版權和法律聲明 美的集團和/或其附屬公司(下稱“美的")的 標識、字詞商標、商品名、商業包装及其 所有版本均系美的的寶貴財產,美的擁有商標、版權和其他智慧財產權,以及因使用美的商標的任何 部分而產生的所有商譽。未經美的事先書面同意,將美的商標用於商業用途可能構成商標侵權或違 反相關法律的不正當競爭。 本手冊由美的公司製作,美的公司保留其所有版權。未經美的公司事先書面同意,任何單位或個人不 得使用、複製、修改、分發本手冊的全部或部分内容,或與其他產品捆綁銷售。 列印本手冊時,手冊中所述的功能和說明均是最新的。但由於功能和設計方面的改進,實物可能會有 所不同。...
- Page 16 www.mideahk.com MideaHK 2022 all rights reserved...
- Page 17 Warning: All the contents of this Guide have been checked carefully. If there are any printing errors OR misunderstanding, please contact with Midea customer service team. It will be compiled into the new version of the guide without any notice if involve the technical improvements.
- Page 18 Thank you for choosing Midea! Please read this user manual be carefully before start use this new appliance. To ensure that you know the operate knowledge and understand more about the product features and functions in a safe way. CONTENTS...
-
Page 19: Safety Instructions
SAFETY INSTRUCTIONS Intended Use The following safety guidelines are intended to prevent unforeseen risks or damage from unsafe or incorrect operation of the appliance. Please check the packaging and appliance on arrival to make sure everything is intact to ensure safe operation. If you find any damage, please contact the retailer or dealer. - Page 20 SAFETY INSTRUCTIONS WARNING Installation precautions Before using the water purifier, please read this Manual carefully and keep it for future reference. To avoid human injury, use municipal tap water; ● During initial use, please let the purified water flow for at least 60 seconds; ●...
- Page 21 SAFETY INSTRUCTIONS Precautions in use Some faucets(e.g., sprinkler pull-our faucets, faucets with rectangular or elliptical outlets, ● sensing faucets, or faucets in diameter out of 15-24mm with a throat depth less than 15mm) are not suitable to installed;6 adapters and 1 universal connector provided with the water purifier may be easily mounted on majority of threaded faucets;...
-
Page 22: Specifications
SPECIFICATIONS Product Model MC122-2 Purified water flow 2L/min Rated total purified water 1200L Applicable water quality Municipal tap water Main body in White, Key switch in Rose Gold Appearance di erence 0.1-0.4MPa Water pressure... -
Page 23: Product Overview
PRODUCT OVERVIEW Product introduction Mounting nut Thread adapter Filter cartridge cover Silicone washer Stainless steel filter screen Watter purifier main unit Purified water and raw Filter base water switch display Key switch... - Page 24 Accessories Universal connector x1 Adapters x6 Filter cartridge x1 Warranty Card x1 Accessory kit x1 User Manual x1 User Manual Warranty Card Teflon tape x1...
-
Page 25: Product Installation
PRODUCT INSTALLATION Before installing the water purifier, make sure you have the required faucet mounting adapter. Install Type A adapter for threaded faucets in diameter of 19.5mm, 21.5mm or 23.5mm. 1. Remove the mounting nut from the main 2. Remove the faucet bubbler, and select the unit. - Page 26 PRODUCT INSTALLATION Install the universal connector for faucets in diameter of 15-24mm. 1. Remove the faucet bubbler, and select the 2. With the mounting nut facing up, attach appropriate adapter. the internal thread adapter to the universal connector. 3. Put the universal connector into the 4.
-
Page 27: Operation Instructions
OPERATION INSTRUCTIONS Instructions for use After installation of the faucet, the tap water is opened, and the water purifier key is switched to the water purification level, with the filtered purified water discharged from the water outlet; after the water purifier key is switched to the raw water level, the unfiltered tap water is discharged from the raw water outlet. -
Page 28: Cleaning And Maintenance
CLEANING AND MAINTENANCE Filter replacement 1. Rotate the filter cartridge 90 degrees 2. Open the filter cartridge cover, take out the backward to remove the filter. old filter, peel o the new filter film, and reinstall the filter into the filter cartridge. 3. -
Page 29: Troubleshooting
TROUBLESHOOTING Problem Possible reason Solution Re-install Is it properly installed on the faucet? ● Main unit head Is front end of the faucet aging? Repair the faucet leaks ● Is the seal aging? Change the seal ● Water pipe port Is the water pipe firmly connected? Reconnect correctly ●... -
Page 30: Trademarks, Copyrights And Legal Statement
Midea may constitute trademark infringement or unfair competition in violation of relevant laws. This manual is created by Midea and Midea reserves all copyrights thereof. No entity or individual may use, duplicate, modify, distribute in whole or in part this manual, or bundle or sell with other products without the prior written consent of Midea. - Page 32 www.mideahk.com MideaHK 2022 all rights reserved...
Need help?
Do you have a question about the MC122-2 and is the answer not in the manual?
Questions and answers