
Related Manuals for aidapt VP178X


Summary of Contents for aidapt VP178X
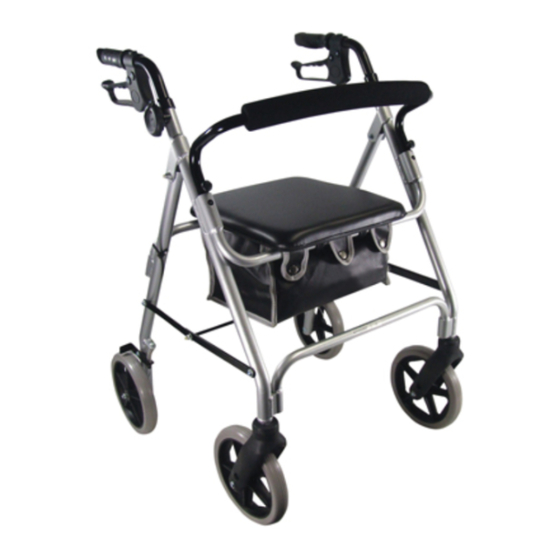
- Page 1 Lightweight Aluminum & Steel Rollator VP178X, VP178T, VP178S Usage and Maintenance Instructions...
-
Page 2: Intended Use
Aidapt Rollator. Do not use or combine bags and/ or baskets from other manufacturers. When not in use, you can simply fold the Aidapt Rollator and store away until you require it next. The Aidapt range of rollators are designed to be used both inside and outside the home. - Page 3 ASSEMBLY INSTRUCTIONS Carefully remove all packaging, including the cardboard tubes covering the knurled tube part of the brake assembly. Check the product thoroughly for damage or obvious faults. If you suspect the unit to be faulty, please do not use, but contact your supplier immediately for service.
- Page 4 CENTRAL LOCKING MECHANISM AND USE Open out and fully extend the Main Rollator Body by pulling the cross bars outwards in opposite directions forming an inverted ‘V’ with the main frame. Ensure that your Rollator is fully extended, and check that the side bars are straight and level (Fig.
- Page 5 ATTACHING THE BACK LEGS AND BRAKE ASSEMBLY 1. Attach the back legs (the back legs are straight) to the back of rollator frame. 2. When attaching the back legs, ensure that the wheels are on the outside of the frame. 3.
-
Page 6: Operating The Brakes
To stop, gently apply a gripping pressure to both brakes simultaneously (Fig. 8), this will slow down and stop your rollator. The brakes on your Aidapt Rollator have a park option (Fig. 9). To operate the park option, push downwards on both brakes simultaneously. You will feel the brake make a very slight click. -
Page 7: Brake Adjustment
Fig. 9 Fig. 8 BRAKE ADJUSTMENT fig. 10 Your Rollator brake system will NUT B require periodic adjustment. The brake adjust-ment is similar to bicycle brakes; 1. Fig. 8 shows the brake handle in its default delivered position. Should the brakes DEFAULT NUT A need adjusting they can be tightened by... - Page 8 BRAKE ADJUSTMENT (CONTINUED) 3. If the brake handles are fully adjusted and more adjustment is required refer to fig. 12. Whereby screw C is unlocked and nut D is unscrewed anti-clockwise to tighten the cable further or clockwise to loosen the cable. 4.
- Page 9 PADDED BACK To install the half round padded back first line up the ends of the tubular back with the locating points. (See Fig. 13). Attach the padded back frame to the main body of the rollator ensuring the locator pins lock into place (you will hear a click).
- Page 10 CARE AND MAINTENANCE & YOUR OBLIGATION Only use your Aidapt Rollator for the purpose for which it intended, which is as an aid to walking. It is intended your rollator is only used on standard pavements or at home.
- Page 11 TECHNICAL SPECIFICATION Usage and Maintenance Instructions...
-
Page 12: Technical Specification
TECHNICAL SPECIFICATION Overall height..........825mm - 980mm Overall width..........580mm Overall depth..........650mm - 670mm Seat height..........460mm - 510mm Seat depth...........250mm Seat width............370mm Handle height..........5 height adjustments Width outside the handgrips....430mm (inside) and 540mm (outside) Top of seat to top of arm......345mm - 455mm Seat height..........3 height adjustments Wheel size............6 inches (150mm) Net weight...........7.3kg... -
Page 13: Maintenance
(detailed below) if you have any queries concerning the assembly/use of your product. Aidapt Bathrooms Ltd, Lancots Lane, Sutton Oak, St Helens, WA9 3EX Telephone: +44 (0) 1744 745 020 • Fax: +44 (0) 1744 745 001 • Web: www.aidapt.co.uk Email: • sales@aidapt.co.uk Usage and Maintenance Instructions...
Need help?
Do you have a question about the VP178X and is the answer not in the manual?
Questions and answers