Table of Contents
Advertisement
Quick Links
Advertisement
Table of Contents

Related Manuals for Tuthill KINNEY KDH-65


Summary of Contents for Tuthill KINNEY KDH-65
- Page 1 ® KINNEY SINGLE-STAGE ROTARY PISTON VACUUM PUMPS Models: KDH-65 KDH-80 KDH-130 KDH-150 Instruction Manual 1817-1 FOR SALES AND SERVICE PLEASE CALL: PTB SALES :: 62 6.3 34. 050 0 sales@ptbsales.com service@ptbsales.com www.ptbsales.com DATE SERVICED: VIEW OUR INVENTORY Revision 2001...
- Page 2 Safety Instructions for Rotary Piston Pumps Please read the following safety information on this page before operating your Vacuum Pump. • Do not operate the pump unless the beltguard is properly attached. The power supply must be dis- connected before removing or installing the belt guard. Operating the pump without the beltguard properly secured in place exposes people in the vicinity of the pump to risk of injury from rotating drive parts.
-
Page 3: Table Of Contents
TABLE OF CONTENTS INTRODUCTION ........................3 DESCRIPTION ......................... 3 Operating Mechanism ......................3 Inlet and Outlet Valves ......................4 Sealing and Lubrication ......................4 Sealing Oils ..........................4 Operating Cycle ........................4 Gas Ballast ..........................5 INSTALLATION ........................6 Mounting the Pump ......................... 6 Connecting the Cooling Water .................... -
Page 4: Introduction
INTRODUCTION This manual applies to KDH-65, KDH-80, KDH-130, and KDH-150 pumps built from 1974 to date. Earlier models may differ. The KDH-130 was replaced by the KDH-130B (and by the KDH-131 for radiator filling appli- cations) in November 1987. Serial numbers between 871080 and on are the new “B” model. The differences between the KDH-130 and the KDH-130B are: The cylinder casting design is changed, and new water jacket plates are fitted to the KDH- •... -
Page 5: Inlet And Outlet Valves
Within each section is a piston which is driven by a cam. The cams are mounted 180° apart on a single shaft so that the centrifugal forces of the moving pistons will oppose one another. The shaft passes through the center wall separating the two pump sections and is supported in bear- ings in the heads at each end of the cylinder. -
Page 6: Gas Ballast
Throughout the operating cycle, the cylindrical part of the piston is always close to, but not touching the bore of the pump cylinder. In this small gap, an effective oil seal is built up ahead of the piston, which in addition to the film of oil between the ends of the piston and face of the heads, as well as the slide pin clearances, prevents leakage from the compression or atmospheric side to the vacuum side. -
Page 7: Installation
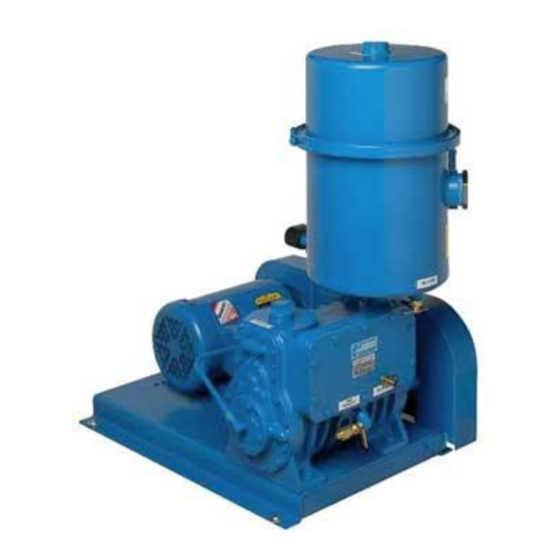
INSTALLATION Warning: Disconnect the pump from source electrical power prior to making repairs or adjust- ments to any electrical components of the unit. Mounting the Pump The pump unit should be mounted on a suitable rigid foundation and securely fastened down. Connecting the Cooling Water Caution: Do not allow the cooling water to freeze. - Page 8 Figure 2: Typical Outline of KDH Pump...
-
Page 9: Electrical Connections
Electrical Connections Connect the power supply to the motor. Refer to the Solenoid Valve Section for wiring dia- gram for the solenoid valves. Prestart Checks 1. Be sure that the suction lines are absolutely free of foreign matter and perfectly tight. Use an inlet protection screen or drop out trap on new installations or where large welded piping is employed. -
Page 10: Stopping The Pump
Stopping the Pump 1. Close the isolation valve in the suction line, if one is installed. 2. Vent the pump to atmosphere through a vent valve or the gas ballast valve. 3. Stop the pump. 4. Shut off the cooling water. Changing the Oil The pump temperature should be near normal operating temperature (140°F) to drain the oil more easily. -
Page 11: Oil Separator
It may be possible to run the pump continuously with the gas ballast valve partially open. Open the valve until the blank-off pressure is slightly below the highest pressure level at which the process can be performed. This is particularly useful in humid climates Oil Separator The oil separator acts as a baffle to prevent large oil droplets from being expelled from the pump and it also forms a reservoir for oil;... -
Page 12: Wet Coils
Wet Coils Valves are designed for use in comparatively dry locations and in temperatures up to 115°F. Weatherproof valves are available for wet locations and have threaded holes for the use of con- duit. Coil Replacement Should a coil fail for any reason or if it is desired to change to a different voltage, this is easily done without disturbing the piping. -
Page 13: Checking Process Equipment
inlet with a McLeod gauge. This should be done about 10% lower than the operating pressure needed. If the blank-off pressure is acceptable, the pump is functioning properly. The process equipment is at fault. Proceed as directed in Checking Process Equipment. If the blank-off pressure is too high, indicating that the pump is at fault, proceed as directed in Pump Test. -
Page 14: Pump Test
Pump Test To check the condition of the pump, measure the blank-off pressure as directed below using a McLeod gauge. If possible, also read the blank-off pressure with a thermistor or thermocouple gauge to check the condition of the pump oil. To read the blank-off pressure: 1. -
Page 15: Solenoid Valve
Solenoid Valve If the pump has been operating for some time and the oil in the separator is cool while the pump is hot, check the solenoid valve for proper opening. This is explained under Noise in the Sole- noid Valve section, page 11. Discharge Valves The KDH-65, KDH-80, KDH-130, and KDH-150 use 1-1/2 inch diameter discharge valves. -
Page 16: Mechanical Shaft Seal
To reassemble the flat spring type 1-1/2 inch discharge valve, proceed as follows: 1. Combine the six individual springs into three pairs, aligning the guide tabs in each pair. 2. Slide the first pair of springs on to the lift stop with the guide tab first. That is, with the guide tab retaining groove between each spring pair so that the springs are spaced equally around the valve. -
Page 17: Stalling
Stalling Difficult pump starting may result from excessively low pump temperatures which can be caused by leaving the pump cooling water flow on when the pump is stopped, or by exposing the pump to low ambient temperatures. If this occurs, warm the pump to the minimum pump starting temperature of 50°F. -
Page 18: Overhaul
OVERHAUL General Arrangements for repair service can be made with Tuthill Vacuum Systems (TVS) to either re- pair pumps on site or return them to the manufacturer or other local service centers for repair. Call TVS (800-225-3810) for service locations and for the proper procedure to return a pump back to the factory for repair. - Page 19 11. Remove slide pin from piston. 12. Remove shaft and cam. 13. Remove cam from shaft if replacing one or the other. 14. Remove valve chamber cover and gasket. 15. Remove valve hold down plates and valves. 16. If water jacket needs to be cleaned, remove side cover and bottom plate and gaskets. KDH-130B Reassembly Before reassembling pump, clean and de-burr all mating surfaces.
-
Page 20: Kdh-65 And 130
Notes : To check the solenoid valve, run pump at blank-off. Note oil level in sight glass. Open the gas ballast valve; the oil level should rise. Close the gas ballast valve and the oil level should drop back to normal operating level. If the oil level does not change, it could be a faulty solenoid valve or clogged oil lines. - Page 21 6. Insert the shaft and cam into cylinder until the CE head end of the shaft is into the CE head bearing and the cam is up against the center wall. 7. Put the slide pin onto the tang of the piston. The wider two of the long edges of the slide pin go towards the piston.
-
Page 22: Replacement Parts
REPLACEMENT PARTS Spare Parts A minimum quantity of spare parts can save costly and perhaps lengthy periods of breakdown. Recommended spare parts for each pump model are identified on parts list. Ordering Parts Each pump has a nameplate attached to the cylinder on the lower left corner facing the closed head. -
Page 23: Parts Lists & Pump Views
Parts List KDH-65, 80, 130, 150 DESCRIPTION UNIT KDH-65/80 KDH-130/150 CYLINDER 801413 E000 807101 D000 HEAD, OE & CE 803986 B000 807048 C000 PPG, HEXS 1/4 057320 00ST 057363 00ST HOUSING, BRG & SS 083987 B000 807050 C000 CAP, OUTBD BRG 083983 A000 807053 A000 CAP, CLOSED END... - Page 24 Figure 4: KDH-65, 80, 30 and 150 Assembly Drawing...
- Page 25 Parts List KDH-130B DESCRIPTION UNIT KDH-130B CYLINDER 808556 D000 HEAD, OE & CE 808554 D000 CAP, CLOSED END 808563 B000 HOUSING, SS & BRG 808557 B000 BOTTOM PLATE 808568 B000 SIDE COVER 808567 A000 COVER, VLV CHMBR 807051 B000 CAM, OE 801324 B000 CAM, CE 801325 B000...
- Page 26 Figure 5: KDH-130B Assembly Drawing...
Need help?
Do you have a question about the KINNEY KDH-65 and is the answer not in the manual?
Questions and answers