
Related Manuals for IKA HS/KS 260 control


Summary of Contents for IKA HS/KS 260 control
- Page 1 (217) 352-9330 | Click HERE Find the IKA KS 260 at our website:...
- Page 2 ® 31 066 00 c WERKE IKA HS/KS 260 basic IKA HS/KS 260 control KS 260 basic HS 260 control ETRIEBSANLEITUNG PERATING INSTRUCTIONS ’ ODE D EMPLOI ® ® HS/KS260 0506 Artisan Technology Group - Quality Instrumentation ... Guaranteed | (888) 88-SOURCE | www.artisantg.com...
-
Page 3: Garantie
CE-KONFORMITÄTSERKLÄRUNG Warranty Wir erklären in alleiniger Verantwortung, daß dieses Produkt den Bestimmungen der Richtlini-en 89/336/EG, 73/023/EG und 92/31/EG entspricht und mit den fol- You have purchased an laboratory machine which meets the hig- genden Normen und norminativen Dokumenten übereinstimmt: EN 61010-1 und EN 61326-1. hest engineering and quality standards. -
Page 4: Table Of Contents
berechtigt ist, Arbeiten in diesem Bereich durchzuführen. Inhaltsverzeichnis Das Gerät darf - auch im Reparaturfall - nur von einer Fachkraft geöffnet werden. Vor dem Öffnen ist der Netzstecker zu ziehen. Seite Spannungsführende Teile im Inneren des Gerätes können auch Garantie längere Zeit nach Ziehen des Netzsteckers noch unter Spannung Sicherheitshinweise stehen. -
Page 5: Bestimmungsgemäßer Gebrauch
Bestimmungsgemäßer Gebrauch Beim Schütteln können infolge ungünstiger Beladung und Schwerpunktlage dynamische Kräfte auftreten, die ein Wandern des Der HS/KS 260 basic und HS/KS 260 control eignet sich durch Schüttlers auf der Abstellfläche verursachen können. Einschrän- Verwendung unterschiedlicher Aufsätze zum Mischen von kungen der Belastbarkeit bzw. -
Page 6: Auspacken
Einstecken des Netzsteckers betriebsbereit. Andernfalls ist siche- Zum Lieferumfang des Gerätes gehören: Ein HS/KS 260 basic rer Betrieb nicht gewährleistet oder das Gerät kann beschädigt oder HS/KS 260 control, vier Klemmschrauben, ein Einmaul- werden. schlüssel, ein Netzkabel und eine Betriebsanleitung. -
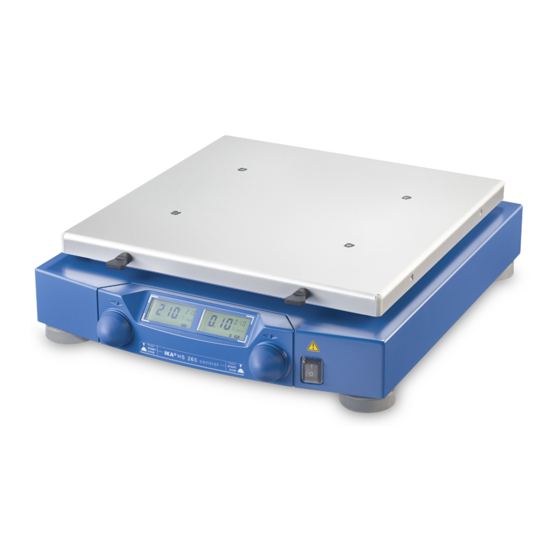
Page 7: Anzeige
Das Gerät unterbricht nach Ablauf einer einge- Betriebsart A: stellten Zeit (max. 50 min) den Schüttelvorgang Ab Werk ist der HS/KS 260 control in die Betriebsart A geschal- HS/KS260 0305 Artisan Technology Group - Quality Instrumentation ... Guaranteed | (888) 88-SOURCE | www.artisantg.com... - Page 8 2 3 0 tet. Nach dem Einschalten des Gerätes mit dem Netzschalter S A F E (Wippschalter) sind die Funktionen Schütteln und Zeitablauf aus- geschaltet. Die eingestellten Sollwerte sind gespeichert und m i n werden digital angezeigt. Sie werden beim Einschalten der jeweiligen Funktion übernommen.
- Page 9 2 3 0 Betriebsart B: 3 5 8 : S A F E Beim Einschalten des Gerätes werden die vor dem Ausschalten (Netz AUS) eingestellten Sollwerte für die Drehzahl und Zeitein- m i n stellung übernommen. Die eingestellte Drehzahlobergrenze wird bei der Wahl dieser Betriebsart aus der Betriebsart A über- nommen und kann nicht verändert werden.
- Page 10 Nach einer Netzunterbrechung läuft das Gerät in 3 5 8 : I 3 0 Betriebsart C von selbst wieder an. m i n m i n Nach der Wahl der Betriebsart und dem Einschalten des Gerätes wird der folgende Ablauf auf dem Display angezeigt. e.) Durch Drücken des linken bzw.
-
Page 11: Einstellen Der Schüttelzeit
Ausschalten des Gerätes mit dem Im rechten Display wird die aktivierte Arretierfunktion (Lock - Netzschalter. Funktion) durch das Symbol = angezeigt. Ist das Symbol = nicht im rechten Display zu sehen, ist die Arretierfunktion des b.) Rechter Drehknopf gedrückt halten Schütteltisches ausgeschaltet. -
Page 12: Einstellen Der Drehzahl
Gerät zuerst in den Off-Betriebszustand (Stillstand) und dann Einstellen der Drehzahl wieder in den Zeitbetrieb. Das Gleiche gilt in umgekehrter Reihenfolge, wenn der rechte Drehknopf über einen längeren Basic - Variante Zeitraum auf Linksanschlag gedreht wird. Die Drehzahl (HS max. 300 1/min und KS max. 500 1/min) kann Nach einem Stromausfall wird die eingestellte Zeit (Zeitbetrieb durch drehen des linken Drehknopfes eingestellt werden. -
Page 13: Aufsätze
Schüttelvorganges verhindern. Abmessung BxHxT in mm Die von IKA empfohlenen Aufsätze müssen auf dem Schüttel- 410 x 33 x 370 tisch gut befestigt werden um ein sicheres Arbeiten zu gewähr- leisten. Außerdem dürfen die in den Diagrammen dargestellten ACHTUNG! Der Schalenaufsatz wird über vier seitliche Klemm-... -
Page 14: Fehlermeldungen (Error Codes)
eine Anlage eingebaut), ist im Betrieb darauf zu achten, dass Warnsignal erzeugt und die rote Off-Signalleuchte im Anzeige- infolge ungünstiger Beladung und Schwerpunktlage, dynami- feld leuchtet auf. Versuchen Sie bitte zuerst durch Abschalten sche Kräfte auftreten. Diese können zum einen die Umgebung in und anschließendes Einschalten des Gerätes den Betrieb fortzu- Schwingung versetzen oder den Tisch zu unkontrollierbaren setzen. -
Page 15: Schnittstelle Und Ausgänge
ACHTUNG! Tritt eine Fehlermeldung auf, wird ein akustisches Warnsignal erzeugt und auf dem Display angezeigt. Versuchen Das Gerät HS/KS 260 control ist auf der Geräterückseite mit einem 15-poli- Sie bitte zuerst durch abschalten und anschließendes einschal- gen SUB-D-Buchsenstecker ausgerüstet. Die Pins sind in Betrieb mit ana- ten des Gerätes den Betrieb fortzusetzen. - Page 16 Signalübertragung an Labor-MSR Einzelgeräten (Rev. 1.1). • Übertragungsart: Voll Duplex Übersicht der NAMUR-Befehle • Zeichenformat: Zeichenerstellung gemäß Datenformat in DIN (Nur Version HS/KS 260 control) 66022 für Start-Stop Betrieb. 1Startbit; 7Zeichen- Verwendete Abkürzungen: bits; 1Paritätsbit (grade= Even); 1Stopbit. X,y = Numerierungsparameter (Integerzahl) •...
- Page 17 -2: Er2 / WD nen (nach vorherigem -3: Er3 RMP_PAUSE_X). -4: Er4 RMP_RESET_X Fortsetzung der Rampenfunktio- -9: Er9 nen und Löschen aller vorgege- -41: Er41 benen Rampensegmente -42: Er42 RMP_LOOP_SET_X Arbeiten der Rampe in einer -83: Falsche Parität Schleife -84: Unbekannter Fehler RMP_LOOP_RESET_X X=4 Beenden der Rampen Schleife -85: Falsche Befehls-...
-
Page 18: Verbindungsmöglichkeiten Laborgerät - Pc
Wartung und Reinigung auf einen 9-poligen Sub-D-Buchsenstecker (RS 232 C). PC 1.5 Kabel Der Schüttler HS/KS 260 basic und HS/KS 260 control arbeitet Das Kabel PC 1.5 wird zur Verbindung der 15-poligen Buchse wartungsfrei. Er unterliegt lediglich der natürlichen Alterung der zum PC (25-poliger Stecker) benötigt. -
Page 19: Zubehör
Drehzahleinstellung: Analog (stufenlos) AS 260.5 Scheidetrichteraufsatz Drehknopf Frontseite links Drehzahlanzeige: 10fach LED-Zeile mit Ska- (nur HS/KS 260 control) PC 5.1 Adapter IKA - Control PC 1.2 Adapter la in 30 1/min Stufen (HS) und 50 1/min (KS) Stufen PC 1.5 Kabel AK 2.1... - Page 20 appliance. The machine may only be opened by trained specialists Contens - even during repairs. The machine is to be unplugged from the mains before opening. Live parts inside the machine may still be Page live for some time after unplugging from the mains. Guarantee NOTE ! Covering or parts that are capable of being...
-
Page 21: Proper Use
The delivery scope covers: The safety of the user cannot be guaranteed if the appliance is A HS/KS 260 basic or HS/KS 260 control, for attachment screws, operated with accessories that are not supplied or recommended a single-head spanner, a connection cable and operating instruc- by the manufacturer or if the appliance is operated improperly, tions. -
Page 22: Useful Facts
thed (protective earth conductor contact). If these conditions are Useful facts met, the device is ready to operate after plugging in the mains plug. If these procedures are not followed, safe operation cannot With the purchase of this device, you have acquired a high-qua- be guaranteed and/or the equipment may be damaged. -
Page 23: Display
Operation mode A: turned off (Off-LED lights up). The HS/KS 260 control is switched into operating mode A when it leaves the factory. After the device is turned on with the power switch (flip switch), the agitation and time expiration functions are turned off. - Page 24 power has been turned off and back on, both functions must be d.) If the upper speed limit is fixed, the unit 1/min in the left dis- started again. The upper speed limit can only be set or changed play changes to OK. The new time target value that is set or sto- in operating mode A.
- Page 25 rating mode A when this operating mode is selected and cannot d.) The new speed target value has been set or just stored in the be modified. left display (for example 130) is the shown in the unit 1/min and When you turn on the device with the power switch, a B is flashing SV .
- Page 26 a.) All display elements in the digital displays are activated for tator in operation. the speed and time values are then shown in about 2 seconds. large format on the display. In addition, the text PV is shown on the display instead of SV . The actual value of the time setting must be understood from this point onward as the time remaining for the agitation pro- cess.
-
Page 27: Setting The Agitation Time
ATTENTION! After a power failure, the audio signal indicating that time unlocked (freely movable) agitation table will con- has expired by pressing the right tinue to perform a circular motion until the lock turn button. function can fasten the agitation table in place. Note: If the time expiration signal has been activated, expiration of the set time is indicated by a sequence of signals (3 times 5 short tons at intervals of about 10 seconds). -
Page 28: Setting The Speed
Control model be required for continuous operation or for several agitation pro- cesses in timed mode. 9 5 9 . 3 4 5 9 5 9 : The amount 3 4 5 of time requi- NOTE: After the power has failed, the set time is erased and the m i n m i n red for the agi-... -
Page 29: Attachments
Attachments in mm 410 x 33 x 370 Attachments recommended by IKA must be connected to the ATTENTION! The dish attachment is secured in place by four agitation table to ensure safe and secure operation. in addition , lateral clamping screws on the agitation table. -
Page 30: Error Codes
place evenly on the agitation table, and that all vessels are secu- tracking down the error and makes it possible to form a prelimi- rely fastened in place. nary opinion. AS 260.1 Universal attachment Error code Error Cause of the error Off - LED (red) The potentiometer for -Too rapid a change in the... -
Page 31: Interface And Outputs
8x flash / 2 sec pause (HS/KS 260 control version only) The HS/KS 260 control is equipped with a 15-pin SUB-D connector on the Control error codes: rear side of the device. The pins are assigned in operatin with analog and ATTENTION! If an error code is encountered, an audio warning serial signals. - Page 32 • RTS: (Pin 7) LOW (positive tension) NAMUR Instructions Function Display / PC may send additional • RTS: (Pin 7) HIGH (negative tension) IN_PV_X Reading the real-value / PC may not send OUT_SP_Xn Setting the actual value to n • CTS: (Pin 8) LOW (positive tension) up to a maximum of the set / PC recipient...
- Page 33 To work off the ramps in one instrument and PC loop RMP_LOOP_RESET_X X=4 Ending of ramp loop IN_TYPE Requiring identification of (HS/KS 260 control version only) laboratory instrument IN_NAME Requiring the designation name PC 5.1 Adapter IKA - Control OUT_NAME Output of designation name The Adaptor PC 5.1 splits the analog and serial signals.
-
Page 34: Motor Protection / Safety Device
For materials which are not listed, please request information Motor protection / safety device from IKA. Wear the proper protective gloves during cleaning of the devices. Electrical devices may not be placed in the cleansing agent for If the motor is locked or if a load is placed on it resulting in a the purpose of cleaning. -
Page 35: Accessories
360 x 97 x 420 AS 260.3 Dish attachment Weight: 8,1 (basic) AS 260.5 Separating funnel attachment 8,8 (control) (HS/KS 260 control version only) HS/KS 260 basic PC 5.1 Adapter IKA - Control Speed setting: Analog (infinitely variable) PC 1.5 Cable Rotary knob on front side left PC 2.1... -
Page 36: Conseils De Sécurité
Caractéristiques techniques et de coupure, voir image 1 : Liste de pièces de rechange HS/KS 260 basic/control 53 emplacements dangereux). Pièces de rechange HS/KS 260 control/basic 54/55 Attention auxparties du corps, cheveux ou vêtements qui ris- quent d’être happés par les Conseils de sécurité... -
Page 37: Utilisation Conforme
être bien fixés. conforme, contre les prescriptions du fabricant. Les récipients mal fixés peuvent être endommagés ou projetés et Lors de l’entretien, le câblage choisi par IKA doit être refait à l’in- blesser les personnes présentes. La fixation des récipients à dentique! secouer et celle des supports doivent se faire à... -
Page 38: Déballage
Mise en service fer ou transporteur). Le HS/KS 260 basic ou le HS/KS 260 control est livré avec qua- tre vis de serrage, une clef à serrage, un câble de connexion et Vérifiez si la tension indiquée sur la plaque signalétique corre- son mode d'emploi. -
Page 39: Mise En Marche
écrans d’affichage, puis la diode allumée) après actionnement du commutateur principal. rouge, située sur la ligne DEL TIME, indique le fonctionnement Description de affichage HS/KS 260 control OFF de l’appareil (signal acoustique). Dans le cas de la version „control“, tous les éléments d’afficha- Valeur réelle... - Page 40 Mode de fonctionnement A: SAFE, l’unité 1/mn et SV clignotant pendant environ 2 secon- Le HS/KS 260 control est préréglé en usine sur le mode de fon- des. Tant que l’affichage SV clignote, il est possible de modifier ctionnement A. Après la mise en marche de l’appareil au moyen la limite supérieure de la vitesse en enfonçant et en tournant...
- Page 41 I 3 0 3 5 6 . 3 5 8 : de vitesse réglée (ou mémorisée) du mode de fonctionnement I 3 0 A avec SAFE et OK pendant environ 2 secondes. La limite supérieure de vitesse affichée ne peut pas être modifiée. Sur le m i n m i n display de droite apparaît la durée de consigne nouvellement...
- Page 42 2 3 0 3 5 8 : Mode de fonctionnement C: S A F E Lors de la séleection de ce mode de fonctionnement, la limite supérieure de vitesse réglée est reprise du mode de fonctionne- m i n ment A et ne peut pas être modifiée. les valeurs de consigne pour la vitesse et la minuterie, réglées sous le mode de fonc- d.) Ensuite, la vitesse de consigne mémorisée (p.ex.
- Page 43 modes de fonctionnement A, B et C. En effet, il est unique- Le verrouillage (fonction Lock) de la table vibrante peut être ment possible de commuter enrecommençant une des activé/désactivé en fonction du réglage du signal acoustique deux actions précédentes. A - Action a.) + b.) >B - Action de la minuterie.
-
Page 44: Réglage De La Durée De L'agitation
9 5 9 : et affichée sur 3 4 5 Réglage de la durée de l’agitation le display de m i n m i n droite. Si la du- Version „Basic“ rée de consgine Affichage après une interruption de curant La durée requise pour l’agitation est réglée au moyen du bouton (max. -
Page 45: Supports
ATTENTION! Le support à cuvette est fixé à la table d’agitati- on au moyen de quatre vis de serrage latérales. Les supports conseillés par IKA doivent être bien fixés sur la AS 260.5 Support pour ampoules à décantrer table d’agitation, afin d’assurer un fonctionnement sûr. En outre, Pour l’agitation intensive de ampoules à... -
Page 46: Poids De Charge (Charge Utile)
de la table. Si l’appareil présente une marche irrégulière, réduisez Poids de charge (charge utile) toujours la vitesse de rotation jusqu’à ce que la marche rede- vienne régulière. L’agitateur-remueur ne doit être utilisé que dans les limites de Si vous placez un seul récipient sur la table, mettez-le au milieu ; la plage de poids utile et de vitesse (voir diagramme-zone si vous en utilisez plusieurs, répartissez-les sur de façon homo- hachurée), afin d’assurer un foncionnement sûr. -
Page 47: Interface Et Sorties
Essayez d’arbord de continuer l’utilisation en éteignant puis en rallumant l’appareil. Si une panne ne devait L’appareil HS/KS 260 control est équipé à l’arrière d’une prise SUB-D à 15 pas trouver de solution même après une pause prolongée, veuil- pôles. - Page 48 (Rev. 1.1). • Format de signaux: Ecriture des caractères conformément au format Aperçu des instructions NAMUR ((Uniquement version HS/KS 260 control) de données sous DIN 66022 pour mode start- Abréviations employées: stop.
- Page 49 RESET Désactivation de la fonction de RMP_START_X Activation de la fonction rampe à l’appareil computer du segment rampe n°1. STATUS Edition de l’état (Possible uniquement après 1*: Mode de fonctionnement A START_X. antérieure. N’est pas 2*: Mode de fonctionnement B nécesaire après 3*: Mode de fonctionnement C RMP_STOP_X et START_X.
-
Page 50: Communication Entre L'appareil De Laboratoire Et Pc
Off et, dans le cas de la version Control, par un message de panne sur le display de (Uniquement version HS/KS 260 control) l’affichage de la vitesse (voir chapitre „Messages de panne“). PC 5.1 Adapteur Commande IKA Le adateur sépare les signaux analogiques des signaux numéri-... -
Page 51: Accessoires
Ne nettoyer les appareils IKA qu'avec les produits de Plage de vitesse de rot.: KS 1/mn 0 - 500 nettoyage autorisés par IKA.Nettoyage de : Durée de mise en circuit adm.: substances colorantes avec isopropanol Température environ adm.: °C... -
Page 52: Ersatzteilliste Hs/Ks 260 Basic / Control
Variation de la durée: ±1 Sechskantmutter Klemmschraube Halterung Kantenschutz HS/KS 260 control Gabellichtschranke BLP - Entstörung Réglage de la vitesse de rotation: digital Plastite-Schraube Hinweisschild Bouton plaque frontale à gauche (1 pas = 10 1/mn) Leiste Rundkabelschelle Sicherungsring Warnschild Affichage de la vitesse: DEL - Display Gehäuse... - Page 53 List of spare parts HS / KS 260 basic List of spare parts HS / KS 260 control Item.Designation Item. Designation Item.Designation Item. Designation Base Fuse Base Apparatus plug Rubber base PCB - motor Rubber base Fuse Motor Connecting terminal P3 Motor PCB - power Eccentric...
-
Page 54: Liste De Pièces De Rechange Hs/Ks 260 Basic/Control
Liste de pièces de rechange Liste de pièces de rechange HS / KS 260 basic HS / KS 260 control Pos. Désignation Pos.Désignation Pos. Désignation Pos. Désignation Fond 37 Fusible Fond Fiche Pied en caoutchouc 38 Circuit imprimé moteur Pied en caoutchouc Fusible Moteur 39 Borne de connexion P3... -
Page 55: Ersatzteilbild Hs/Ks 260 Basic / Control
Ersatzteilbild / spare parts diagram / Pièces de rechange IKA HS/KS 260 basic 13 32 6 9 12 14 17 15 16 A - A B - B D - D 36 37 C - C GNYE Boden /ground GNYE... - Page 56 Ersatzteilbild / spare parts diagram / Pièces de rechange IKA HS/KS 260 control 9 12 14 17 15 16 A - A B - B D - D 36 - 37 C - C 72 - 74 GNYK GNYK GNYK...
- Page 57 47810 Petaling Jaya Tel.: +49 7633 831-0 Selangor, Malaysia Tel.: 800 733-3037 Fax: +49 7633 831-98 Tel.: +60 3 7804-3322 Tel.: +1 910 452-7059 E-mail: sales@ika.de Fax: +60 3 7804-8940 Fax: +1 910 452-7693 www.ika.net E-mail: sales@ika.com.my E-mail: usa@ika.net www.ika.net www.ika.net...
Need help?
Do you have a question about the HS/KS 260 control and is the answer not in the manual?
Questions and answers