
Related Manuals for Breville All In One


Summary of Contents for Breville All In One
- Page 1 All In One ™ Instruction Book - BSB530XL BSB530XL_IB_C16.indd 1 7/11/2016 1:45 PM...
-
Page 2: Table Of Contents
RECOMMENDS the edge of a counter-top SAFETY FIRST or table during operation. Ensure the surface is level, At Breville we are very safety clean and free of water, conscious. We design and flour, etc. manufacture consumer products with the safety of you, •... - Page 3 • If using the immersion • Ensure the immersion blender to blend hot food blender is turned off and in a saucepan over heat, the cord is unplugged remove the saucepan from the power outlet from the heat source and before attempting ensure the power cord and to attach any of the...
- Page 4 • Never mix dry, thick or • Always assemble heavy mixtures for more processing bowl than 30 seconds. Stop lid and insure it is locked the operation and stir into place before use. the ingredients before • If food becomes lodged continuing.
- Page 5 • Do not leave the • Do not place hands or immersion blender fingers in the processing unattended when in use. bowl of the food processor unless the • To protect against electric motor, processing blades shock do not immerse the or disc have come to a motor body, cord or power complete stop.
- Page 6 • This appliance has a becomes damaged in polarized plug (one blade any way. Call Breville is wider than the other). Consumer Support for To reduce the risk of examination, adjustment electric shock, this plug and/or repair.
- Page 7 • This appliance is for SHORT CORD household use only. Do INSTRUCTIONS not use this appliance Your Breville appliance for anything other than is fitted with a short its intended use. Do not power supply cord to use in moving vehicles reduce personal injury or or boats.
-
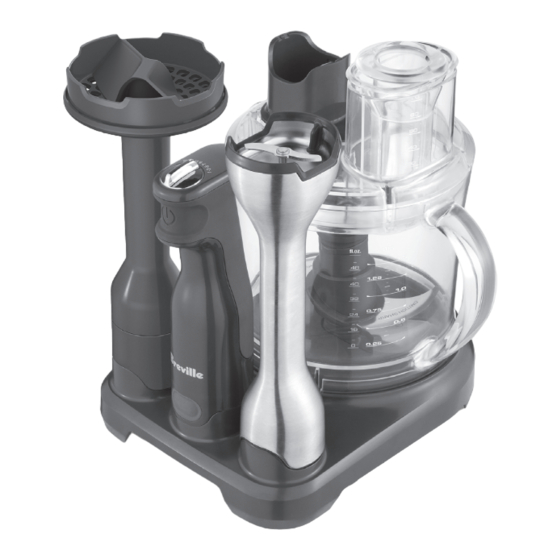
Page 8: Components
Components A. Speed Control Dial J. Variable Mashing Leg B. Easy Grip Trigger Switch K. Micro-serrated S Blade™ C. Motor Body L. Adjustable Slicing Disc D. Processing Gear Box M. Reversible Shredding Disc E. Processing Bowl Lid N. Storage Base F. -
Page 9: Functions
TO ATTACH THE BLENDING LEG Functions Hold the blending leg with the blades down, and align the top end of the blending leg with the corresponding end of the motor body and push until the blending leg clicks and locks BEFORE FIRST USE onto the motor body. - Page 10 6. Turn the motor off by releasing the trigger • Warm all liquids to be added to soups and switch. purées, this will ensure even blending. 7. Ensure the motor has completely stopped • Do not operate the appliance continuously before lifting the blender out of the jug.
- Page 11 2. To attach the motor click it into place on 2. Holding the reversible shredding disc, the gearbox. notice that there is a side for coarse shredding and a side for fine shredding. Place the side you require up. Align the hole in the center of the disc with the spindle and ensure that it is pushed down firmly.
- Page 12 2. The adjustable slicing disc has 19 precise When using the S Blade™ settings. To adjust the settings hold the 1. Using care, hold the S Blade™ in one hand, adjustable slicing disc by the edge (on the with the other hand, place the spindle opposite side of the cutting blade) with one through the center of the S Blade™...
- Page 13 TO USE THE FOOD PROCESSOR Once the blade or disc has been selected for the food processor and you have assembled as 1. Insert the plug into a 110/120V outlet. listed in the previous instructions, you can now 2. Select a speed between 1–15 on the speed process food.
- Page 14 TO DETACH THE GEARBOX 5. When processing has finished turn the motor off by releasing the trigger switch FROM THE LID and remove the power plug. Lift the gear box up from the processing 6. Detach the motor from the gear box and bowl lid.
- Page 15 BEFORE FIRST USE 3. Holding gearbox twist outer leg to lock. Remove any packaging material and promotional labels. Wash blade and two parts of the mashing leg before use. CAUTION Never immerse the motor body or gearbox in water or any other liquid. ASSEMBLY OF THE MASHING LEG 1.
- Page 16 TO USE THE VARIABLE RECOMMENDATIONS WHEN USING MASHING LEG WITH THE VARIABLE MASHING LEG For food preparation tips and recipes refer • Release the trigger switch and ensure the to the recipes section. Ensure the variable mashing leg has completely stopped turning mashing leg is completely and properly before removing the mashing leg from the assembled.
- Page 17 TO USE THE WHISK RECOMMENDATIONS WHEN USING THE WHISK ATTACHMENT For food preparation tips and recipes refer to the recipes section. Ensure the whisk is • Do not allow the whisk to touch the bottom or completely and properly assembled. sides of mixing bowl while the appliance is in operation, as this may damage the whisk.
-
Page 18: Care & Cleaning
The food processing bowl, bowl lid, S Blade™ and processing discs should be Care & Cleaning hand washed in hot soapy water, rinsed and dried thoroughly after each use. Alternatively, the food processing bowl, bowl lid, S Blade™, MOTOR BODY adjustable slicing disc and reversible shredder can also be washed in the dishwasher (TOP To remove any food residue wipe the motor... - Page 19 TO DISASSEMBLE THE CAUTION VARIABLE MASHING LEG Do not use abrasive cleaners or steel wool. 1. Ensure the motor is unplugged and attached to the mashing leg. Remove the mashing blade that is found under the base NOTE of the leg by turning it clockwise. Mashing leg gear box is not dishwasher safe.
-
Page 20: Troubleshooting
Troubleshooting PROBLEM SOLUTION • Blades don’t turn when May be too much food in bowl; reduce quantity. • processing. Pieces of food, such as meat are too large, reduce size. • Unable to lock lid into place. Spindle may be out of position. Remove lid, straighten spindle as vertical as possible and reposition lid. -
Page 21: Food Preparation Guide
Food Preparation Guide FOOD TYPE ATTACHMENT DISK TYPE SPEED BLADE RECOMMENDED TYPE SETTING THICKNESS QUANTITY Carrot Food Processor Shredder fine 9–13 1–2 carrots at a time, depending on size Food Processor Shredder coarse 9–13 1–2 carrots at a time, depending on size Food Processor Adjustable slicer 9–13... - Page 22 FOOD TYPE ATTACHMENT DISK TYPE SPEED BLADE RECOMMENDED TYPE SETTING THICKNESS QUANTITY Milkshakes, Blending Leg 11–15 Use chilled milk. Blend for 30 seconds at a time smoothies, fruit frappes, cocktails Soups, Blending Leg 11–15 Blend until smooth, checking desired baby food consistency every 30 seconds Blending Leg–...
- Page 23 All In One ™ Manuel d'instructions - BSB530XL BSB530XL_IB_C16.indd 23 7/11/2016 1:45 PM...
- Page 24 IMPORTANTES Table des MESURES DE matières SÉCURITÉ 24 Breville vous recommande la sécurité avant tout LISEZ TOUTES LES 31 Composants INSTRUCTIONS AVANT 32 Fonctions USAGE ET CONSERVEZ- 41 Entretien & nettoyage LES À TITRE DE 44 Guide de dépannage RÉFÉRENCE.
- Page 25 • Lorsque vous mixez • Soyez prudent lorsque des liquides avec le vous manipulez le mélangeur à immersion, mélangeur à immersion, et spécialement des les accessoires ou les liquides chauds, utilisez lames, ou lorsque vous un contenant profond retirez les aliments du ou mélangez de petites bol ou nettoyez l’appareil.
- Page 26 • Ne tentez pas d’utiliser le • Durant l'opération, gardez mélangeur à immersion les mains et les ustensiles d’autres façons que celles hors du récipient pour décrites dans ce livret. éviter de vous blesser ou d'endommager l'appareil. • Ne mélangez pas de Une spatule peut être liquides chauds ou utilisée, mais seulement...
- Page 27 • Ne soulevez pas le • Gardez l’appareil propre. mélangeur à immersion Respectez les consignes hors des ingrédients de nettoyage fournies durant l’opération. dans ce livret. Assurez-vous que • N’utilisez pas le l’appareil est éteint et mélangeur à immersion immobilisé avant de ce avec les mains mouillées.
- Page 28 IMPORTANTES • Le BSB530XL comprend plusieurs accessoires. MESURES DE Le courant nominal de SÉCURITÉ POUR cet appareil est basé TOUT APPAREIL sur l'utilisation du pied-mélangeur et des ÉLECTRIQUE accessoires du robot culinaire pour traiter • Déroulez complètement le de lourdes charges. Les cordon avant l'usage.
- Page 29 à l'extérieur. d'alimentation, la fiche ou l'appareil lui-même sont endommagés de quelque façon. Appelez le Service aux consommateurs de Breville pour le faire vérifier, ajuster et/ou réparer. BSB530XL_IB_C16.indd 29 7/11/2016 1:45 PM...
- Page 30 FICHE ASSIST INSTRUCTIONS SUR LE ® BREVILLE COURT CORDON Votre appareil Breville est Votre appareil Breville est muni d'une fiche exclusive muni d'un court cordon Assist conçue spéciale- d'alimentation qui réduit ® ment avec un anneau pour le risque de blessures ou laisser passer un doigt et dommages pouvant résult-...
- Page 31 Composants A. Cadran de contrôle de vitesse J. Pied presse-purée variable B. Interrupteur à gâchette à prise facile K. Lame en SMC microdentelée C. Corps du moteur L. Disque éminceur ajustable D. Boîte d'engrenage M. Râpe réversible E. Couvercle du bol mélangeur N.
- Page 32 POUR ASSEMBLER LE PIED- MÉLANGEUR Fonctions Tenez le pied-mélangeur avec les lames orientées vers le bas et alignez la partie supérieure avec l'extrémité du corps du AVANT LA PREMIÈRE UTILISATION moteur. Appliquez une pression jusqu'à ce les Enlevez tout matériel d'emballage et étiquettes deux pièces s'enclenchent et se verrouillent promotionnelles.
- Page 33 RECOMMANDATIONS POUR 4. Plongez le pied-mélangeur au fond du pichet et appuyez sur l'interrupteur pour UTILISER COMME MÉLANGEUR À mettre le mélangeur à immersion en IMMERSION marche. Vous devrez tenir l'interrupteur • Le mélangeur à immersion traite rapidement enfoncé tout au long de l'opération. les aliments et les liquides.
- Page 34 UTILISATION DU BOL MÉLANGEUR Pour assembler le bol mélangeur, les accessoires et le couvercle Assembler la boîte d'engrenage au bol 1. Retirez le bol mélangeur du socle de mélangeur rangement et placez-le sur un comptoir ou un plan de travail en vous assurant que la 1.
- Page 35 3. Installez le couvercle du bol mélangeur 3. Fixez le disque éminceur ajustable en vous assurant qu'il est bien aligné et sur la tige de rotation, en l'enfonçant verrouillé en place. correctement. 4. Mettez le couvercle du bol mélangeur en Utilisation du disque éminceur ajustable place, en vous assurant qu'il est bien aligné...
- Page 36 POUR UTILISER LE ROBOT 2. Placez la lame en S et la tige de rotation dans le centre du bol mélangeur. CULINAIRE 3. Alignez et verrouillez le couvercle du bol 1. Branchez l'appareil dans une prise murale mélangeur. de 110/120V. 2.
- Page 37 6. Détachez le corps du moteur de la boîte d'engrenage et retirez le couvercle du bol (en suivant les instructions). Retirez délicatement le disque ou la lame en S à l'aide d'une spatule, raclez l'excédent de nourriture laissé sur le disque ou les lames, puis retirez les aliments traités du bol.
- Page 38 AVANT LA PREMIÈRE UTILISATION 3. Tout en maintenant la boîte d'engrenage, faites tourner le bras externe pour le Retirez tout matériel d'emballage et étiquettes verrouiller. promotionnelles. Lavez la lame et les deux pièces du pied presse-purée avant l'usage. ATTENTION Ne pas immerger le corps du moteur ou la boîte d'engrenage dans l'eau ou tout autre liquide.
- Page 39 POUR UTILISER LE PIED RECOMANDATIONS POUR UTILISER PRESSE-PURÉE VARIABLE LE PIED PRESSE-PURÉE VARIABLE Pour des trucs de préparation des aliments et • Relâchez l'interrupteur et assurez-vous que des recettes, consultez la section des recettes le pied presse-purée est complètement à la fin de ce livret. Assurez-vous que le pied immobilisé...
- Page 40 POUR UTILISER LE FOUET RECOMANDATIONS POUR UTILISER LE FOUET Pour des trucs de préparation des aliments et des recettes, consultez la section des recettes à • Ne laissez pas le fouet toucher le fond ou les la fin de ce livret. Assurez-vous que le fouet est parois du récipient durant l'opération, car cela correctement assemblé.
- Page 41 Entretien & NOTE nettoyage Le couvercle du bol mélangeur va au lave- vaisselle. Vous n'avez qu'à retirer la boîte d'engrenage amovible du couvercle avant de le CORPS DU MOTEUR mettre dans le lave-vaisselle. Pour nettoyer les résidus alimentaires Le bol mélangeur et son couvercle, la lame laissés sur le corps du moteur ou le cordon en S , le disque éminceur ajustable et la...
- Page 42 PIED PRESSE-PURÉE VARIABLE 3. Soulevez le bras externe pour le séparer du bras interne. Débranchez l'appareil avant de netttoyer le pied presse-purée. Retirez le corps du moteur et la boîte d'engrenage du pied presse-purée. Le pied peut être lavé à la main dans l'eau chaude savonneuse, rincé...
- Page 43 FOUET Débranchez l'appareil avant de nettoyer le fouet. Détachez d'abord le corps du moteur du fouet, puis la boîte d'engrenage. Le fouet peut être lavé à la main dans de l'eau chaude savonneuse, rincé et séché correctement après chaque usage. Vous pouvez également le mettre dans le lave-vaisselle (SUR LE PLATEAU SUPÉRIEUR SEULEMENT).
- Page 44 Guide de dépannage PROBLÈME SOLUTION • Les lames ne tournent pas La quantité d'aliments dans le bol est peut-être excessive; réduisez-la. • durant l'opération Les aliments comme la viande sont peut-être coupés trop gros; réduisez leur taille. • Incapable de verrouiller le La tige de rotation est peut-être décentrée.
- Page 45 Tableau de préparation des aliments TYPE TYPE TYPE DE RÉGLAGE ÉPAISSEUR QUANTITÉ D'ALIMENT D'ACCESSOIRE DISQUE DE LA LAME RECOMMANDÉE VITESSE Carotte Robot culinaire Râpe - côté fin 9–13 1–2 à la fois, selon la grosseur Robot culinaire Râpe - côté grossier 9–13 1–2 à...
- Page 46 TYPE TYPE TYPE DE RÉGLAGE ÉPAISSEUR QUANTITÉ D'ALIMENT D'ACCESSOIRE DISQUE DE LA LAME RECOMMANDÉE VITESSE Cheddar Robot culinaire Râpe - côté fin Très froid Robot culinaire Râpe - côté grossier Très froid Mozzarella Robot culinaire Râpe - côté grossier Au congélateur 20 min avant de râper Parmesan Robot culinaire...
- Page 47 BSB530XL_IB_C16.indd 47 7/11/2016 1:45 PM...
- Page 48 Web: www.breville.ca/support Breville is a registered trademark of Breville Pty. Ltd. A.B.N. 98 000 092 928. Copyright Breville Pty. Ltd. 2016. Due to continued product improvement, the products illustrated/photographed in this booklet may vary slightly from the actual product.
Need help?
Do you have a question about the All In One and is the answer not in the manual?
Questions and answers