Advertisement
Quick Links
Advertisement

Subscribe to Our Youtube Channel
Related Manuals for Logik LS474W


Summary of Contents for Logik LS474W
- Page 1 LS474W/LS474WN...
- Page 2 ....1 This manual contains sections of Safety Instructions,Operating Instructions, Installation Instructions and Troubleshooting Tips etc. Carefully reading it before using the dishwasher will help you to use and maintain the dishwasher properly.
- Page 3 Under certain conditions, Hydrogen gas may be produced in a hot-water system that has not been used for two weeks or more. HYDROGEN GAS IS EXPLOSIVE. If the hot-water system has not been used for such a period, before using the dishwasher turn on all hot-water faucets and let the water flow from each for several minutes.
- Page 4 To get the best performance from your dishwasher,read all operating instructions before using it for the first time. Del ay Aut o S tron g N orm al Rinse Glass Ra pid Delayed Start Button: Press this button to set the ON/OFF Button: To turn on/off the power supply.
- Page 5 Pre-wash 40 ( ℃) For all soiled loads, such as Autowash 50-60 ( ℃) pots,pans,casserole dishes Rinse 4/20g and dishes that have been 0.8~1.2 9~12 Rinse 70 ( ℃) sitting with dried food on them Drying. for a while. Pre-wash(50 ℃...
- Page 6 NOTE: After you open the door during washing, the unit will pause for a few seconds before its restarting. This is normal. There are two ways to reduce the water hardness: one way is using water softener, the other is using detergent.
- Page 7 The dispenser must be refilled before the start of each wash cycle following the instructions provided i n the" Wash Cycle Table". Your dishwashers use less detergent and rinse aid than conventional dishwashers. Generally, only one tablespoon of detergent is needed for a normal wash load. Also, more heavily soiled items need more detergent. Always add the detergent just before starting dishwasher, otherwise it could get damp and will not dissolve properly.
- Page 8 If there is no rinse aid warning light in the control panel, you can judge the amount of rinse aid by the following means. The black dot on the rinse aid dispenser indicates the amount of rinse aid in the dispenser. As the rinse aid diminishes, the size of the black dot decreases.
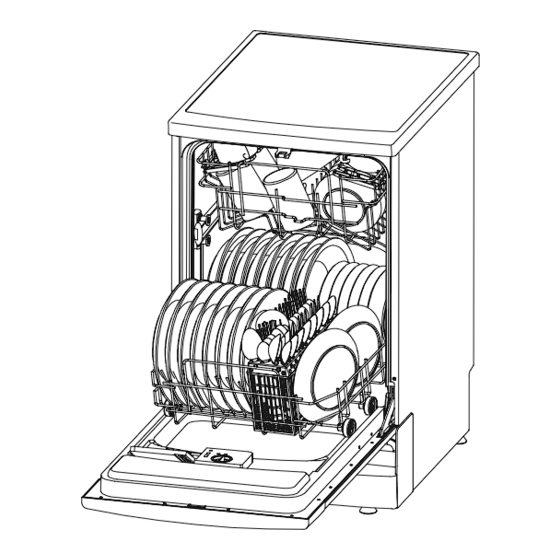
- Page 9 If required, the height of the upper rack can be adjusted in order to creat more space for large utensils either in the upper rack or lower rack. The upper rack can be adjusted for height by putting wheels of different height into the rails. Lengthy items, serving cutlery, salad servers or knives should be placed on the shelf so that they do not obstruct the rotation of the spray arms.
- Page 10 Silverware should be placed in the silverware basket with handles at the bottom: If the rack has side baskets, the spoon should be loaded individually into the appropriate slots, especially long utensils should be placed in the horizontal position at the front of the upper rack.
- Page 11 The filter prevent larger remnants of food or other objects from getting inside the pump. This residue can occasionally clog up the filters. The filter system consists of a coarse filter,a flat (Main filter) And a microfilter(Fine filter). Main filter Food and soil particles trapped by this filter are pulverized by a special jet on the lower spray arm and washed down the drain.
- Page 12 If your dishwasher is left in an unheated place during the winter, ask a service technician to: Reconnect the water inlet pipe to the Cut off electrical power to the dishwasher. water valve. Turn off the water supply and disconnect the water Remove the filter in the tub the bottom inlet pipe from the water valve.
- Page 13 To clean the edge around the door, you should use only a soft warm, damp rag. To prevent penetration of water into the door lock and electrical components, do not use a spray cleaner of any kind. Also, never use abrasive cleaners or scouring pads on the outer surfaces because they will scratch the finish.
- Page 14 The appliance must be connected to the water mains using new hose-sets. The old hose-sets should not be reused. Water pressure must be between 0.04 MPa and 1 MPa. If the pressure is below the minimum consult our Service Department for advice. Pull The safety supply hoses completely out from storage compartment located at rear of dishwasher.
- Page 15 Position the appliance in the desired l ocation. The back should rest against the wall behind it, and the sides, along the adjacent cabinets or wall. The dishwasher is equipped with water supply and drain hoses that can be positioned to the right or the left to facilitate proper installation.
- Page 16 Notes ● Carefully read this manual before installation Reading this manual will help to understand the connections of inlet, drain hoses and power cord, and to find a optimal position for the dishwasher. This product is exclusively available though Dixons stores group.In the unlikely evert of a problem with your product please return to the store where your purchase was made.
- Page 17 【Figure 1】 90 ° 90 ° Cabinet dimensions Less than 5mm 820mm between the top of dishwasher and 580mm Electrical, drain and cabinet and the water supply line entrances outer door aligned to cabinet. Space between cabinet bottom and floor 450 mm 【Figure 2】...
- Page 18 Make sure your plumbing is suitable to install First connect water inlet hose to your dishwasher Ensure black rubber seal is your new dishwasher. If in doubt contact a in place. qualified plumber. Then connect the straight end to your water mains supply Ensure black rubber seal is in place.
- Page 19 Connection of drain hoses ● Insert the drain hose into a drain pipe with a minimum diameter of 4cm, or let it run into the sink, making sure to avoid bending or crimping it. Use the speical plastic support that comes with the appliance (Figure 3). The free end of the hose must be at a height between 400 and 1000mm and must not be immersed in water to avoid back flow .
- Page 20 Dishwasher installation steps ● Connect the inlet hose to the cold water supply Connect the drain hose. Connect the power cord Put the dishwasher to slide rails Add the condensation strip following instructions on the reverse side of the condensation strip Place the dishwasher into position.
- Page 21 Condensation strip ● "For all the built-in models and some free standing models(when you take off the top board and put the unit into the cabinet), this condensation strip must be fitted to the underside of theworktop above your dishwasher to protect it against any moisture. Its purpose is to deflect steam rising from your apliance to protect your worktop's underside.
- Page 22 The dishwasher must be level for the racks to operate correctly and to give maximum wash performance. Place a spirit level on the door and the lower rack rail as shown in diagram 1 to check that the dishwasher is level. It is easy to level the dishwasher by adjusting the four leveling legs individually from the front of the dishwasher.
- Page 23 Replace fuse or reset circuit breaker. Remove any other Fuse blown, or the circuit breaker acted appliances sharing the same circuit with the dishwasher Power supply is not Make sure the dishwasher is turned on and the door is turned on closed securely.
- Page 24 Combination of soft Use less detergent if you have soft water and select a water and too much shortest cycle to wash the glassware and to get them clean. detergent Tea or coffee stains using a solution of 1/2 cup of bleach and 3 cups warm water to remove the stains by hand.
Need help?
Do you have a question about the LS474W and is the answer not in the manual?
Questions and answers