Table of Contents
Advertisement
Quick Links
Fiido C22 Pro
Electric Bike
P le as e m a k e s ur e t o r ead t his ma n ual car ef ully b ef ore r id in g. Ens u r e t ha t y ou u nd e rst an d t he o pe rat i ons and ke e p t h is ma nua l
and oth er mater ials f o r f u tu re re f e r e nc e .
W AR N IN G: DO N OT U SE T HE B IK E U NT I L YO U KN O W HO W T O U S E I T .
Advertisement
Table of Contents

Related Manuals for Fiido C22 Pro


Summary of Contents for Fiido C22 Pro
- Page 1 Fiido C22 Pro Electric Bike P le as e m a k e s ur e t o r ead t his ma n ual car ef ully b ef ore r id in g. Ens u r e t ha t y ou u nd e rst an d t he o pe rat i ons and ke e p t h is ma nua l and oth er mater ials f o r f u tu re re f e r e nc e .
- Page 2 Fiido C22 Pro. Please ensure that you have a thorough understanding of everything outlined in this manual regarding the bike. If you have any questions, please do not hesitate to contact the Fiido After-sales Team or our Local Service Center. We will provide a prompt reply and a feasible solution to your inquiry.
- Page 3 8. Do not attempt to charge while the charger or power supply is wet, please follow the local safety regulations if you need to charge the bike in public area. 9. For effective protection and as convenient as possible for yourself, please be sure to use Fiido specific parts.
-
Page 4: Table Of Contents
CONTENTS 1.Product introduction 2. Using guide 3.Maintenance precautions 4. Service directory 1.1 Bike overview 2.1 Installation guide 3.1 Using precautions 4.1 Troubleshooting methods 1.2 Packing list 2.2 First time using 3.2 Bike maintenance & repair 4.2 Specifications 1.3 Bike diagrams 2.3 Charging instructions 3.3 Motor maintenance &... -
Page 5: Product Introduction
1. Product introduction 1.1 Bike overview 1.2 Packing list 1.3 Bike diagrams 1.4 Function DESC... -
Page 6: Bike Overview
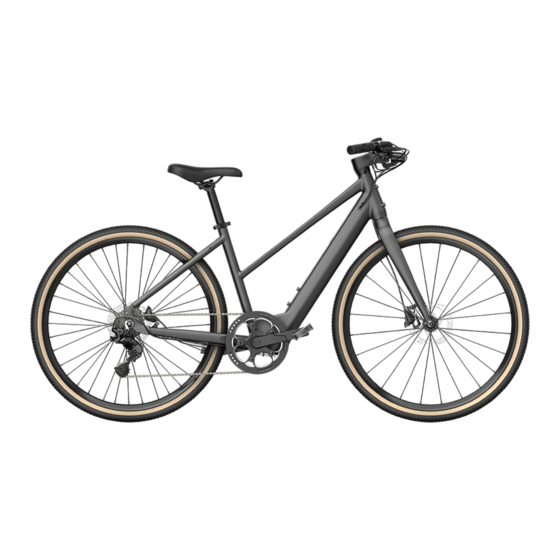
1.1 Bike overview The C22 Pro is Fiido's latest city e-bike, featuring brand new technology and Fiido's iconic minimalist design style. It is the first city e-bike on the market with proximity start. Equipped with the newest Fiido modular mid-mounted meter, it can be connected with the Fiido Riding App and Fiido Mate smartwatch. -
Page 7: Packing List
1.2 Packing list Bike parts Handlebar*1 Tires*1 Electric Bike*1 Seatpost*1 Bike accessories Fenders*1 Pendals*1 Headlight*1 Meter*1 Taillight*1 Adapter*1 Charger*1 User manual*1 (Equipped for EU and UK regions) Tools Open spanner*2 Hex wrench*8 Y-Type Allen Wrench*1 Screwdriver*1 *Please carefully check that all items are complete and intact. If there are any problems, such as missing or damaged components, please contact the official after-sales team as soon as possible. -
Page 8: Bike Diagrams
1.3 Bike Diagrams Handlebar Headlight Saddle Top Tube Seat Clamp Down Tube Tire Front fork Disc Brake Disc Brake Motor Shafts Derailleur Pedal Charge Valve Crank Chainwheel Chain *Non-professionals are prohibited from assisting with and assembling the battery. Please contact the after-sales team for assistance. -
Page 9: Function Desc
1.4 Function DESC Handlebar Connect with bluetooth Overheat Protection ( To connect the Fiido Mate cycling watch, please (When the controller temperature is too high, simultaneously press the "M" button and " this icon will be displayed and the output Power-assisted Shift Up"... -
Page 10: Using Guide
2.Using Guide 2.1 Installation guide 2.2 First time using 2.3 Charging instructions... -
Page 11: Installation Guide
2.1 Installation guide The basic installation of the bike has been completed before leaving the factory. When you receive the bike, you only need to install the handlebar, meter, headlight, front wheel, pedals, and lock the seat saddle. lnstall the handlebar ①... - Page 12 Install the front wheel ① Remove the front brake spacer and unscrew the ② Lift the front part of the bike, align the front shaft on the front fork. wheel and insert the front fork sleeve ring. ③ Put the shaft through the front wheel and tighten it clockwise with a three-prong wrench to complete the installation for front wheel.
- Page 13 Install the meter Place the meter in the groove of the handlebar. Use the hexagonal tool to tighten the screw to fastening the meter on the handlebar. Install the front light Align the headlight screw hole with the bottom hole of the handlebar, insert the screw and tighten it.
- Page 14 Insert the wire ① Insert the light wire and horn wire according to the wire color, like picture 1, align the interface and make sure the direction of arrows is the same direction. ② Insert the meter wire and make sure the direction of arrows is on opposite. (ATTENTION: The installation interface is equipped with fool-proofing, if the direction of the interface is wrong, the installation will not be completed.
- Page 15 安装座管 安装座管 Install the seatpost ① Open the seat clamp, insert the seatpost. ② Adjust the seatpost to suitable height, the recommended height is when the saddle is level with the user’s pelvis when standing naturally.The height of the adjustment can NOT exceed the safety line.
- Page 16 Install pedals Use the open spanner of the tools bag, screw the pedal shaft into the threaded hole and tighten it in the direction of the arrow. Caution: While installing the pedal, pay attention to the left / right pedal corresponding to the left / right crank, the pedal screw and the inside of the crank are respectively marked L(left) / R(right).
-
Page 17: First Time Using
2.2 First time using Before riding, please follow the installation guide to install components properly, check whether the firmware is loose, ensure sufficient power, and take appropriate protection for riding. Step 1:Adjust the seat Please adjust the seat to the appropriate riding height according to your height. (the recommended height is when the saddle is level with the user’s pelvis when standing naturally. - Page 18 Step 3: Function description Switch and choose the riding mode according to the cycling road conditions and personal needs. ① Switch the power-assisted gear: Equipped with 5 power-assisted gears, please click the "∧""∨" button on the left handlebar to switch the gear. ②...
-
Page 19: Charging Instructions
2.3 Charging instructions The battery comes with a small amount of electricity, before the first time use, please make sure to charge it to full power before riding. Charging 1.Equipped with fool proofing. The adapter cable head must be inserted from the left while connecting the adapter Charging connection: Connect the charging interface of the charger to the charging port, then connect the power plug of the charger to the power socket. - Page 20 Caution: Charger has high voltage device, DO NOT repair without permission. In order to avoid danger, battery and charger should be placed away from children. There should be no inflammable and explosive objects around the batteries (such as car seat cushions, sofas, etc.). Keep the battery in a ventilated and dry place, and make sure NOT to charge in open-air place, to avoid electrical short circuit fire and other accidents caused by rain and other factors, and to prevent liquid and metal particles into the electrical parts.
-
Page 21: Maintenance Precautions
3.Maintenance precautions 3.1 Using precautions 3.2 Bike maintenance & repair 3.3 Motor maintenance & repair 3.4 Battery maintenance & repair 3.5 Reflex reflector cautions... -
Page 22: Using Precautions
3.1 Using precautions (Ⅰ)Users should pay attention to the safety of bicycle use 1. No parking in building foyers, evacuation stairs, walkways and safety exits. 2. No charging in residential buildings. Charging should be far away from combustible, and no longer than 9 hours 3. - Page 23 (Ⅲ)Examination before riding: please repair in time or go to the local maintenance point for repair, if there’ s any abnormality. 1. Please confirm the normal power use when using the kickstand and the rear wheel is off the ground. 2.
-
Page 24: Bike Maintenance & Repair
3.2 Bike maintenance & repair 1. The bicycle has been adjusted well before leaving the factory. please contact after-sales team if there’s any problems. 2. Normally the spokes of the wheel should be adjusted once after half a month of riding to ensure the best use. 3. -
Page 25: Battery Maintenance & Repair
2. Fiido reflex reflector has been fixed on the vehicle, please do not change the position, modify, disassemble, etc. 3. Make sure to check the normal function of reflex reflector before each use, and keep the surface clean. -
Page 26: Service Directory
4.Service directory 4.1 Troubleshooting methods 4.2 Specifications 4.3 Warranty coverage 4.4 Repair record... -
Page 27: Troubleshooting Methods
4.1 Troubleshooting methods Fault code description Fault phenomenon Fault code Communication issues Throttle issues Brake lever issues Motor hall issues Motor issues Controller issues ECO mode Overheating protection General fault Fault phenomenon Fault cause Rule out way Poor contact of regulating handlebar Change regularing handlebar Poor contact of brake cut-off... -
Page 28: Specifications
4.2 Specifications Property index Item Fiido C22 Pro Before folding: Length*Width*Height (mm) 1800*670*1010 Net weight (kg) 17.5kg Product size Maximum load (kg) 120kg Product weight Applicable age Applicable height 155cm(5'0")-180cm(5'9") Serial numbe Location On the head tube Riding requirement Maximum speed 15.5MPH (25km/h)... -
Page 29: Warranty Coverage
4.3 Warranty coverage (Ⅰ)Warranty principle 1. Users should operate correctly according to this user manual. In case of performance failure caused by production quality, according to relevant laws and national provisions of the three guarantees, the company shall uniformly perform the obligations of the three guarantees. 2. - Page 30 (Ⅱ)Warranty scope and period Item Parts Guarantee time Service Natural deformation, open welding, desoldering fracture 36 months Frame phenomenon, quality problems caused by poor manufacturing can be replaced. Self-modification, collision 12 months Fork, Handlebar, Stem, Seatpost damage, etc. are not warranted. Kickstand, Tires, Saddles, Fenders, Safety hook, Seat Basic parts...
-
Page 31: Repair Record
Warranty notification 1. Accessories will be guaranteed in strict accordance with the warranty period. 2. The warranty period shall be calculated from the date of delivery. 3. No warranty will be provided if the charger, battery and motor are disassembled without permission. 4. - Page 32 Shenzhen Fiido Technology Ltd Address:Shenzhen, Guangdong, China. Website: www.fiido.com If you have any questions or suggestions about this user manual, please contact us via following mailaddress Contact us:support@fiido.com Scan for video instruction 6971957790563 4.003.C03001...
Need help?
Do you have a question about the C22 Pro and is the answer not in the manual?
Questions and answers