Table of Contents
Advertisement
Quick Links
Service - Parts
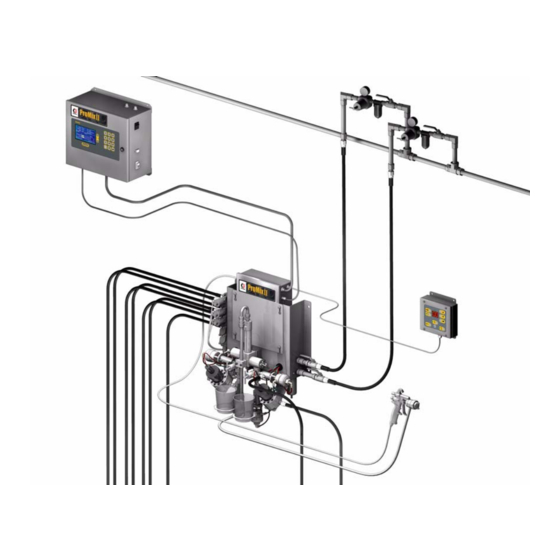
ProMix™ II
For proportional mixing of plural component coatings
Important Safety Instructions
Read all warnings and instructions in this manual.
Save these instructions.
Graco Inc. P.O. Box 1441 Minneapolis, MN 55440-1441
Copyright 2004, Graco Inc. is registered to I.S. EN ISO 9001
310653 rev.B
Advertisement
Table of Contents
Troubleshooting

Related Manuals for Graco ProMix II


Summary of Contents for Graco ProMix II
- Page 1 For proportional mixing of plural component coatings Important Safety Instructions Read all warnings and instructions in this manual. Save these instructions. Graco Inc. P.O. Box 1441 Minneapolis, MN 55440-1441 Copyright 2004, Graco Inc. is registered to I.S. EN ISO 9001...
-
Page 2: Table Of Contents
Replacing Air Filter Element ....14 Graco Information ......40 EasyKey™... - Page 3 Manual Conventions ◆ 310653B...
-
Page 4: Promix™ Ii Models
ProMix™ II Models ◆ ProMix™ II Models WARNING WARNING Do not install equipment approved only for non-haz- Changing the fluid manifold configuration may change ardous location in a hazardous area. Substitution of its pressure rating. Do not exceed the pressure rating components may impair intrinsic safety. -
Page 5: Related Manuals
Related Manuals ◆ Enter Model number here ProMix™ II Gun Flush Unit A Meter B Meter Color Change Coriolis Meter ..........20-3800 cc/min. (0.005-1.00 gal./min.) Related Manuals ProMix™... -
Page 6: Warnings
Warnings ◆ Warnings The following warnings include general safety information for this equipment. More specific warnings are included in the text where applicable. WARNING FIRE AND EXPLOSION HAZARD Flammable fumes, such as solvent and paint fumes, in work area can ignite or explode. To help prevent fire and explosion: •... - Page 7 Do not alter or modify equipment. • For professional use only. • Use equipment only for its intended purpose. Call your Graco distributor for information. • Route hoses and cables away from traffic areas, sharp edges, moving parts, and hot surfaces. •...
-
Page 8: Pressure Relief Procedure
Pressure Relief Procedure ◆ Pressure Relief Engage trigger lock. Procedure Press Standby on Operator Station. If you suspect that the spray tip or hose is clogged WARNING or that pressure has not been fully relieved after following the steps above, very slowly loosen tip guard retaining nut or hose end coupling to relieve pressure gradually, then loosen completely. -
Page 9: Shutdown
Shutdown ◆ Shutdown If shutdown time WILL exceed the pot life, purge To stop production at any time, press Standby the ProMix™ II of mixed material. See ProMix™ II on the Operator Station. Operation manual. If shutdown time WILL NOT exceed the pot life, you do not need to purge the system, but you must WARNING relieve system pressure. - Page 10 Shutdown ◆ 310653B...
-
Page 11: Troubleshooting
Troubleshooting ◆ ProMix™ II Alarms Troubleshooting Alarms E-Codes WARNING Description E-Code Communication Error Purge Error Follow Pressure Relief Procedure, page 8, before Potlife Exceeded Alarm cleaning, checking, or servicing equipment. Read warnings, page 6. Ratio Alarm Overdose Alarm CAUTION Dose Time A Alarm Do not use the fluid in the line that was dispensed off Dose Time B Alarm ratio as it may not cure properly. -
Page 12: Solenoid Troubleshooting
Troubleshooting ◆ Solenoid Troubleshooting Solenoid Troubleshooting Refer to the Pneumatic Diagram, page 30. If the dispense or purge valves are not turning on or off correctly, it could be caused by one of the following. Cause Solution Check air pressure. 80 psi (550 kPa, 5.5 bar) is commonly used. Do not go Air regulator pressure set too below 75 psi (517 kPa, 5.2 bar) or above 100 psi (0.7 MPa, 7 bar), high or too low. -
Page 13: Fluid Panel Control Board Diagnostics
Troubleshooting ◆ Fluid Panel Control Board Diagnostics Fluid Panel Control Board Diagnostics LED Signal Description Diagnosis Dispense Valve A LED turns on when ProMix™ II sends a signal to actuate related solenoid valve Dispense Valve B Air Purge Valve Solvent Purge Valve Gun Flush Box Trigger Color Change Solvent Color 1... -
Page 14: Service
Service ◆ Before Servicing Service Before Servicing Replacing Air Filter Element WARNING WARNING • To avoid electric shock, turn off EasyKey™ power Removing a pressurized air filter bowl could cause before servicing. serious injury. Depressurize air line before servicing. • Servicing EasyKey™... -
Page 15: Easykey™ Display
Updating Software There are 2 ways to update software: • Upload new software from your PC: Requires Graco RS-232 cable 118342 and software update file obtained from your distributor. Follow Updating Software procedure, page 26. - Page 16 Service ◆ EasyKey™ Display Replacing Display Board or Display Remove 4 screws (508e) and display board assembly (508b, 508c). F . 8. Backlight Separate graphic display (508b) from circuit board (508c). Before replacing the backlight, check the inverter (D - F .
- Page 17 Service ◆ EasyKey™ Display Disconnect keypad ribbon cable (J2) from the Slide the backlight (F) out of the display board display board. F . 7. (508b). Install new backlight (F) Peel keypad (508a) off plate (508d) and carefully slide ribbon cable through slot in plate. F .
- Page 18 Service ◆ EasyKey™ Display Replacing Power Supply Board Turn on power at main circuit breaker. Turn EasyKey™ power on to test operation. WARNING Replacing Power Supply Fuses Servicing the power supply board exposes you to high WARNING voltage. To avoid electric shock, turn off EasyKey™ power and shut off power at main circuit breaker before servicing.
-
Page 19: Operator Station
Service ◆ Operator Station Operator Station Smart Fluid Panel • Preparation CAUTION • Replacing Control Board • Replacing Air Flow or Pressure Switch To avoid damaging circuit board when servicing, wear • Replacing Solenoids grounding strap on wrist and ground appropriately. •... - Page 20 Service ◆ Smart Fluid Panel Slide the panel (14) until its bottom slots (KK) align with the top screw holes and secure the box in place with the 2 screws. F . 14. J10 J5 J3 J6 J4 TI4868a . 15 Remove 4 screws (707).
- Page 21 Service ◆ Smart Fluid Panel Replacing Air Flow or Pressure Solenoid Actuates Switch Standard Dispense Valve A The air flow switch (702) detects whether there is atomizing air flow to the gun (gun is triggered). Dispense Valve B Air Purge Valve A The pressure switch (717) detects if a gun is in the Solvent Purge Valve B gun flush box with the box door closed.
- Page 22 Service ◆ Smart Fluid Panel Reassemble Smart Fluid Panel Shut off ProMix™ II power (0 position). Unscrew cable connector (110) from meter (1). F Remove screws and slide the panel (14) back into place. Unscrew M6 screws (107) from bottom of meter Secure the cover (15) and panel (14) with the 4 mounting plate (108) with socket wrench.
- Page 23 Service ◆ Smart Fluid Panel Installing Remove fluid manifold (17). Screw meter (1) securely onto the dispense valve Service fluid manifold as instructed in the Fluid Mix connector (H), using a wrench. Manifold manual. Installing CAUTION To avoid leakage, secure the meter (1) to the dis- Secure fluid manifold (17) to mounting plate (13) pense valve connector (H) before connecting it to the with 4 screws (18).
- Page 24 Service ◆ Smart Fluid Panel Servicing Color Change Assembly Installing Mount color change assembly to panel wall. Connect air and fluid lines. WARNING Reassemble Smart Fluid Panel (page 22). Read warnings, page 6. Removing Follow Pressure Relief Procedure, page 8. Close main air shutoff valve on air supply line and on ProMix™...
-
Page 25: Connecting To A Pc
Upload icon or select the Setup program from the Start ➜ setup values menu (Start > Programs > Graco > ProMixII Setup). ➜ a custom language to view on screen 2. Tera Term window opens, showing the current COM •... -
Page 26: Updating Software
None b. Enter a name for the new connection. This name will appear on an icon for the connection 3. To activate the Graco software, press the PC Enter on your desktop. key to start the software update program. 4. The main menu displays. Follow the instructions on c. - Page 27 Option a selected. Are you sure? Enter yes to continue:yes Yes entered to continue. *****Welcome to the Graco EasyKey Display Boot Software.***** Boot software screen appears. Version: 1.01.000 Built Apr 1 2004 10:17:00 Warning: you are about to erase your application software.
- Page 28 “Programming Successful” appears when download completes . 26 . 25 7. To verify software versions, go to the Graco soft- ware main menu and follow the screen instructions. Refer to Example of Software Version request, below. Example of Software Version request...
-
Page 29: Software Troubleshooting
Connecting to a PC ◆ Software Troubleshooting Software Troubleshooting ✓ If the Control Application Menu does not appear, check the following. Is the ProMix™ II power on? Is the cable 118342 and any adapters used fully seated in both the PC and ProMix™ II ports? Are any other programs using the same PC com- munication port as ProMix™... -
Page 30: Schematics
Schematics ◆ Pneumatic Diagram Schematics Pneumatic Diagram AIR SUPPLY TO GUN TO MANIFOLD 1/4 TUBE FLUSH AIR TO FLUID INLET 1/4 TUBE . 27 310653B... -
Page 31: Promix™ Ii Electrical Schematic
Schematics ◆ ProMix™ II Electrical Schematic ProMix™ II Electrical Schematic . 28 310653B... -
Page 32: Parts
Parts ◆ ProMix™ II Assembly Parts ProMix™ II Assembly Standard ProMix™ II Parts Table ProMix™ II Component Options Table Ref. Ref. Part No. Description Qty. No. Option Part No. Description Qty. 234443 EasyKey™ Display; page 36 Flow Meter A Kit 234441 Operator Station;... - Page 33 Parts ◆ ProMix™ II Assembly 14, 15 TI4893a 23, 24 21, 41, 42 TI4860a 310653B...
-
Page 34: Flow Meter Kits
Parts ◆ Flow Meter Kits Flow Meter Kits Part No. 234564, G3000 Part No. 234566, G3000HR Ref. Part No. Description Qty. 239716 G3000 Flow Meter, 234564 only; see manual 308778 244292 G3000HR Flow Meter, 234566 only; see manual 308778 195283 Shield 166846 Adapter, 1/4 npt x 1/4 npsm 114339 Swivel Union;... -
Page 35: Operator Station
Parts ◆ Operator Station Operator Station Part No. 234441 Kit available: Ref. Part No. Description Qty. Part No. Description 201* Enclosure 202* Cover 15D547 Operator Station Paint Shields, package 15D187 Keypad Membrane of 10 234448 Cable † Not shown. 104029 Ground Clamp 248124 Circuit Board Not a replacement part. -
Page 36: Easykey™ Display
Parts ◆ EasyKey™ Display EasyKey™ Display Part No. 234443 Kits available: Ref. Part No. Description Qty. Part No. Description 501* Enclosure 15D568 Alarm 118337 Backlight Repair Kit 503▲ 118334 Warning Label 118342 PC Connection RS-232 Cable 15D255 Jack, RJ12 197902 EasyKey™... - Page 37 Parts ◆ EasyKey™ Display 508c 508e 508d 508a 508b 521b 521d 514, 515 521c 521a Alarm 310653B...
-
Page 38: Smart Fluid Panel
Parts ◆ Smart Fluid Panel Smart Fluid Panel Part No. 248252 Ref. Ref. Part No. Description Qty. Part No. Description Qty. 114263 Connector; 1/8 npt x 5/32 in. OD 701† Solenoid Enclosure tube 119159 Air Flow Switch 114669 Screw, machine; M5 x 10 110249 Elbow, 90 degree;... -
Page 39: Technical Data
Dependent on programmed K-factor and application. The ProMix™ II maximum allowable flow meter pulse fre- quency is 425 Hz (pulses/sec.). For more detailed information on viscosities, flow rates, or mixing ratios, consult your Graco distributor. See individual component manuals for additional technical data. -
Page 40: Graco Standard Warranty
With the exception of any special, extended, or limited warranty published by Graco, Graco will, for a period of twelve months from the date of sale, repair or replace any part of the equipment determined by Graco to be defective.
Need help?
Do you have a question about the ProMix II and is the answer not in the manual?
Questions and answers