
Related Manuals for Bambu Lab P1S-Combo


Summary of Contents for Bambu Lab P1S-Combo
- Page 1 P1S-Combo 3D Printer Quick Start Please review the entire guide before operating the printer. Safety Notice: Do not connect to power until assembly is complete.
- Page 3 When operating the AMS, we recommend using Bambu Filament, which has been thoroughly tested to work with the AMS. Please make sure to avoid using soft materials like TPU or damp PVA, as they can get stuck in the AMS. adapter to reduce the risk of slippage and debris getting left behind in the AMS.
-
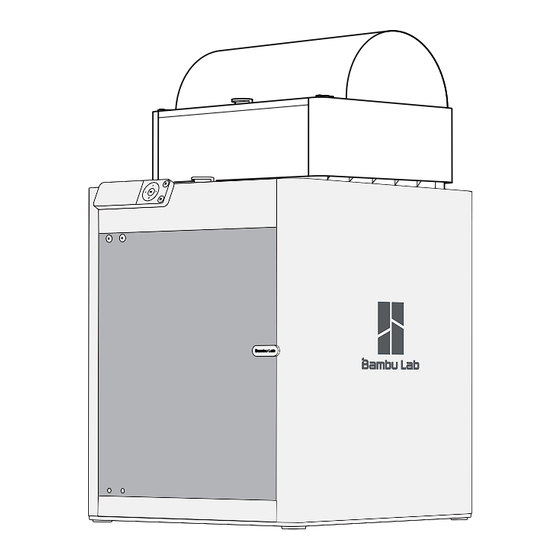
Page 4: Component Introduction
Component Introduction Air Filter Tool Head SD Card Pause Screen Back Chamber Camera Belt Tensioner Bambu Bus Build Plate Cooling Fan Excess Chute Power Socket... - Page 5 Buckle Filament Outlet Desiccant Filament Inlet...
- Page 6 Spool Holder 250g Filament (x3) Spare Hot End Nozzle Wiping Screen (x2) Power Cord Spare Filament Bambu Bus Cable-6Pin Allen Key H1.5 Unclogging Pin Cutter (x2) Allen Key H2 Tool Bambu Bus Cable-4Pin Bambu Scraper Build Plate Pre-installed...
- Page 7 AMS & Tool Head Unlock Take out the AMS by sliding it out through to remove the screws as pictured. the top.
- Page 8 Remove the four screws as the arrows indicate. Take out the AMS cushioning. Remove the carboard from the tool head. Romove the foam from the excess chute.
- Page 9 550mm PTFE Tube 370mm PTFE Tube...
- Page 10 Spool Holder Assembly Remove the screw as pictured with an Allen Secure the spool holder with two screws from the Key H2.
- Page 11 Hot Bed Unlock & Screen Installation Remove the three screws with an Allen Key H2 to unlock the hot bed. into the terminal as pictured. Attention: Bend the LCD cable towards the Inset the screen back to the slot on the printer, opening on the back of the screen as pictured.
- Page 12 QR Code 3. Use Bambu Handy to scan the QR code on the screen, and bind your printer with your Bambu Lab account. 4. Follow the instructions on the screen to complete the initial calibration.
-
Page 13: First Print
First Print Place at least one spool of Bambu Filament automatically pre-loaded when detected. with the supplied Bambu PLA. - Page 14 Bambu Studio Download Bambu Studio: https://bambulab.com/en/download/studio Log in to Bambu Studio with your Bambu Lab account, which is the same for the Bambu Online store. Create or open a project.
- Page 15 Bambu Studio PLA Plate Slice the model, select your printer and send the model to print.
- Page 16 Bambu Studio During printing, you can remotely monitor your print, or pause/stop printing on the...
- Page 17 Item Printing Technology Fused Deposition Modeling Build Volume(W*D*H) 256*256*256 mm³ Chassis Steel Body Shell Plastic & Glass Hot End All-Metal Extruder Gears Steel Nozzle Stainless Steel Max Hot End Temperature Toolhead Nozzle Diameter (Included) 0.4 mm Nozzle Diameter (Optional) 0.2 mm, 0.6 mm, 0.8 mm Filament Cutter Filament Diameter 1.75 mm...
- Page 18 Dimensions(W×D×H) 389*389*458mm³ Physical Dimensions Net Weight 12.95kg 100-240 VAC, 50/60 Hz Input Voltage 1000W Electrical Requirements Max Power USB Output Power 5V/1.5A Display 2.7-inch 192x64 Screen Connectivity Wi-Fi, Bluetooth, Bambu-Bus Electronics Storage Micro SD Card Button, APP, PC Application Control Int Motion Controller Bambu Studio G-code such as Superslicer, Prusaslicer and Cura,...
- Page 19 Please visit the Bambu Lab Wiki for more setup and maintenance tutorials. https://wiki.bambulab.com/en/home Bambulab Wiki Approach 1: Approach 2:...
- Page 20 www.bambulab.com...
-
Page 21: Quick Start
P1S-Combo 3D Printer Quick Start Please review the entire guide before operating the printer. Safety Notice: Do not connect to power until assembly is complete.
Need help?
Do you have a question about the P1S-Combo and is the answer not in the manual?
Questions and answers