Advertisement
Quick Links
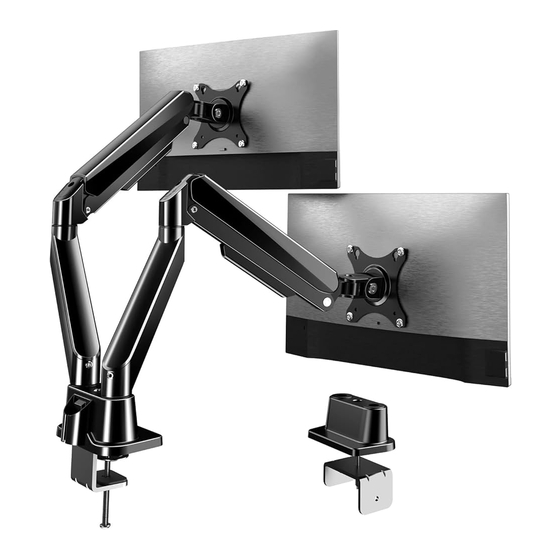
DUAL MONITOR DESK MOUNT
Thanks for choosing our product! We strive to provide the best quality and services
for our customers. Would you kindly share your experience on Amazon if you are
satisfied? If you have any questions, please feel free contact us.
Email: forgingmount888@163.com
75*75mm
100*100mm
INSTALLATION MANUAL
Model:FM4532
We're ready to help!
MAX
32"
19.8LBS
MAX
1
Advertisement

Related Manuals for Forging Mount FM4532


Summary of Contents for Forging Mount FM4532
- Page 1 DUAL MONITOR DESK MOUNT INSTALLATION MANUAL Model:FM4532 Thanks for choosing our product! We strive to provide the best quality and services for our customers. Would you kindly share your experience on Amazon if you are satisfied? If you have any questions, please feel free contact us.
- Page 2 IMPORTANT SAFETY INFORMATION Read the entire instruction manual before you start installation and assembly. If you have any questions regarding any of the instructions or warnings, please contact US via: forgingmount888@163.com BE CAREFUL ! CAUTION: Exceeding the weight capacity can result in serious personal injury or damage to equipment! 1.
-
Page 3: Packing List
PACKING LIST M4×10(×8) M5×10(×8) (×8) 4MM(×1) 5MM(×1) 1(×1) 2(×1) 3(×1) Bracket Clip Plate Long Bolt 4(×1) 5(×1) 6(×2) Bolt Base Lower Arm 7(×2) 8(×1) Upper Arm Anti-slip Pad... -
Page 4: Installation Method
Installation Method 1 Clamp Installation 1a-1 1a-2 To protect your desk: If your desk thickness is 0.39-1.18", please use clip plate(2). If your desk thickness is 1.18-3.15", remove the clip plate(2) and install directly. - Page 5 Method 2 Grommet Base Installation 1b-1 Tips: Grommet mount please tighten the screw(3)from top to bottom. Connect with Monitor Start by screwing the panel to the correct angle for easy placement of the monitor Use a spanner(E) to screw the screws (A/B)and washers (C)into the two holes on the upper back of the display, and then screw the VESA plate into the two holes on the lower end .
- Page 6 A/B C...
- Page 8 Case 1:Monitor/Arm fall down (after install your monitor) Press the arm to keep it in horizontal position and then use the Allen Key to adjust the screw on the arm. Turn counter-clockwise(”+ ” direction) to increase gas spring tension till can hold the weight of your monitor.
- Page 9 Cable Management Adjustable Instruction 180° +90° 360° -45° 360° 360°...
- Page 10 Thank you again for choosing this forgingmount product!
Need help?
Do you have a question about the FM4532 and is the answer not in the manual?
Questions and answers