Table of Contents
Advertisement
Quick Links
Advertisement
Table of Contents

Related Manuals for Maidesite M021-01


Summary of Contents for Maidesite M021-01
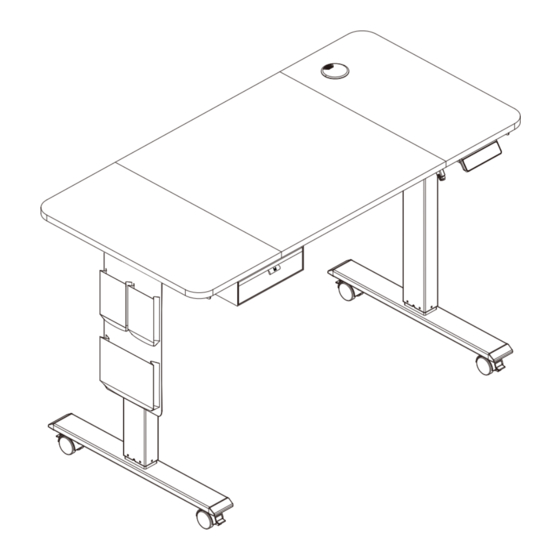
- Page 1 Standing Desk Assembly Instructions M021-01/M021-02 English Email(EU): Customerservice-EU@maidesite.com Website(EU): www.maidesite.de Website(UK): www.maidesite.co.uk YouTube: Maidesite Office Facebook: Maidesite Desk Instagram: Maidesite Standing Desk...
- Page 2 Safety & Warnings Warm prompt WARNING Make sure no obstacles are in the desk's path. Make sure the desktop is not touching any walls. Pinch Point Keep hands Make sure all cords are appropriate length to and fingers accommodate the change in height. clear.
- Page 3 Parts List Assembly Time Persons Needed...
-
Page 4: Table Of Contents
Parts List Desktop Side Bracket ×2 Right Lifting Column Left Lifting Column (with movement) Foot ×2 Frame Drive Rod Power Adapter Power Adapter Fixture Handset Power Cable Hook ×1 Caster ×4 Cable Clip C-Bracket ×2 Wire Management Tray Felt Side Storage Bag Drawer ×... - Page 5 Standing Desk Assembly STEP 1 Desktop Assembly Hardware List Wood Dowel Pins × Fixing Plate × ST4.8*15 Tapping Screw × Screwdriver ×...
-
Page 6: M6*35
STEP 2: Assemble the Frame Hardware List M6*8 Hexagon Screw × 1. Pay attention to the direction of the crossbar. M4 Allen Wrench 2. Please put the short end inward × STEP 3: Assemble the Feet Hardware List M6*35 Hexagon Screw ×... -
Page 7: M6*16
STEP 4: Assemble the Drive Rod 2. Insert the spline “a” on the driving rod into connector of the hexagon bar spline “b” on the motor side and lock it tight. 1.Loosen the knob on the driving rod, draw out the hexagon bar, adjust the angle and then insert it into the lifting column(without motor). -
Page 8: Hexagon Screw ×4
STEP 6: Adjust the Frame and the Length of the Drive Rod Alter the frame and the length of the drive rod according to the holes on the desktop. STEP 7: Assemble the Frame and the Desktop Hardware List M6*14 Hexagon Screw ×... -
Page 9: Hexagon Screw
STEP 8: Secure the Frame and the Drive Rod 1. Secure M6*14 screws on the frame with M4 Hardware List Allen Wrench, lock the frame tight. M6*14 Hexagon Screw × M4 Allen Wrench × 2. Make sure the Driving Rod is inserted into the column(without motor) completely. - Page 10 STEP 10: Install the Handset Hardware List ST4.8*15 Tapping Screw × Screwdriver STEP 11: Connect Wires Connect the power cable, wires on the handset and the motor to corresponding ports, which can be fixed under the desktop with cable clips.
-
Page 11: M6 Nuts×7
Accessories Installation Install the Hooks Hardware List M6*14 Hexagon Screw × M6 Nuts × M4 Allen Wrench × Two Mode Hardware List Install the Casters You can choose whether to install casters according to your personal preference. Open End Wrench ×... - Page 12 Install the Wire Management Tray Hardware List M6*14 Hexagon Screw × M4 Allen Wrench × M6 Nuts ×...
-
Page 13: St4*30
Install the Drawer Hardware List ST4*30 Tapping Screw STEP 1: Install the ABS round spacers, as the limit, with 2 ST4*30 tapping screws. × Screwdriver STEP 2: Unfold the fabric drawer and put it over the limit upside down. - Page 14 Hardware List STEP 3: Bend the fabric drawer bracket along the bend line and place it on the top of ST4.8*15 the drawer. Secure it on the desktop with 6 ST4.8*15 tapping screws. Tapping Screw × Screwdriver Install the Felt Side Storage Bag Hardware List M6*14 Hexagon Screw...
- Page 15 Hand Controller Instruction Memory/Setting Digital Display DOWN Memory heights Please RESET the desk at first time. Please ensure that no objects (walls) will interrupt the movement CAUTION of the desk, and all cables of relevant devices are sufficiently long. RESET: Long press the down key until the desktop reaches the lowest position;...
- Page 16 The following steps can be set according to personal preference. Anti-collision Sensitivity (1) “S-3”anti-collision sensitivity while going up Long press the“m”key for 5 seconds until it displays “S-1”and “1”flashes. Press the“up”key to switch to“S-3”; press the“m”key to set up sensitivity : 0= Closed 1=Minimum Sensitivity ..
- Page 17 The following steps can be set according to personal preference. Max. Height Limit (96cm-120cm) 1 1 0 Adjust the desk to the target Max. height limit; press both the“up” and “down” keys for 5 seconds; the height limit is restored after the buzzer rings. Press both keys for 5s Min.
- Page 18 Q&A Error Codes & Solution Error Code Description Solution The voltage of the main power Check the main power supply. supply is over 45V. The height difference is over 1 cm Initialization. between lead screws. Something is wrong with the controller Check the wire of the controller.
- Page 19 If there are any questions, please feel free to contact us! Email(EU): Customerservice-EU@maidesite.com Website(EU): www.maidesite.de Website(UK): www.maidesite.co.uk YouTube: Maidesite Office Facebook: Maidesite Desk Instagram: Maidesite Standing Desk MADE IN CHINA Prolinx Global LTD 27 Old Gloucester Street London,WC1N 3AX,UK Heavy object Mr.Nianzhuang Liu...
Need help?
Do you have a question about the M021-01 and is the answer not in the manual?
Questions and answers