
Subscribe to Our Youtube Channel
Related Manuals for Maidesite Standing Desk


Summary of Contents for Maidesite Standing Desk
- Page 1 S t anding Desk As sembly I nstructions English Email(EU):Customerservice-EU@maidesite.com Website:www.maidesite.co.uk YouTube:Maidesite Office Facebook:Maidesite Desk Instagram:Maidesite Standing Desk...
- Page 2 TABLE OF CONTENTS 1.Safety & Warnings 2.Parts List P2-P3 3.Standing Desk Assembly P4-P10 4.Install the Accessories 5.Instructions of Handset P12-P15 6.Q&A roduct manual...
- Page 3 Safety & Warnings Warm prompt WARNING Make sure no obstacles are in the desk's path. Make sure the desktop is not touching any walls. Pinch Point Keep hands Make sure all cords are appropriate length to and fingers accommodate the change in height. clear.
- Page 4 Parts List Assembly Time Persons Needed Self provided tools...
- Page 5 Parts List Parts List Lifting Column ×2 Foot×2 Central Rail ×2 Left Crossbar End Right Crossbar End Side Bracket ×2 Control Panel Cable Management Cover×2 Power Adapter Adapter Fixture Cable Clip x4 Power Cable Extension Cable×2 Caster x 4 Hardware List ST5*0.8*16 M6*8 Machine M6*12...
- Page 6 Standing Desk Assembly STEP 1: Assemble the lifting Columns Please put the frame on soft surface like a carpet or soft foam Hardware List M6*8 Machine Screw × M4 Allen Wrench × Tighten the 4 screws Tighten the 4 screws...
- Page 7 STEP 2: Install the Side Bracket Hardware List M6*8 Machine Screw × Tighten the 2 screws M4 Allen Wrench × Tighten the 2 screws...
- Page 8 STEP 3: Assemble the Frame and Center Rails The notch facing inward and the narrow edge facing STEP 4: Assemble the Feet Tighten the 4 screws Tighten the 4 screws Hardware List M6*30 Machine Screw × M4 Allen Wrench × Washers ×...
- Page 9 STEP 5: Assemble the Frame and the Desktop ·If the desktop is from MAIDESITE, please put the frame on the desktop, adjust the distance between crossbar ends and align them with the holes. ·If the desktop is from other brand, put the...
- Page 10 STEP 6: Install the Control Panel Hardware List ST5*0.8*16 Tapping Screw × Philips screwdriver × Tighten the 2 screws STEP 7: Install the Adapter and Fixture Hardware List ST5*0.8*16 Tapping Screw × Philips screwdriver × Tighten the Adapter and fixture to the table top with ST5*0.8*16 screws (installation position), as shown in the picture...
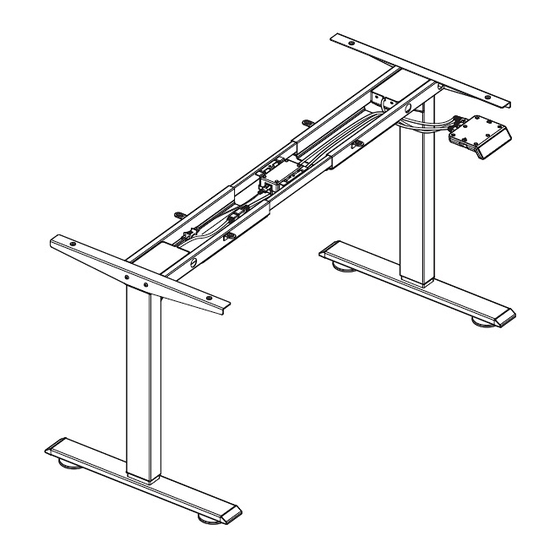
- Page 11 STEP 8: Connect Wires Extension Cable×2 Power Cable Connect the power cable, wires on the control panel,extension cable and the cable on lifting column to corresponding ports STEP 9: Install the Cable Management Cover Tighten the Hardware List 12 screws M6*8 Machine Screw ×...
- Page 12 STEP 10: Upright the desk and plug it in to proceed the running check. Proceed the running check according to the instruction of the control panel according to Control Panel setup...
- Page 13 Install the Accessories Install the Casters 1. Rotate counterclockwise to remove the caster. 2.To lock and unlock the caster by switching the brake on it 3.Screw on the caster and finally lock it with a wrench Hardware List M14 Open End Wrench ×...
- Page 14 Sit-stand Reminder Sit-stand Time Display Reminder Setting Sit-stand Reminder Switch Digital Display Memory/Setting DOWN Memory Heights Please ensure that no objects (walls) will interrupt the movement of the desk, CAUTION and all cables of relevant devices are sufficiently long. 1.Enter the RST mode: Hold the 'DOWN' key for 5s while the desktop is at the lowest position (otherwise lower the desktop first).
- Page 15 The next parts can be set according to your preference. Set the upper limit: Touch the 'M' key: the display shows'S-' . Touch the 'UP' key: the display flashes. Touch and hold the 'M' key for 2s until the display shows '999'.
- Page 16 The next parts can be set according to your preference. Switch the movement mode of the memory height: Enter the RST mode (see instruction above). Touch and hold the '1' key for 5s, the display shows one of the following: '10.1': One-touch movement (Default) '10.2': Constant-touch movement.
- Page 17 The next parts can be set according to your preference. Sit-stand Reminder: First time use: The sit-stand reminder is active by default and the default time is 30 minutes. Touch the 'ON/OFF' key to turn on or off the sit-stand reminder.
- Page 18 Q&A 1.If you encountered the following problem, problem, please try RESET: 1.If you encountered the following problem, problem, please try RESET: · Abnormal Operation · The display shows RST. · The display shows an error message(E07, E08), but all cable connections are normal. 2.The display shows H01(HOT): unplug the power, and let the system cool down for 20 minutes.
Need help?
Do you have a question about the Standing Desk and is the answer not in the manual?
Questions and answers