Advertisement

io-homecontrol® provides advanced and secure radio technology that is easy to install. io-homecontrol® labelled products communicate with each other, improving comfort, security and energy savings.
Introduction
Smoove 1 Tw io is a wall-mounted wireless radio control point for controlling angled roller shutters using io-homecontrol® radio technology.
Smoove 1 Tw io can be used together with frames and intermediate trim which comply with the DIN 49075 standard.
Safety
Safety and responsibility
Please read this guide carefully before installing and using this product.
This Somfy product must be installed by a professional motorisation and home installer for whom this guide is intended. Moreover, the installer must comply with standards and legislation in the country in which the product is being installed, and inform his customers of the operating and maintenance conditions for the product.
Any use outside the sphere of application defined by Somfy is forbidden. This invalidates the warranty and discharges Somfy of all liability, as does any failure to comply with the instructions given herein.
Before beginning installation, check that this product is compatible with the associated equipment and accessories.
Specific safety advice
To avoid damage to the Smoove 1 Tw io:
- Avoid impacts!
- Do not drop it!
- Do not spill liquid on the product or immerse it in liquid.
- Do not use abrasive products or solvents to clean it.
Contents

| Q. | Description | |
| 1 | Mounting plate for Smoove 1 Tw io or | A |
| Mounting plate for Smoove 1 io IN | B | |
| 1 | Somfy frame (optional) | C |
| 1 | Smoove 1 Tw io Module | D |
Commissioning
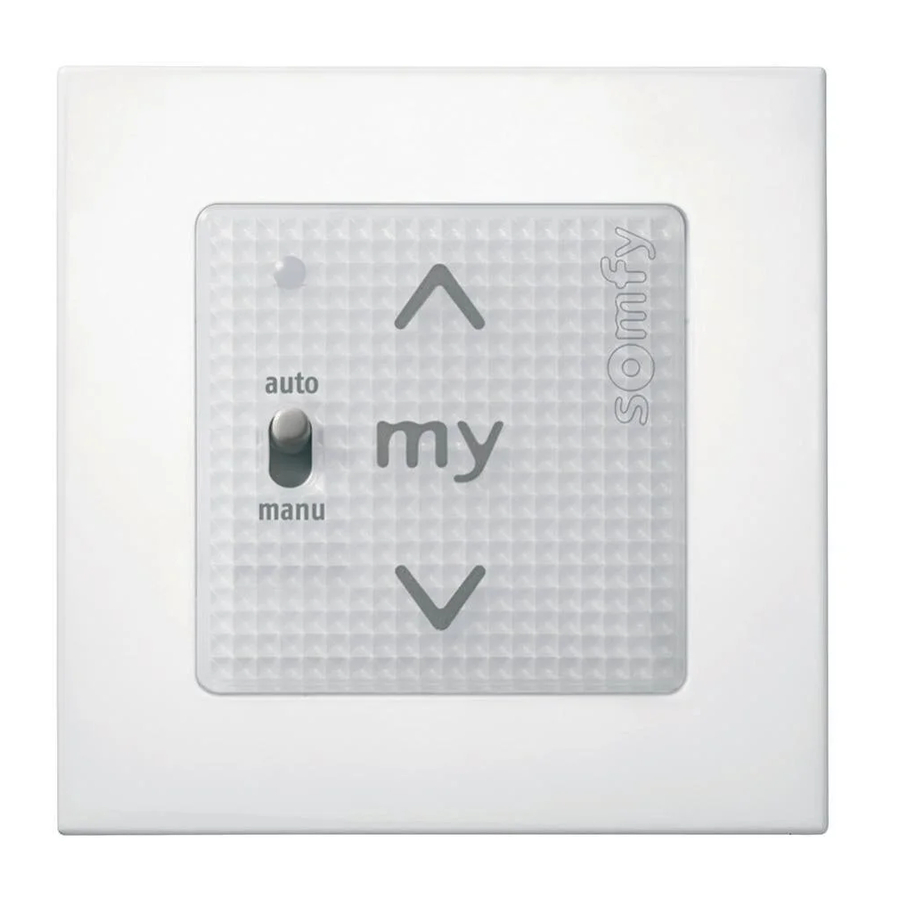
The Smoove 1 Tw io in detail

- Touch-sensitive key (raise)
![]()
- Touch-sensitive key (stop, go to favourite position)
![]()
- Touch-sensitive key (lower)
![]()
- Indicator light showing that the module's keys and buttons have been activated
- "Battery low" indicator light
- Angled out and Angled in position selector
- On/Off button
- PROG button
ON/OFF button

The ON/OFF button activates or deactivates the touch-sensitive keypad as described below. However, the PROG button remains active:
| ON = To activate keypad | Hold down the button until the acoustic signal stops: the indicator light glows constantly:
|
| OFF = To deactivate keypad | Hold down the button until the acoustic signal stops and the indicator light flashes:
|
 To avoid wasting battery power, it is advisable to switch the module to OFF until it is installed on the wall.
Angled out / Angled in position selector


- Angled out position
![]() : The roller shutter moves to its angled out position and the slats are slightly open.
: The roller shutter moves to its angled out position and the slats are slightly open. - Angled in position
![]() : The roller shutter moves to its angled in position and closes fully.
: The roller shutter moves to its angled in position and closes fully.


Programming the Smoove 1 Tw io in an end-product not equipped with a local io control point

Refer to the guide for the Twipso io motor.
Adding/Deleting a Smoove 1 Tw io

The procedures for adding or deleting an io control point are the same.
To add or delete a Smoove 1 Tw io, use the local io control point already associated with the end-product.
If necessary, activate the Smoove 1 Tw io module, see section "ON/OFF button"
Set the end product to the halfway position.
- Press and hold the PROG button on the already associated Somfy io local control point
![]() until the end-product moves back and forth: the Twipso io motor is now in programming mode for 10 minutes.
until the end-product moves back and forth: the Twipso io motor is now in programming mode for 10 minutes. - Briefly press the PROG button (i) on the Smoove 1 Tw io: the end product moves back and forth: the Smoove 1 Tw io is now programmed or deleted.
Installation

The use of radio appliances (e.g. Hi-Fi radio headphones) operating on the same frequency may cause interference and reduce the product's performance.
- The building in which the product is used may reduce the radio range.
The radio range is 15 m.
Never install the Smoove 1 Tw io near or on metal surfaces or with a metal frame, as this can reduce the radio range.
Check the radio range before fitting the Smoove 1 Tw io.
This product must be installed on an internal wall and Somfy recommends that the wall surface should be flat.
Leave the module in the mounting plate or in the frame during the different programming phases to make it easier to perform the operations.
Do not rest the module on its front panel (the side with the keys) to avoid the accidental emission of commands.
Operation is only guaranteed if the touch received by the module is clean and dry (no gloves).
Installation of the Smoove 1 Tw io control point

- Use screws to fix the mounting plate (Somfy recommends the use of countersunk head screws of 3 mm diameter).
- Place the Somfy frame on the mounting plate.
- Clip the module onto the assembly (frame + mounting plate).
Use
Information sounds
Pressing a key causes a "clicking" sound!
Pressing more than one key at the same time causes a more high-pitched sound.
Favourite position (my)
")
Briefly press  : the end-product is activated to the favourite position (my).
Setting or modifying the favourite position (my)
")
- Set the end product to the desired favourite position (my).
- Press
![]() until the end-product moves back and forth: The favourite position (my) has been programmed.
until the end-product moves back and forth: The favourite position (my) has been programmed.
Deleting the favourite position (my)
")
- Press
![]() : the end product is activated and stops in the favourite position (my).
: the end product is activated and stops in the favourite position (my). - Press
![]() again until the end-product moves back and forth: The favourite position is deleted.
again until the end-product moves back and forth: The favourite position is deleted.
STOP function

The end product is moving. Briefly press : the associated end product will automatically stop.
Buttons up and down
 and
and 
Briefly press or : the end product is activated.
Battery low
The "Battery low" indicator lights up when the battery power level is low.
Tips and recommendations
Questions about the Smoove 1 Tw io?
| Observations | Possible causes | Solutions |
| The selected product does not react at all when a button on the Smoove 1 Tw io is pressed. | The battery is weak. | Replace it. |
| The keys are not activated. | Press the ON/OFF button to activate the touch-sensitive keys. | |
| The control point is not programmed. | See section Adding/Deleting a Smoove 1 Tw io. | |
| External radio equipment is interfering with the radio reception. | Turn off any radio equipment nearby. | |
| The Smoove 1 Tw io does not react when a button is pressed. | Pressing a key for more than 10 seconds deactivates the key. | Press another key to reactivate the Smoove 1 Tw io. |
| The end-product makes an unexpected movement. | Pressing the ON/OFF button turns on the Smoove 1 Tw io. | Press the key to stop the movement. |
Replacing the battery

- Unclip the frame with its Smoove 1 Tw io Module.
- Push the old battery out of its housing using a plastic object.
- Insert a battery with identical specifications, the face marked with a plus sign (+) visible.
- Push the battery fully into its housing.
- Clip the frame and the Smoove 1 Tw io module on again.
- Press a key on the front panel. If the indicator light lights up, then the battery has been replaced correctly.
Replacing a lost or broken io control point

This reset deletes all the local io control points ; however two-way control points  , sensors and the favourite position are stored.
Apply the double power cut only for the end-product to be reset .
- Set the end product to the halfway position.
- Cut the power supply off for 2 seconds.
- Switch the power supply back on again for between 5 and 15 seconds.
- Cut the power supply off for 2 seconds.
- Switch the power supply back on:
► The end-product moves for several seconds.
![information]() If the end-product is in the upper or lower end limit position, it will move back and forth briefly.
If the end-product is in the upper or lower end limit position, it will move back and forth briefly. - Press the PROG button on the new Smoove 1 Tw io until the end-product moves back and forth: all the local io control points
![]() are deleted and the new io control point is programmed.
are deleted and the new io control point is programmed.

- Follow the procedures in the "Commissioning" section to add io control points.
Technical data
| Frequency bands and maximum power used: | 868.700 MHz - 869.200 MHz e.r.p. <25 mW |
| Radio frequency: | 868.95 MHz, io-homecontrol® |
| Safety level: | Category III |
| Operating temperature: | 0°C to + 60°C + 32°F to + 140°F |
| Dimensions of the Somfy frame (A) in mm (h x w x d): | 80 x 80 x 10 |
| Dimensions of Module (B) in mm (h x w x d): | 50 x 50 x 10 |
| Power supply: | 1 x 3 V battery type CR 2430 |
| Protection rating | IP 30 |
Batteries or accumulators have to be separated from other type of waste and must be recycled through your local treatment and recycling system.


Documents / Resources
References
Download manual
Here you can download full pdf version of manual, it may contain additional safety instructions, warranty information, FCC rules, etc.
Download SOMFY Smoove 1 Tw io - Wireless Radio Control Point Installer Guide
Advertisement


Need help?
Do you have a question about the Smoove 1 Tw io and is the answer not in the manual?
Questions and answers