
Related Manuals for GreenWorks Pro SN80L620


Summary of Contents for GreenWorks Pro SN80L620
- Page 1 SN80L620 SNOW THROWER OPERATOR MANUAL MANUEL D'UTILISATION SOUFFLEUSE À NEIGE EQUIPO QUITANIEVE MANUAL DEL OPERADOR CAN ICES-002 / NMB-002 www.greenworkstools.com SNB408...
- Page 3 English 10.3 Start and stop the auger/impeller..... 11 Description........4 10.4 Adjust the auger speed......11 Purpose............4 10.5 Self propelled drive mode......12 Overview............ 4 10.6 Start auger and self-propelled drive General appliance safety simultaneously .........12 warnings........4 10.7 Lock self-propelled drive paddle and Recommended ambient auger engagement paddle with one hand............
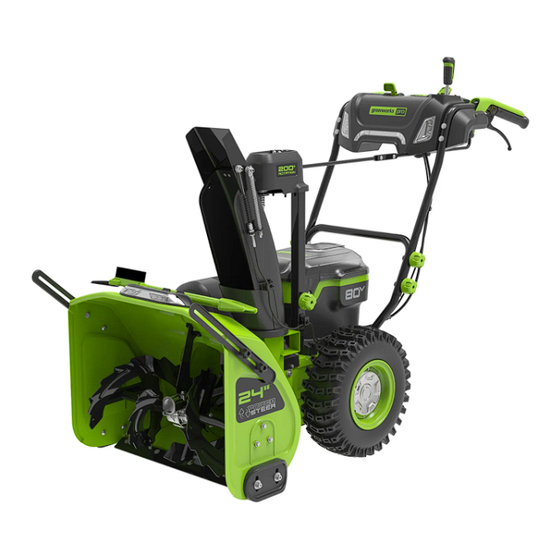
- Page 4 English DESCRIPTION Chute deflector Discharge chute PURPOSE 3-in-1 Cleanout Tool Drift cutter This product has been designed and built to remove Intake housing and clear away snow from pavements, drives and other ground-level surfaces. Auger Scraper plate OVERVIEW Skid shoe Wheel Left zero turn trigger ①...
- Page 5 English • Adjust the housing height to clear gravel or crushed • Never direct the discharge toward people or areas rock surface. where property damage can occur. Keep children and others away. • Never attempt to make any adjustments while the appliance is running (except where specifically •...
- Page 6 English • Store idle appliances Indoors – When not in use, Item Temperature the appliances should be stored indoors in a dry, Battery storage tempera- 32 °F (0 °C) ~ 113 °F (45 locked-up place – out of reach of children. ture range °C) •...
- Page 7 English WARNING SYM- SIGNAL MEANING If the battery pack cracks or breaks, with or without leaks, do not recharge it and do not use. Discard it DANGER Indicates an imminently and replace with a new battery pack. DO NOT TRY hazardous situation, which, TO REPAIR IT! To prevent injury and risk of fire, if not avoided, will result in...
- Page 8 English Do not install battery pack until you assemble all the parts. UNPACK THE MACHINE WARNING Make sure that you correctly assemble the machine before use. WARNING • If the parts are damaged, do not use the machine. • If you do not have all the parts, do not operate the machine.
- Page 9 English 1. Loosen the knob (24) and bolt (25) on the discharge chute assembly (14). 2. Align the holes on the discharge chute with the holes on the lower support. Spacers 3. Once you have engaged the discharge chute onto the chute base, push until you hear a click.
- Page 10 English INSTALL THE BATTERY PACK WARNING Do not store or charge battery outside. Battery must be charged and stored indoors prior to use of the machine. If the machine does not start: • remove the battery pack from the machine, •...
- Page 11 English 10.3 START AND STOP THE AUGER/ Zero turn Turn assist handles for quick and ① IMPELLER trigger effortless steering. This machine is ② equipped with zero turn system, which gives the machine accurate and smooth steering without devia- tion. Chute de- The chute deflector can be adjusted flector...
- Page 12 English NOTE NOTE Lower the scraper to the ground to remove the snow. Finish these 3 actions within 5 seconds. WARNING 10.7 LOCK SELF-PROPELLED DRIVE PADDLE AND AUGER Keep bystanders a safe distance from the machine. ENGAGEMENT PADDLE WITH ONE HAND WARNING Examine the work area.
- Page 13 English 10.9 LED HEADLIGHTS Chassis plate 3. Unplug the motor cable. 4. Reinstall the bottom plate with eight screws. 5. Manually push the machine to move. Turning the headlights on: • Push the button (6) to turn on the LED light. Turning the headlights off:...
- Page 14 English 10.10 ADJUST THE DISCHARGE CHUTE 100° 100° 2. Rotate the chute adjustment handle (9) left to move the discharge chute (14) to the left. Release the grip handle to lock the chute in the desired direction. 3. Rotate the chute adjustment handle (9) right to move the discharge chute (14) to the right.
- Page 15 English 10.11 ADJUST THE CHUTE DEFLECTOR 4. Move the chute deflector control lever (2) backward to adjust the deflector (13) up and increase the snow throw distance. 10.12 OPERATION TIPS • If it is possible, clear the snow with the direction of the wind.
- Page 16 English 11.2 CLEAR THE CLOGGED CHUTE NOTE The range of adjustable height for skid shoes is 1.5mm, when putting the bolts through the U-hole on the skid shoes. 1. Loosen the 2 sets of bolts (29), spacers (30) and nuts (31) that attach the skid shoe (20) to the snow thrower housing.
- Page 17 English 11.5 REPLACE THE SAFETY PIN 11.6 REPLACE THE DRIFT CUTTER Auger bar Safety pin NOTE The safety pin is used to disperse the pressure of snow to protect the auger/impeller bar. 1. Remove the nuts and safety pins. 2. Install the new safety pins. (The spare safety pins are on the top of the chute support.) 1.
- Page 18 English • Make sure that the machine does not have loose * If you cannot find the solution to these problems, call or damaged parts. If it is necessary, do these steps/ 1-855-345-3934. instructions: TECHNICAL DATA • Replace the damaged parts. •...
- Page 19 English HELPLINE: Warranty service is available by calling our toll-free helpline, at 1-855-345-3934. TRANSPORTATION CHARGES: Transportation charges for the movement of any power equipment unit or attachment are the responsibility of the purchaser. It is the purchaser’s responsibility to pay transportation charges for any part submitted for replacement under this warranty unless such return is requested in writing by Greenworks.
- Page 20 English Part No. Description R0203400-00 Skid Shoes Kit R0203401-00 Drift Cutter Kit R0203402-00 Lock Kit R0203403-00 3-in-1 Cleanout Tool R0203404-00 Scraper Assembly R0204288-00 Impeller Assembly R0204289-00 Bolt and Pin R0204545-00 Motor Assembly R0204546-00 Left Wheel Hub Motor Assembly R0204547-00 Right Wheel Hub Motor Assembly R0204548-00 PCBA ( Snow Thrower ) Battery Management System R0204549-00...
Need help?
Do you have a question about the SN80L620 and is the answer not in the manual?
Questions and answers